
You can accept payments directly within projects built in AI Studio using your existing products and payment setup. Payments can be introduced while AI Studio is building a project or configured later from within the builder. You can also customize checkout fields, support subscriptions, and offer post-purchase upsells. This article explains how to enable payments, add products, configure checkout, and review orders.
TABLE OF CONTENTS
- What is Payments in AI Studio?
- Key Benefits of Payments in AI Studio
- Prerequisites and Limitations
- How to Enable Payments in AI Studio
- Configure Your Payment Provider
- How to Add and Configure Products
- Checkout Experience
- Orders and Post-Purchase Experience
- Frequently Asked Questions
- Need Help?
What is Payments in AI Studio?
Payments in AI Studio lets you add functional checkout experiences to AI-generated projects. Whether you're selling a single product, offering subscriptions, or building an online storefront, you can use products and prices already configured in your product catalog.
AI Studio handles how products and checkout appear within your project, while the existing payment infrastructure manages payment processing and order records. This allows you to customize the shopping experience without rebuilding your payment setup.
This gives you a faster way to move from an idea to a working purchase experience while keeping your products, payment configuration, and orders centralized.
Key Benefits of Payments in AI Studio
Adding payments to AI Studio projects lets you create functional shopping experiences while reusing existing product and payment configurations. This reduces manual setup and keeps payment processing and order information connected to your existing records.
- Faster payment setup: Enable payments while AI Studio generates a project or configure them afterward from the project builder.
- Existing product catalog: Add products and variations that are already configured without recreating them.
- Integrated checkout: Use a hosted checkout experience that processes card details outside the project's generated code.
- Flexible purchasing: Support individual products, recurring subscriptions, and post-purchase upsells.
- Checkout customization: Configure buyer information fields and use two-step checkout to capture contact details before payment.
- Centralized order management: Review customer orders, payment status, transactions, and related project information in Orders.
Prerequisites and Limitations
Before enabling payments, confirm that your project uses a supported architecture and that the required payment and product configurations are available. Understanding these requirements helps you avoid unsupported checkout options.
Prerequisites
- Supported project type: Payments are available for AI Studio projects built on TanStack Start.
- Existing React projects: React projects must be migrated using Project Settings > Migrate to SSR before the Payments option becomes available.
- Payment provider: A supported payment provider must be connected before accepting live payments.
- Product catalog: Products, prices, and available variations must be configured in the product catalog before adding them to an AI Studio project.
Current Limitations
- Manual Payments: Manual payment methods, including Cash on Delivery, are unavailable.
- Calendar Payments: Payments are not supported for AI Studio calendar experiences.
- Product Personalization: Arbitrary product-personalization fields, such as engraving text or custom printing instructions, cannot be passed to orders.
- Product Editing: Product details, prices, and variations must be managed in the product catalog rather than edited directly in AI Studio.
- Project Type: Payments are currently available only for projects built on TanStack Start. Existing React projects must be migrated using Project Settings > Migrate to SSR.
- Shipping and Pickup: Customer-facing shipping and pickup options are not supported.
How to Enable Payments in AI Studio
Payments can be enabled while AI Studio generates a project or manually through the project's Payments settings. Both methods allow you to add checkout functionality to a supported AI Studio project.
Automatic Payment Detection
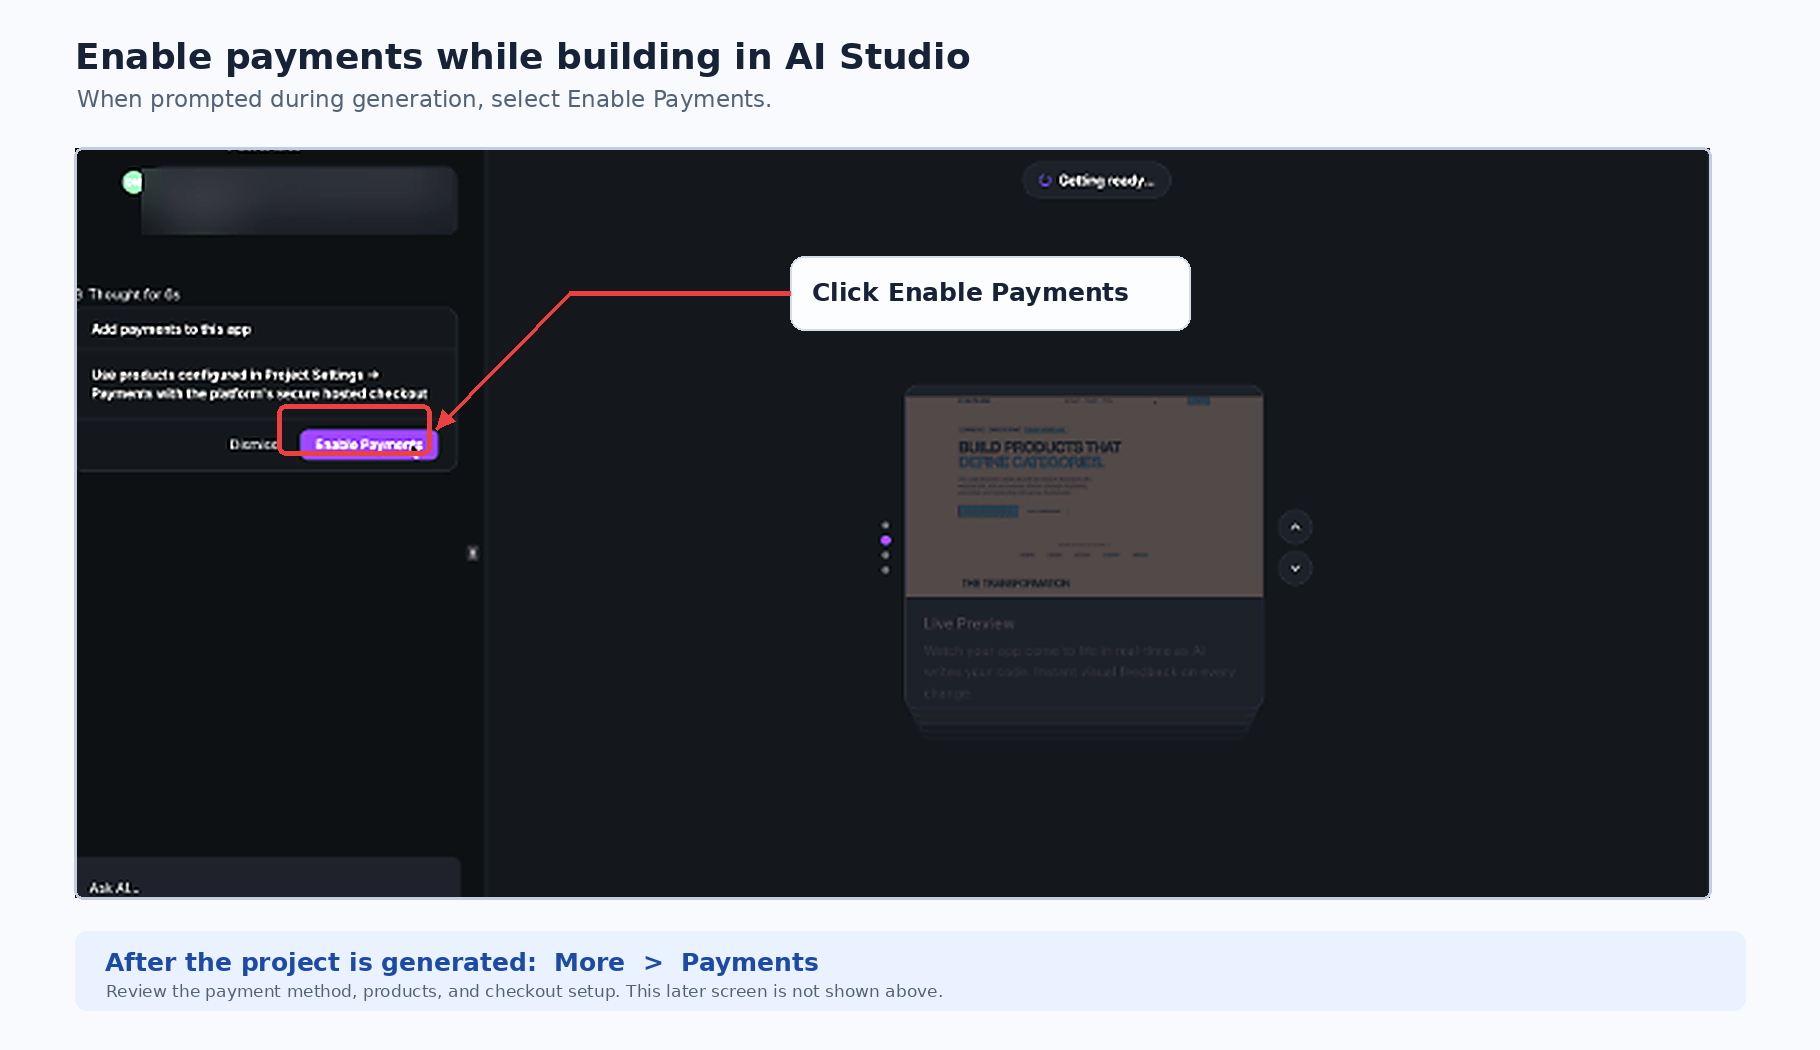
When AI Studio detects that your request involves selling a product or accepting payments, it can prompt you to enable payments while the project is being generated. This allows checkout and purchasing to be considered as part of the initial project build.
- Open AI Studio and describe the website or experience you want to build.
- If AI Studio detects selling intent, an Add payments to this app prompt appears.
- Click Enable Payments to include payments in the project.
- Continue through any follow-up questions AI Studio asks about the experience you want to create.
The follow-up questions are generated based on your original request, so the options can vary from project to project. For example, AI Studio may ask how you want customers to purchase a product or what type of selling experience you want to create.
Enabling payments during the build allows AI Studio to account for checkout and purchasing as it creates the project.
After the project is generated, use More > Payments to review and complete the payment configuration.
Manually Enable Payments
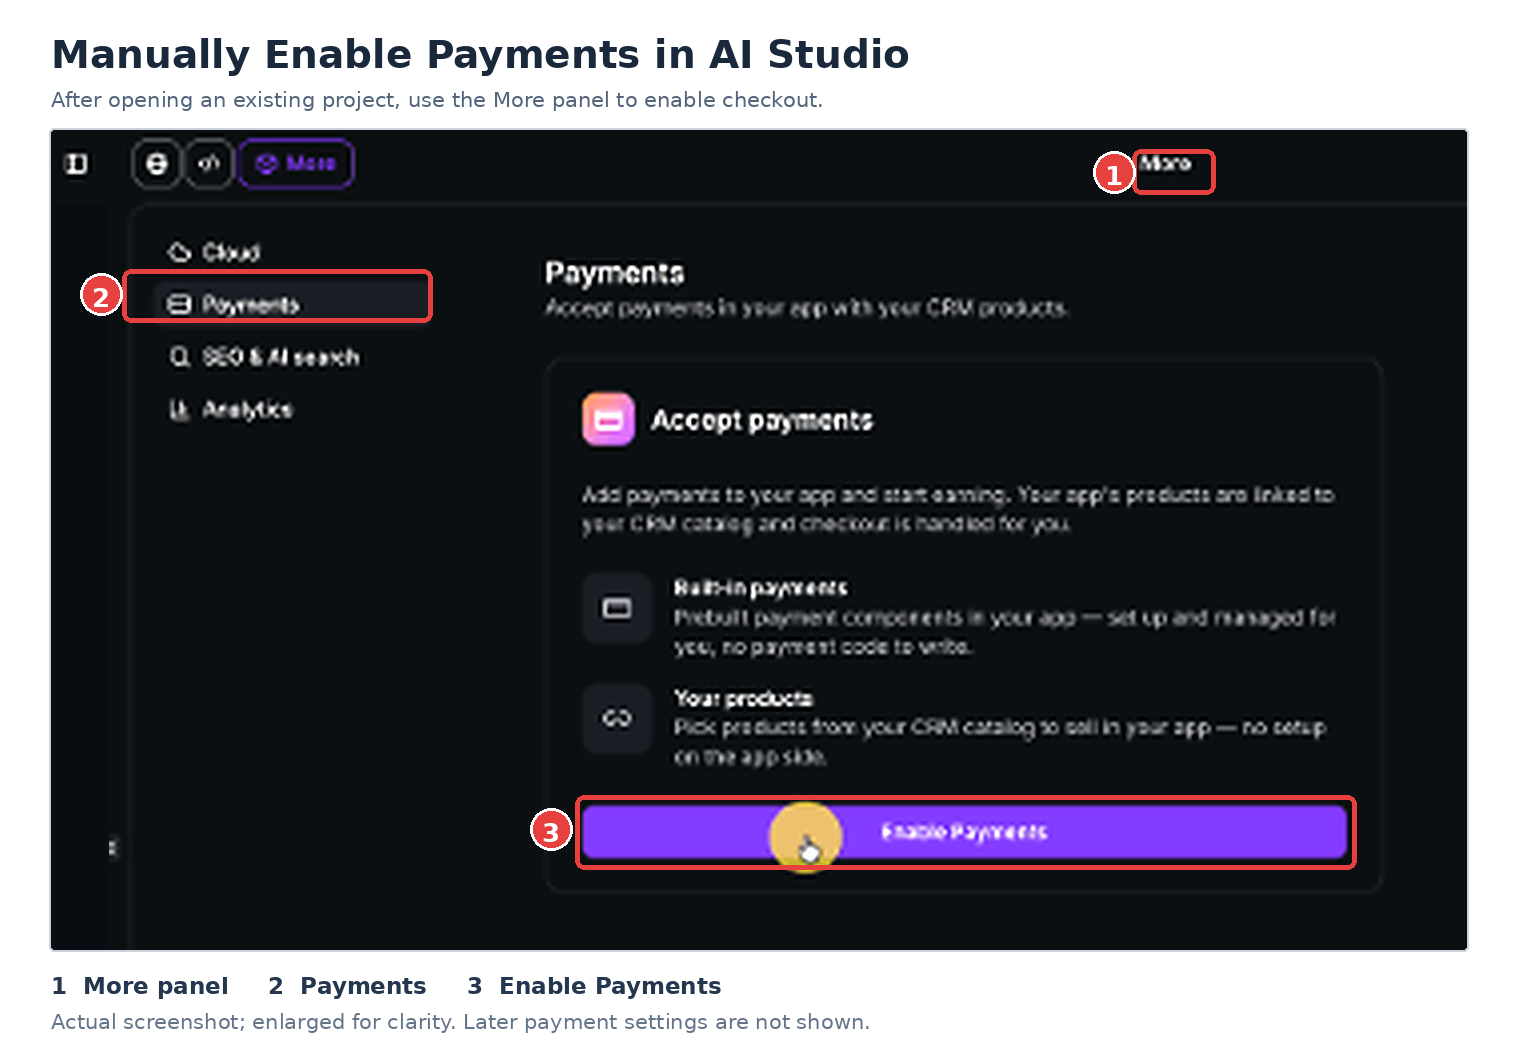
You can also enable or manage payments directly from an existing project without relying on AI Studio to detect selling intent. This is useful when adding checkout functionality after the project has already been created.
- Navigate to AI Studio > My Projects.
- Open the project where you want to enable payments.
- Click More.
- Select Payments.
- Click Enable Payments.
The Payments area displays the project's payment status, Test and Live modes, payment method, and payment products.
You can also disable payments on a project from this page.
Already using Payments? Existing AI Studio projects receive these checkout enhancements on their next prompt. You do not need to reconnect Payments.
Configure Your Payment Provider
AI Studio uses the existing payment infrastructure, so payment providers are managed through your payment settings rather than through a separate AI Studio integration. This lets you reuse an existing provider connection when configuring an AI Studio project.
- Navigate to AI Studio > My Projects.
- Open your Payments-enabled project.
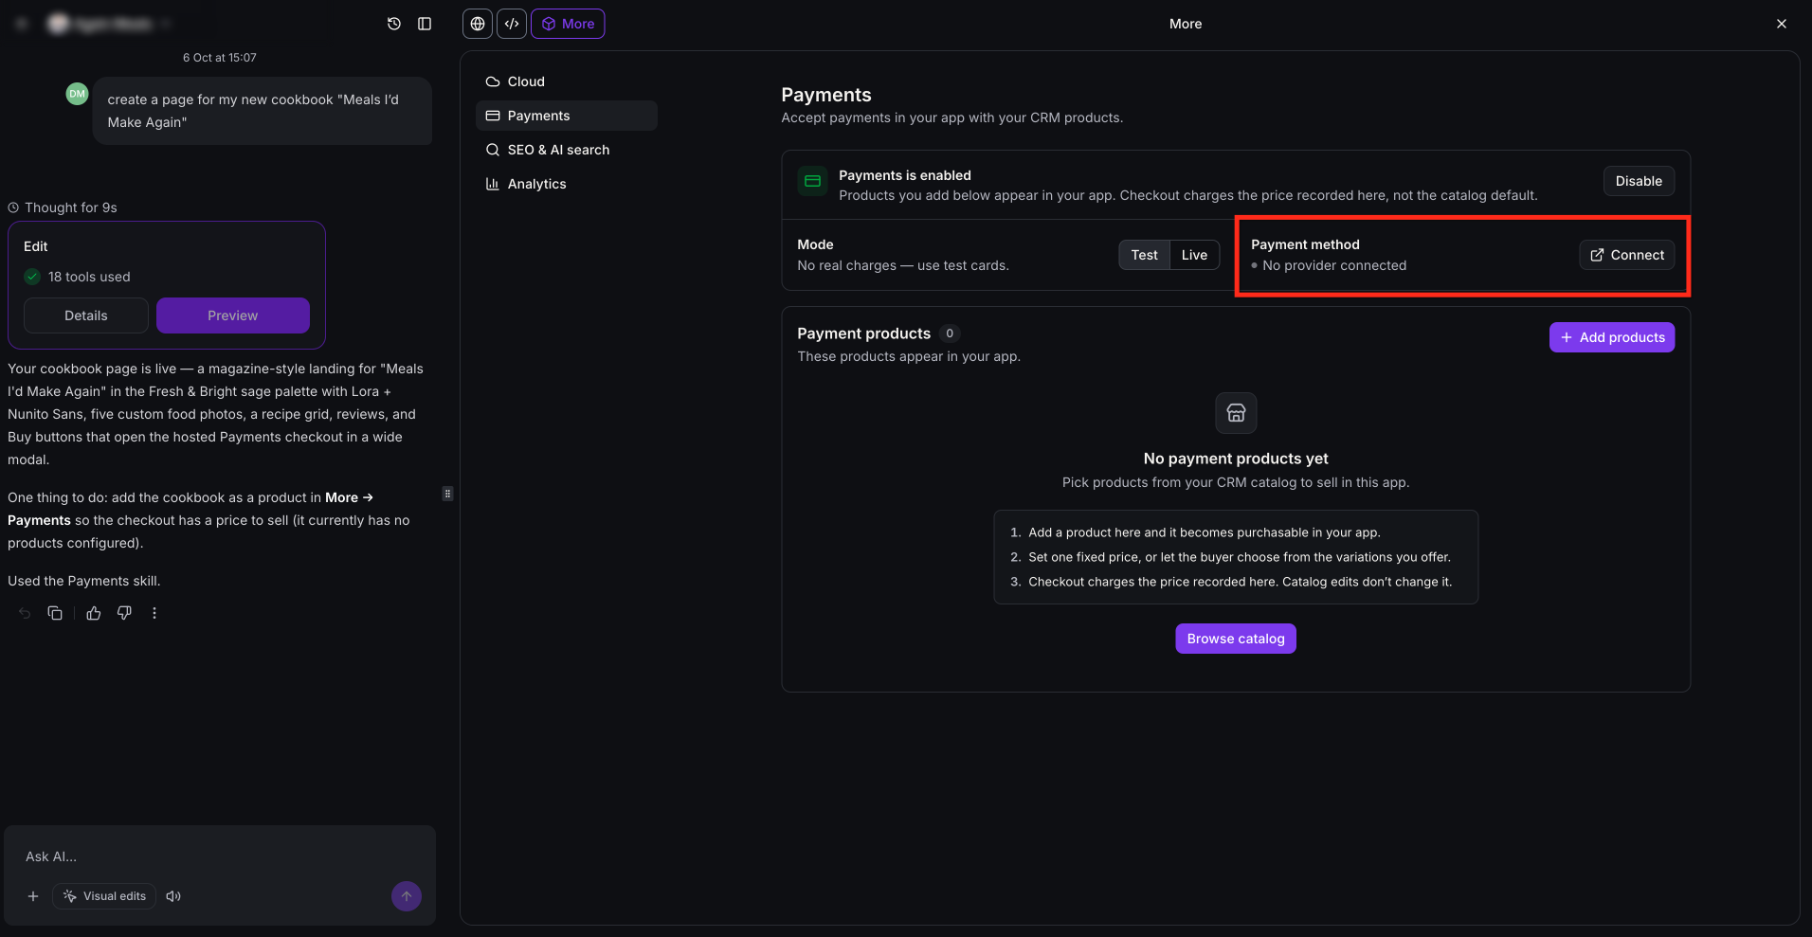
- Click More > Payments.
- Find the Payment method area.
- Choose the appropriate option:
- Click Connect if no payment provider is connected.
- Click Manage to review or update an existing payment integration.
- Click Connect if no payment provider is connected.
If a payment provider is already connected, AI Studio uses that existing payment setup for the project.
Test and Live Payment Modes
Test and Live modes let you validate the purchase experience before processing real customer payments. Review your product and checkout configuration in Test mode before accepting live transactions.
When payments are enabled, the project starts in Test mode by default.
- Test Mode: Verify the products, pricing, and checkout experience without processing real charges.
- Live Mode: Switch to Live mode when testing is complete to begin accepting real customer payments.
How to Add and Configure Products
AI Studio uses products from your existing product catalog. Each product, its pricing, and any available variations must already be configured in the catalog before you can add it to an AI Studio project.
Using existing products allows you to create a purchase experience without setting up the same products again inside the project.
Add Products to an AI Studio Project
Select products from the existing catalog and choose which prices or variations customers can purchase through your project.
- Navigate to AI Studio > My Projects.
- Open the project where payments are enabled.
- Click More > Payments.
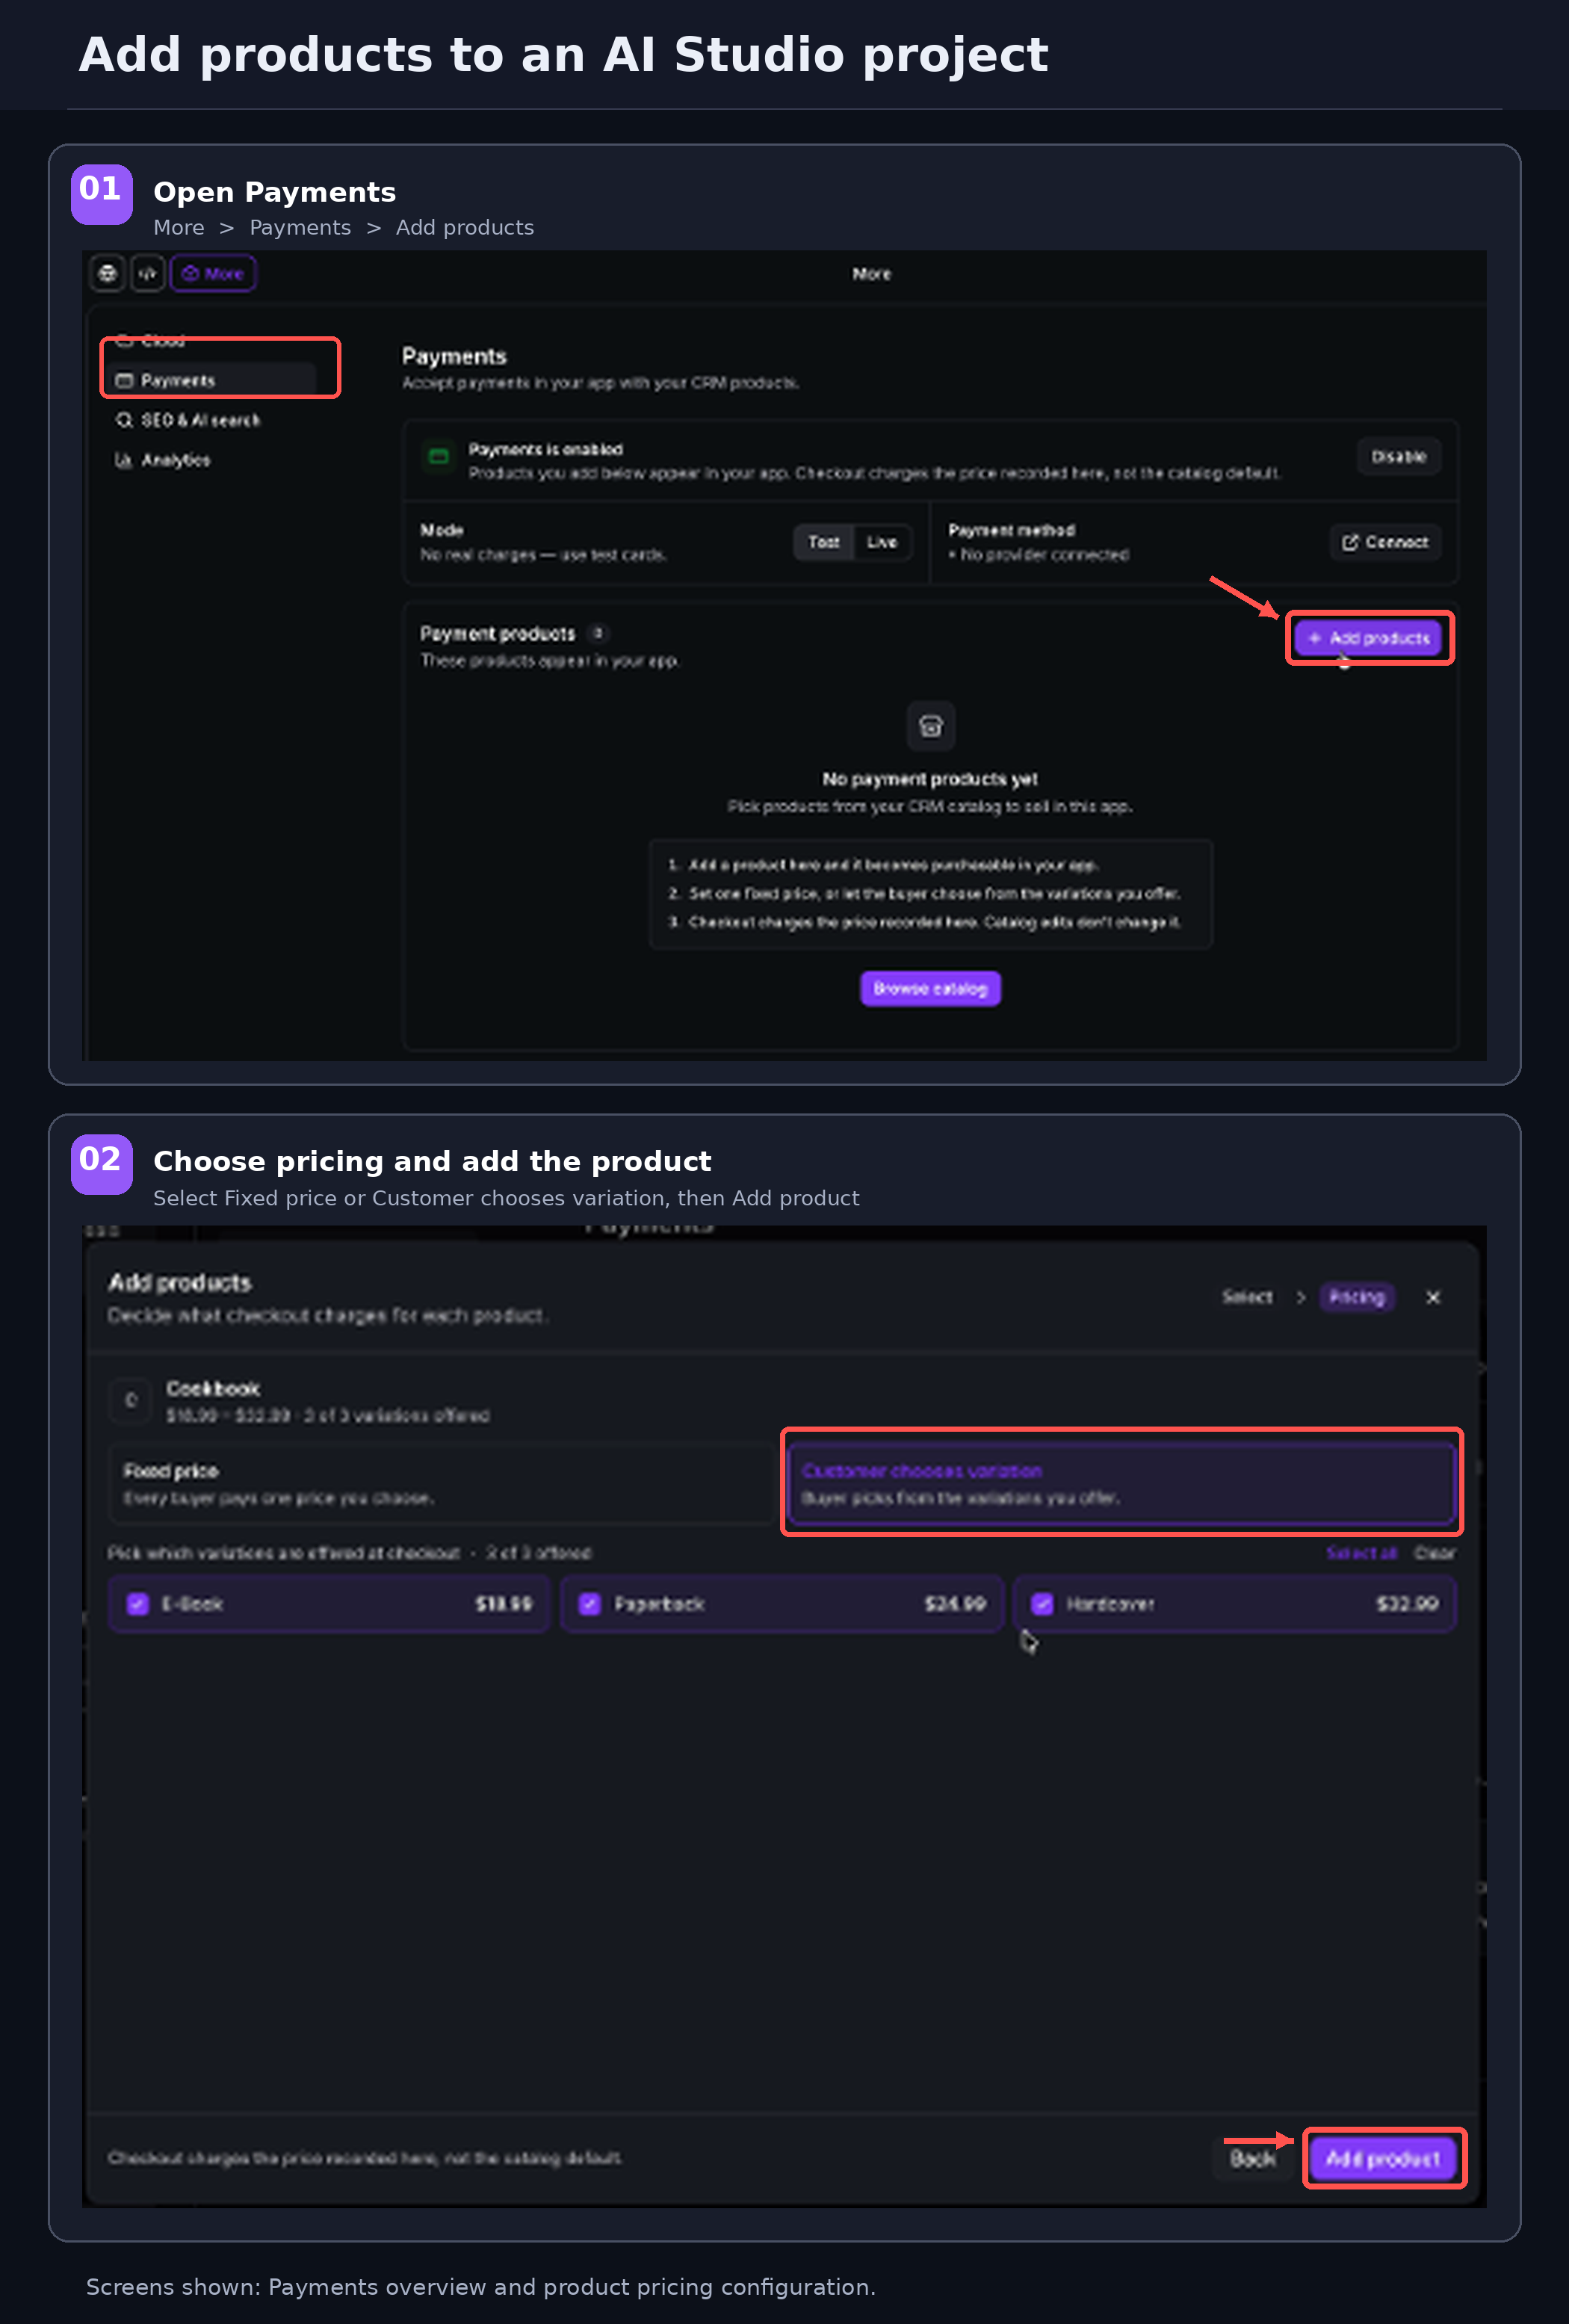
- In Payment products, click Add products or Browse catalog.
- Search for a product by name or SKU.
- Select the products you want to add.
- Click Continue to pricing.
- Choose how each product should be offered:
- Fixed price: Select the specific price or variation customers will purchase.
- Customer chooses variation: Allow customers to choose from the variations already configured for that product.
- Fixed price: Select the specific price or variation customers will purchase.
- Review the configuration.
- Click Add product.
Checkout Experience
Checkout in an AI Studio project uses a hosted payment experience. Card details are entered and processed through the hosted checkout rather than the project's generated code, allowing you to customize the shopping interface without directly handling payment credentials.
Supported Payment Methods
The hosted checkout supports the payment methods available through the connected payment configuration.
- Card payments through the connected payment provider.
- PayPal Express Checkout.
Checkout also supports fully discounted orders without requiring card details and subscriptions, including carts with multiple subscription products.
Post-Purchase Upsells
Post-purchase upsells allow customers to accept an additional offer after completing their original purchase. Supported saved-card payment providers can make this experience faster by allowing an additional purchase without requiring payment details again.
After checkout, you can present a post-purchase upsell.
With supported saved-card providers, customers can accept the offer in one click without entering payment details again.
Supported providers include:
- Stripe
- Square
- Authorize.net
- NMI
- Adyen
- Mercado Pago
Other payment methods use the standard payment form.
An upsell can only be charged after the original order is successfully paid and can only be charged once per order.
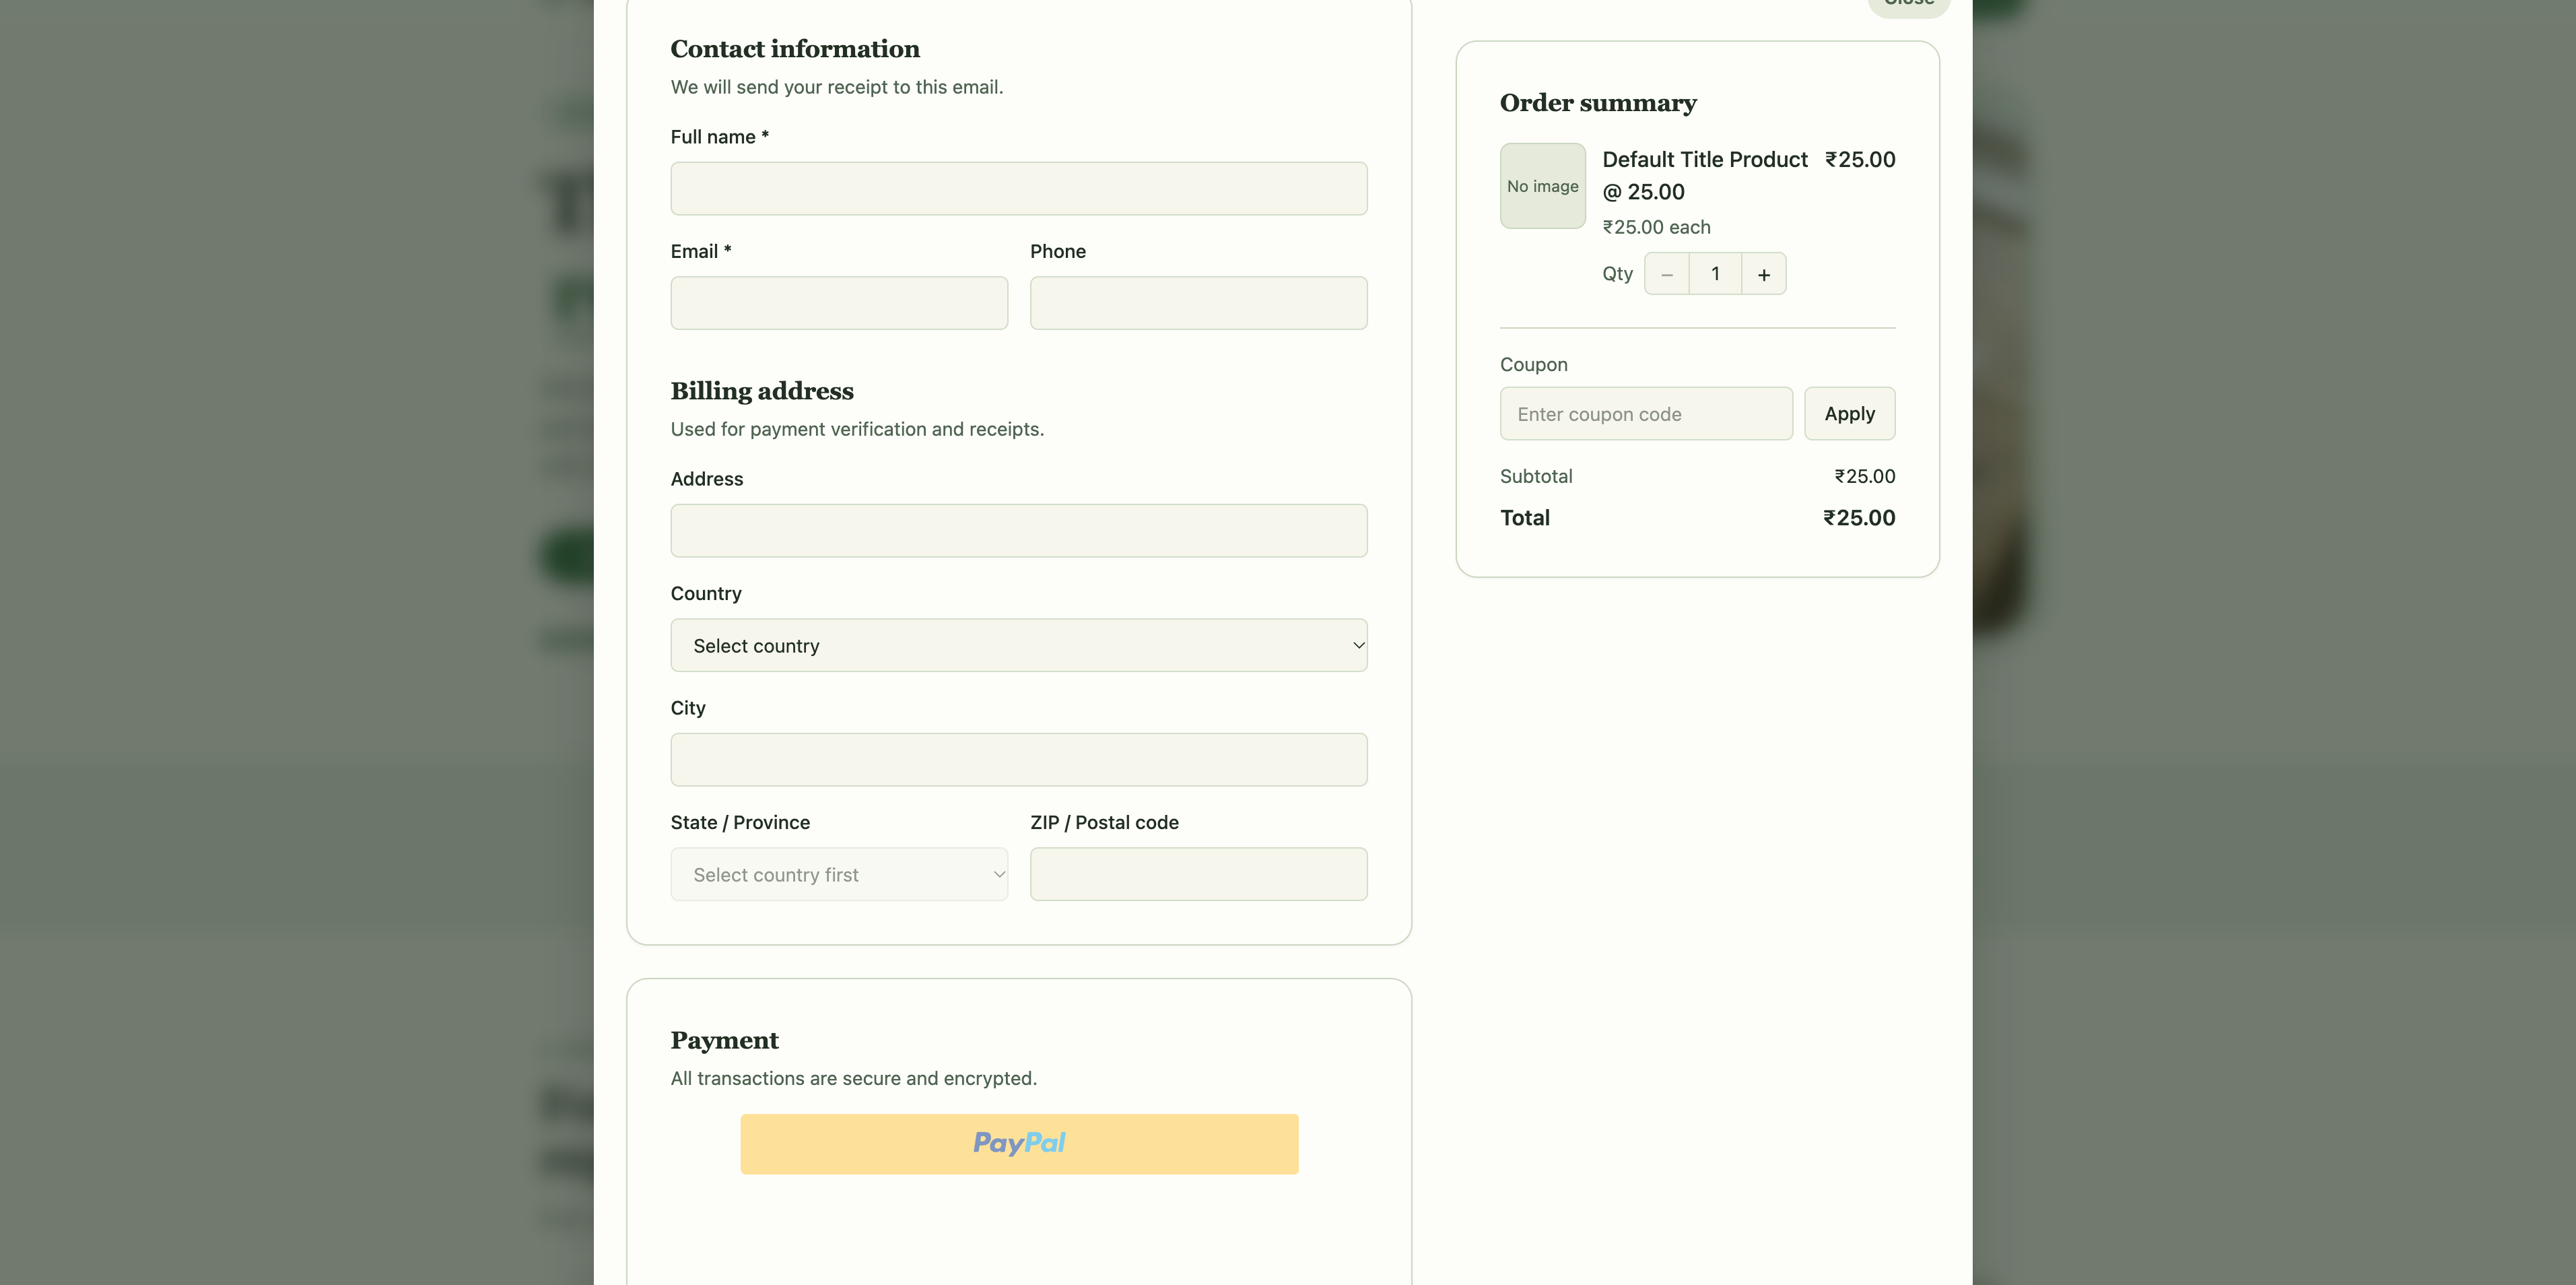
Customize Checkout Fields
You can choose which buyer details appear at checkout to collect the information needed for your purchase experience without adding unnecessary fields. Checkout field settings can be adjusted through prompts in the AI Studio project chat.
How to Customize Checkout Fields
Use a natural-language prompt to change the visibility or requirement settings of supported checkout fields.
- Navigate to AI Studio > My Projects.
- Open your Payments-enabled project.
- In the project chat, enter a prompt such as "Make phone required and hide the billing address."
- Review the updated checkout in the project preview.
Available field settings:
- Phone and billing address: Set each field to hidden, optional, or required. Address fields include street, city, state, ZIP code, and country.
- Name and email: Always required. These fields cannot be hidden.
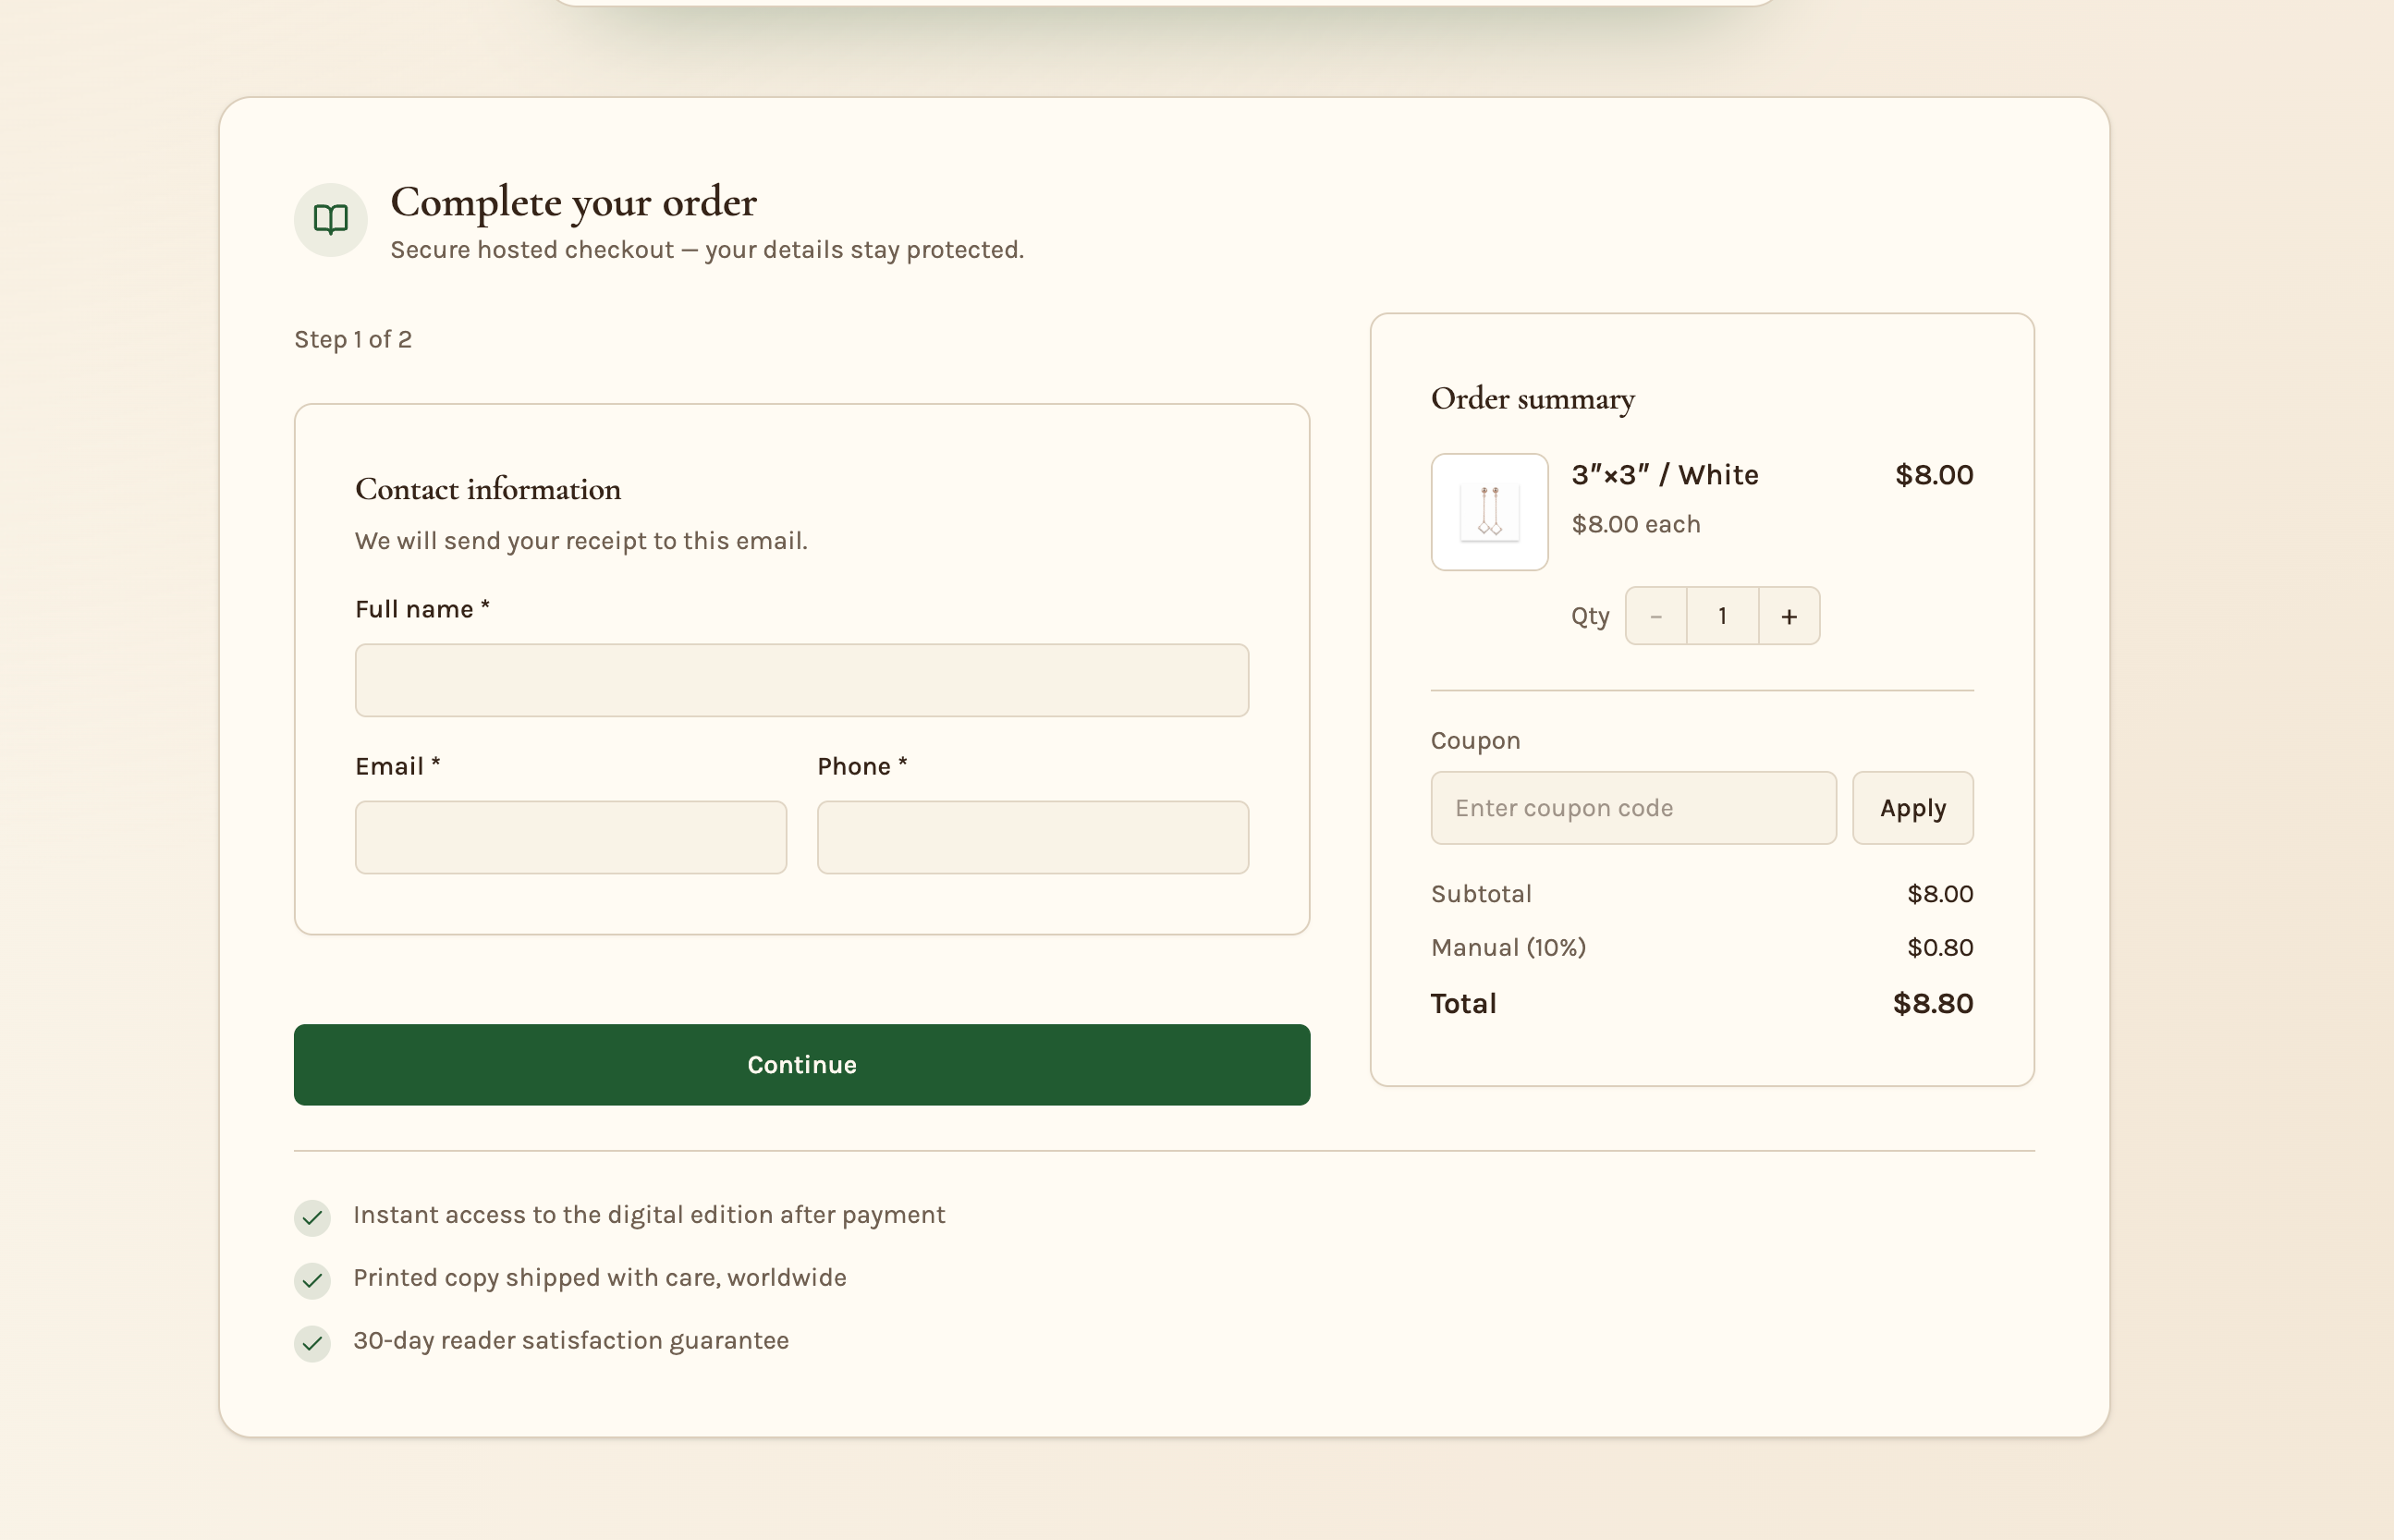
Two-Step Checkout and Lead Capture
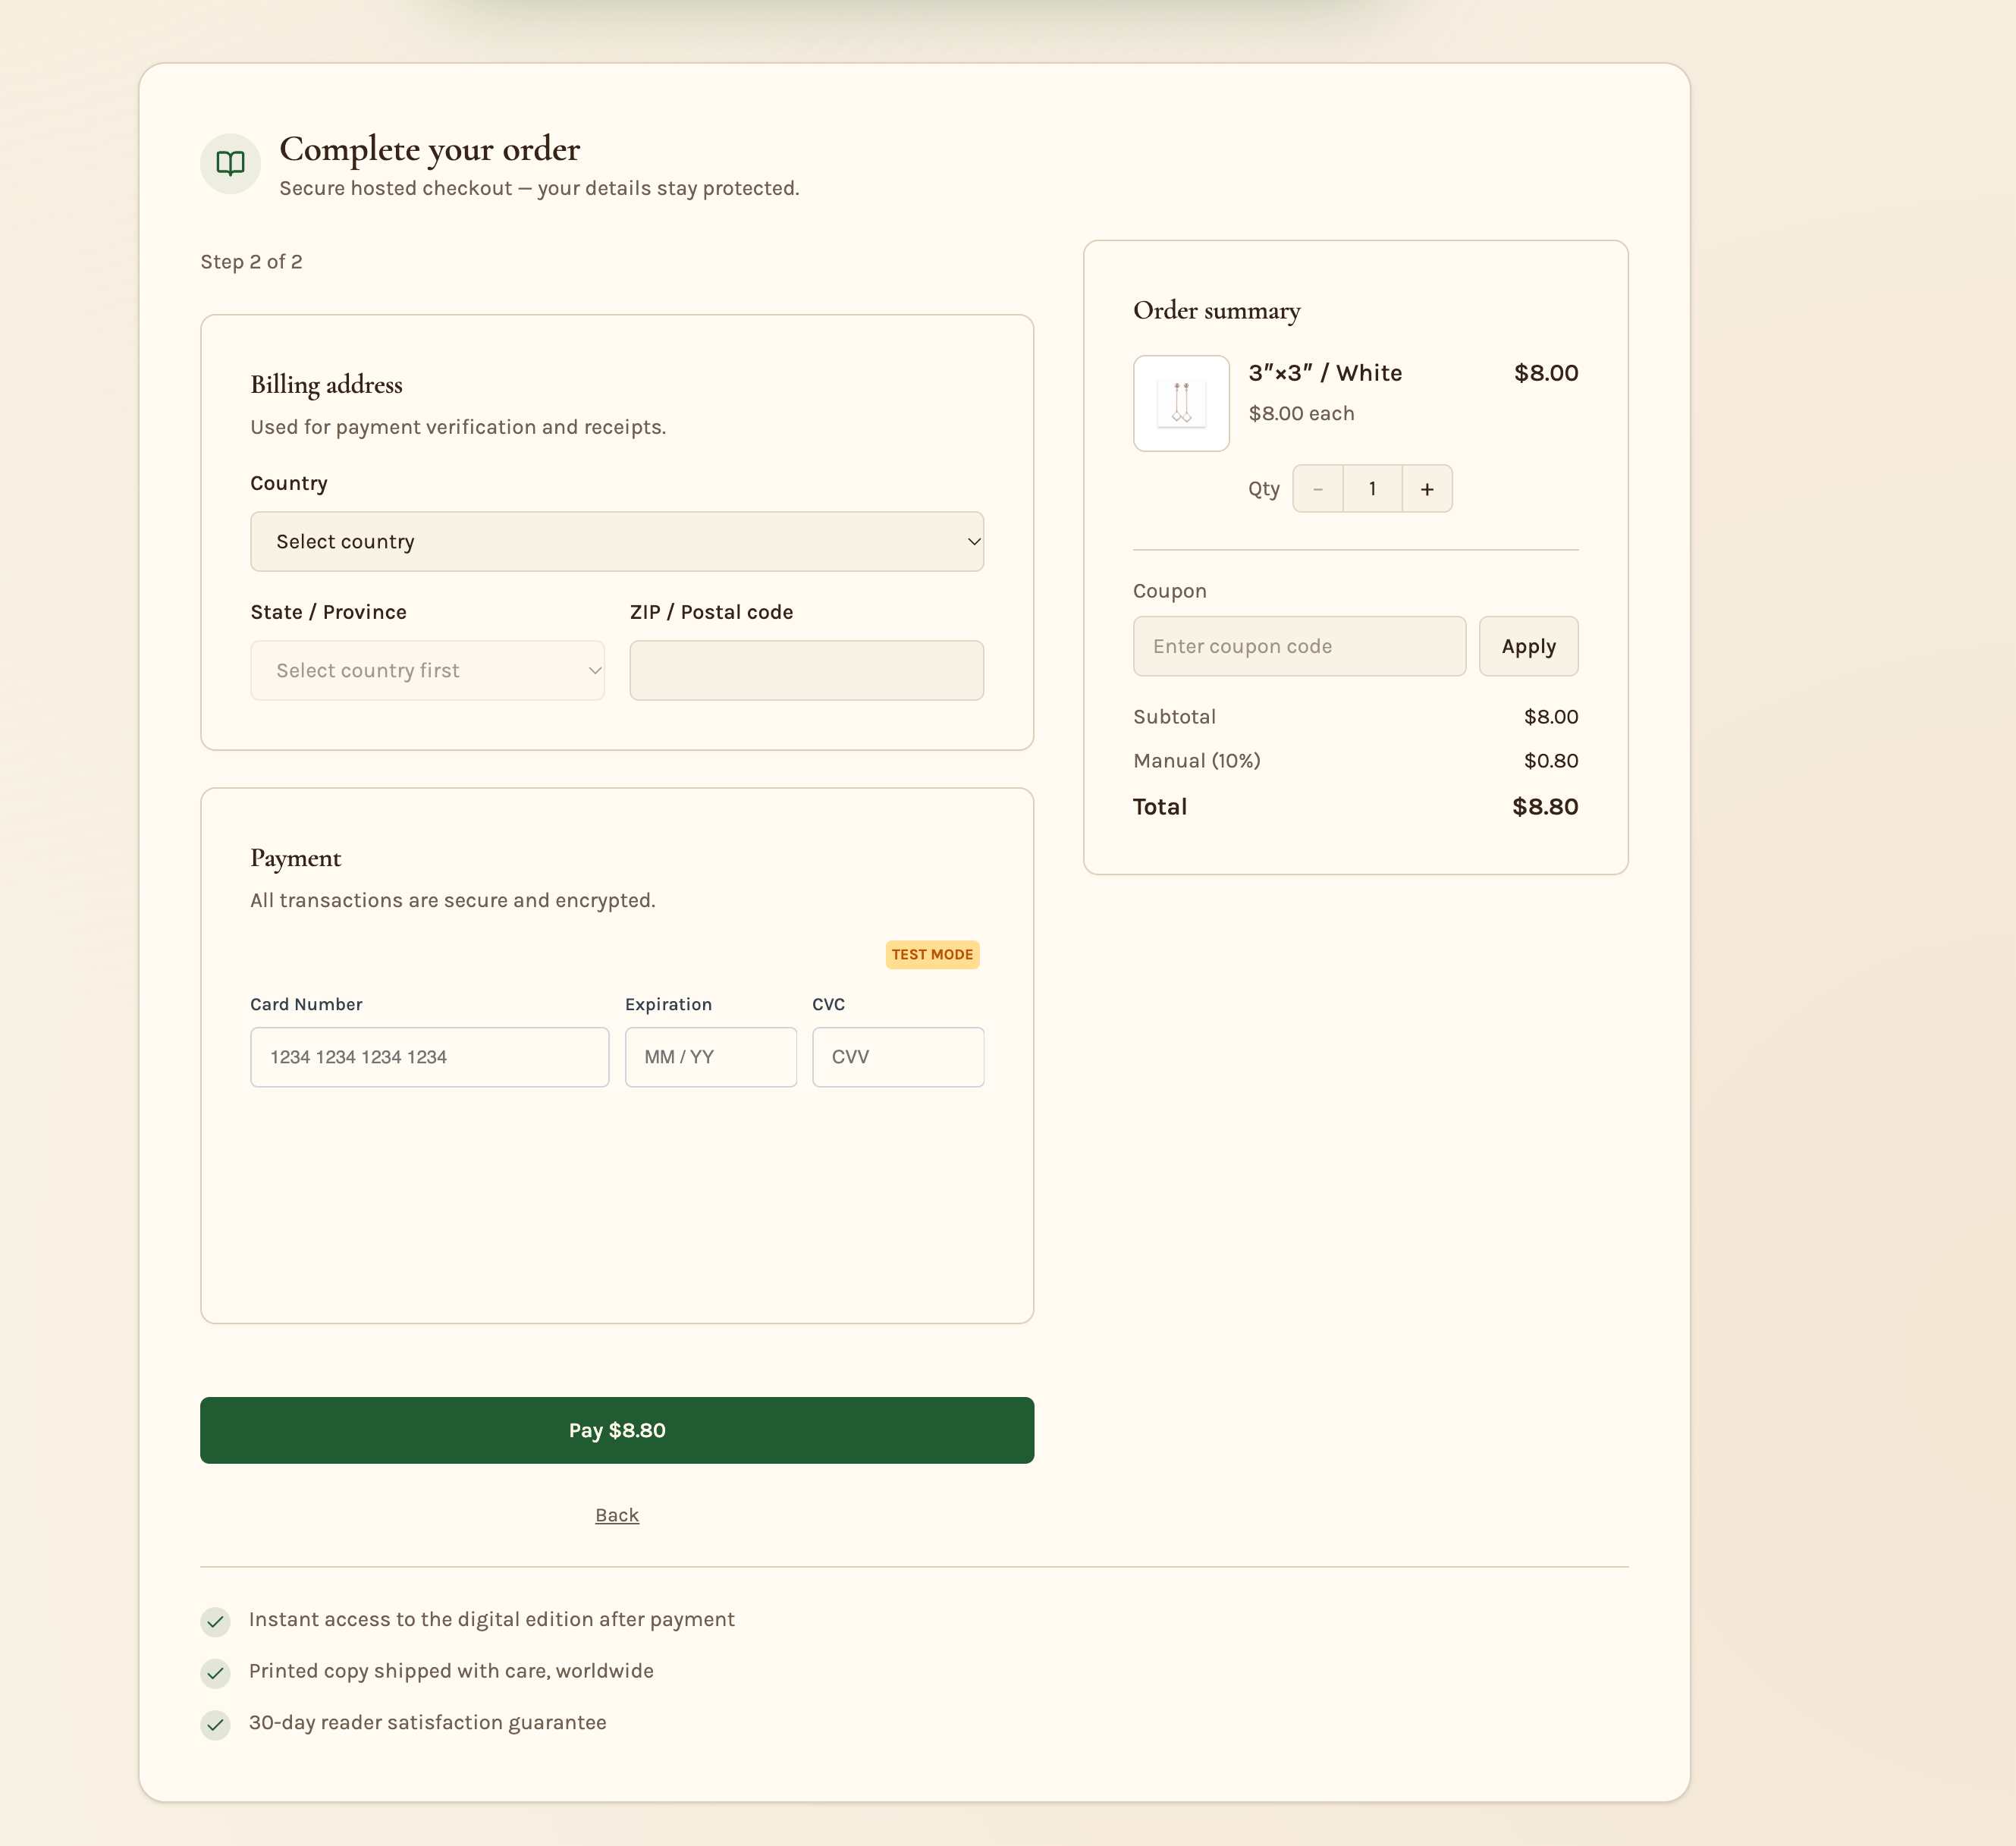
Two-step checkout captures buyer information before payment, helping you retain new leads even when they do not complete a purchase. This separates contact creation from payment collection while keeping both steps in the checkout experience.
How to Enable Two-Step Checkout
Use the AI Studio project chat to request a two-step purchase experience and review the updated flow before using it.
- Navigate to AI Studio > My Projects.
- Open your Payments-enabled project.
- In the project chat, enter "Make it a two-step checkout."
- Review the updated checkout in the project preview.
The checkout uses two steps:
- Step 1: Save the buyer as a CRM contact.
- Step 2: Collect payment.
Orders and Post-Purchase Experience
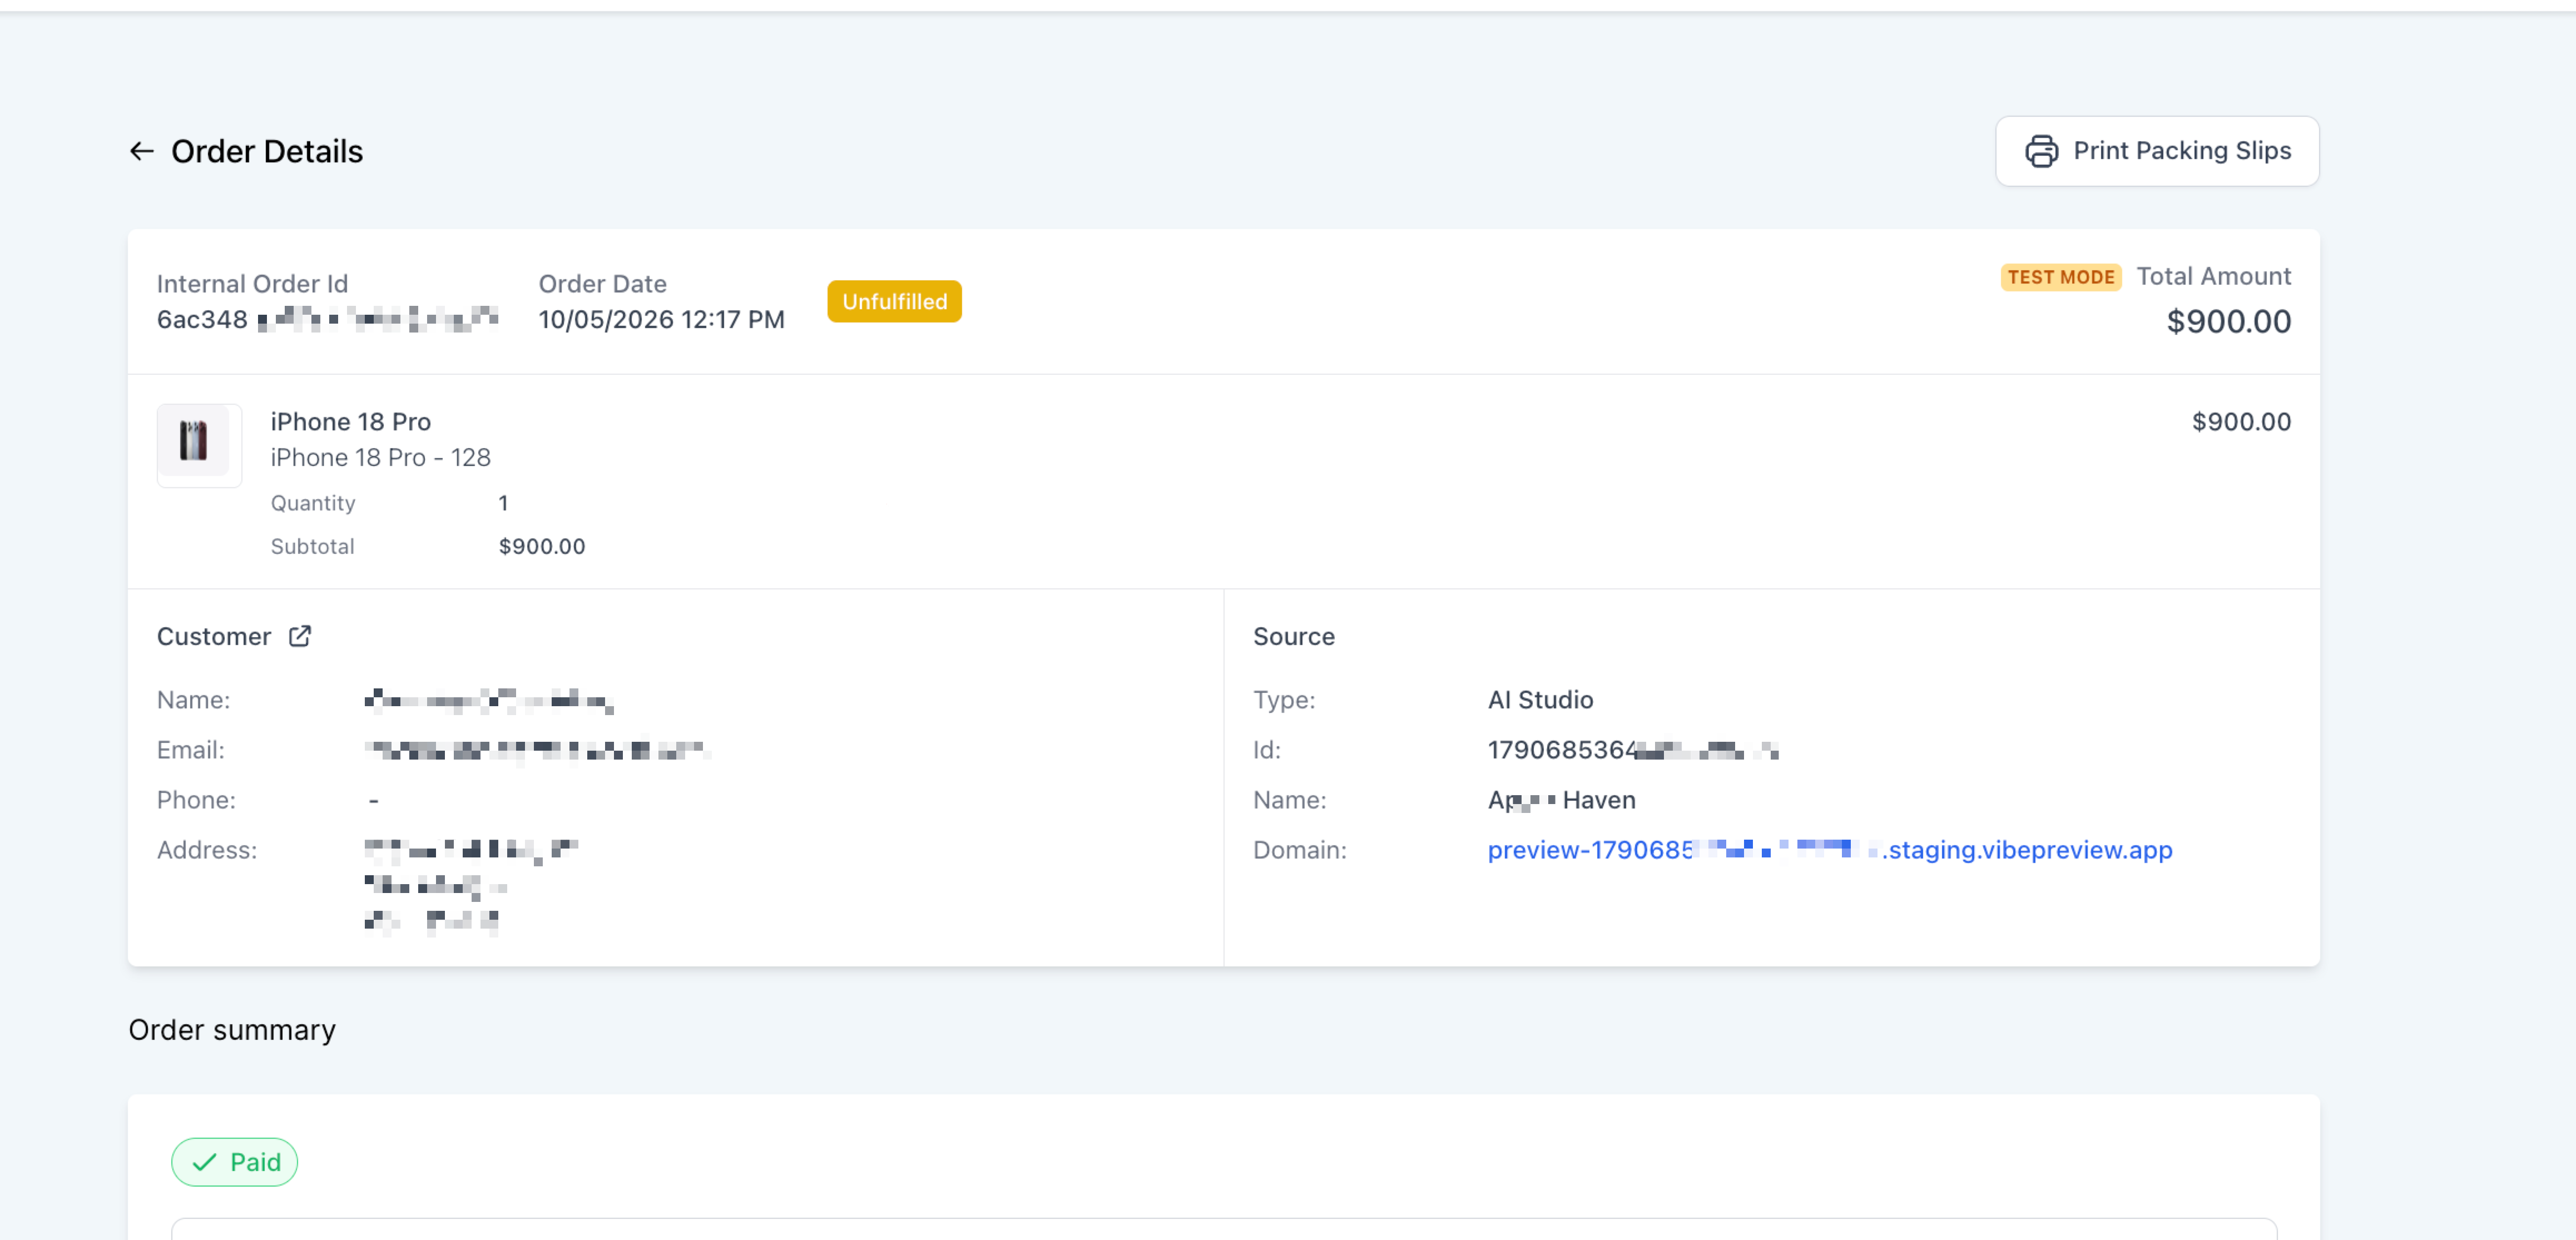
Orders generated through AI Studio appear in the existing Orders area alongside orders from other sales channels. This keeps customer purchases and payment information available for review and post-purchase management.
Open an order in Orders to review:
- Customer information.
- Purchased products.
- Payment status.
- Transaction details.
- Fulfillment information.
The Source section identifies orders that originated from AI Studio and displays the related project details, including:
- Project name.
- Project ID.
- Project domain.
You can also use workflows after a purchase to send confirmations, follow-up messages, internal notifications, and other post-purchase automations.
Order Confirmations and Custom Thank-You Pages
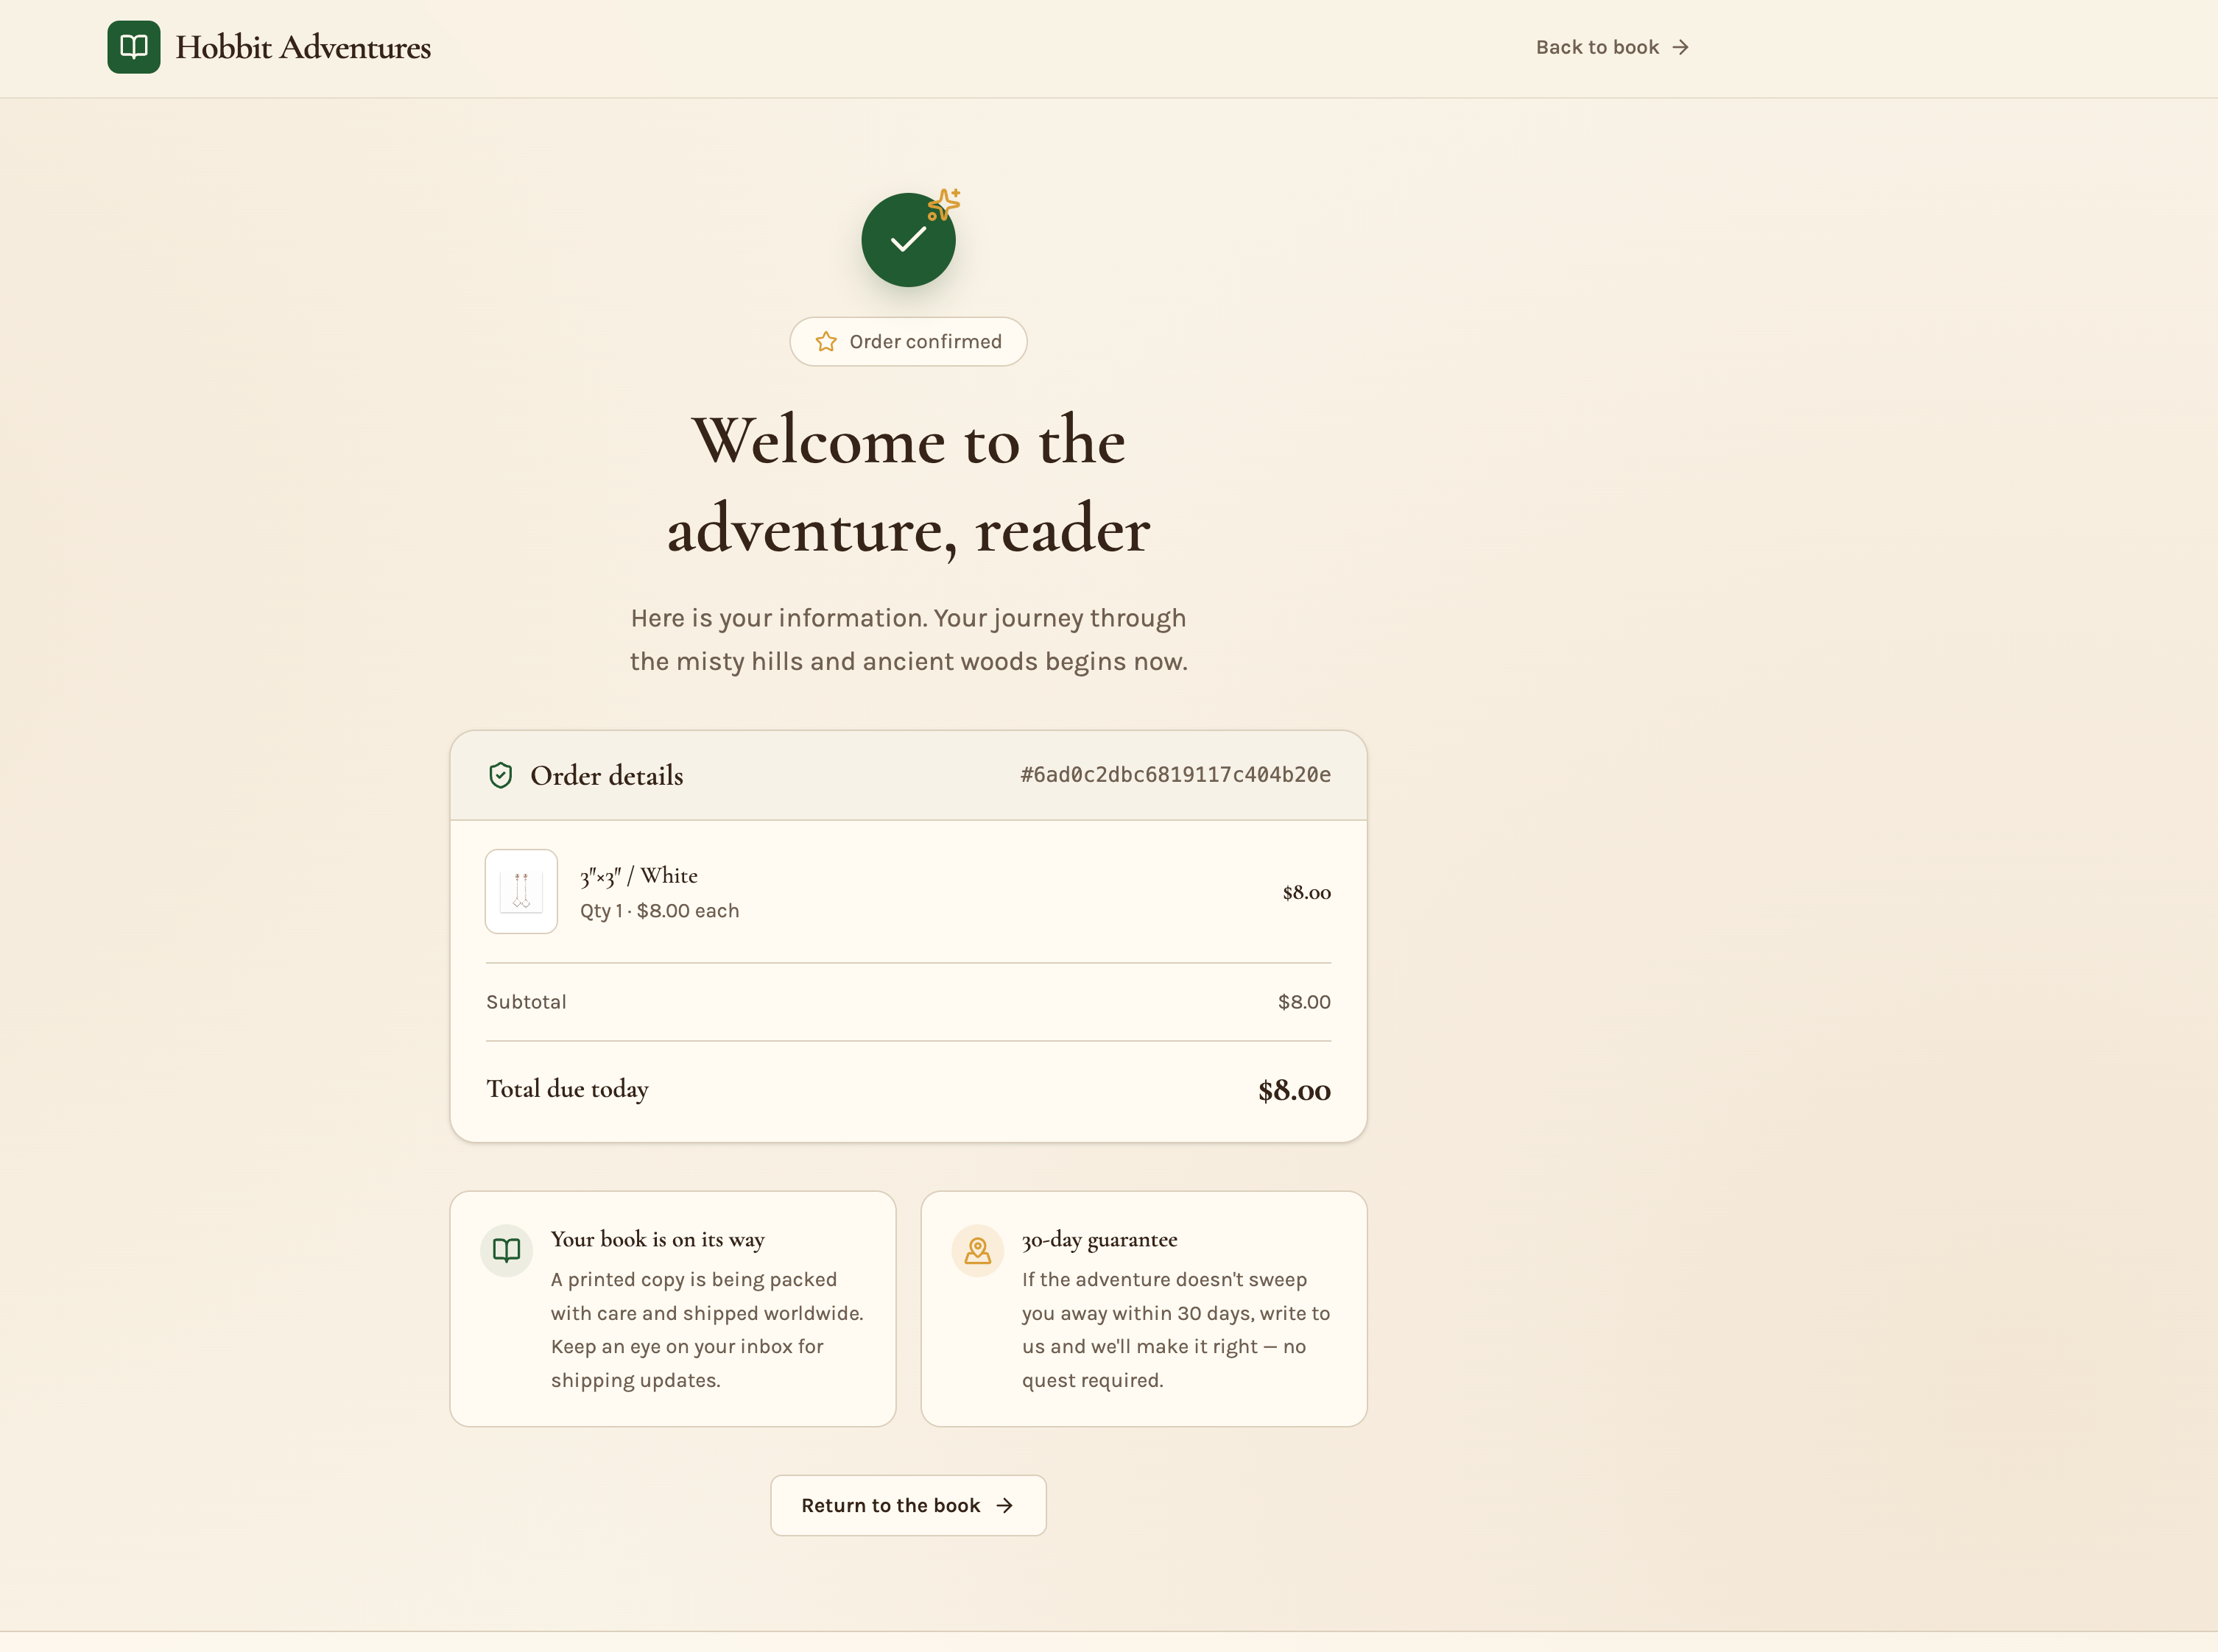
After a successful payment, buyers receive an order confirmation with their purchase details. You can also customize the post-purchase experience by directing buyers to a thank-you page that displays information from their actual order.
Order Confirmation Details
After a successful payment, buyers see a detailed order confirmation showing:
- Order ID.
- Purchased items.
- Taxes.
- Total paid.
Subscription confirmations also show the next charge.
How to Add a Custom Thank-You Page
Use the project chat to request a customized post-payment page and then review the resulting experience.
- Navigate to AI Studio > My Projects.
- Open your Payments-enabled project.
- In the project chat, enter "Send buyers to my own thank-you page after payment."
- Review the post-payment experience.
Frequently Asked Questions
Q: Can I add payments to an AI Studio project after it has been created?
Yes. Open the project, select More > Payments, and click Enable Payments. You can also disable payments from this area.
Q: Why can't I see the Payments option in my existing React project?
Payments are supported for projects built on TanStack Start. Existing React projects must be migrated using Project Settings > Migrate to SSR before the Payments option becomes available.
Q: Do I need to reconnect my payment provider for each AI Studio project?
AI Studio uses the existing connected payment configuration. If a provider is already connected, the project can use that setup. Use Connect or Manage in the Payment method area as needed.
Q: Can I manage product prices and variations directly inside AI Studio?
No. Product details, prices, and variations must be managed in the product catalog. AI Studio lets you select existing products and choose their configured prices or variations for the purchase experience.
Q: Does AI Studio support subscriptions and post-purchase upsells?
Yes. AI Studio Payments supports recurring products, subscriptions, and post-purchase upsells. An upsell can only be charged after the original order is successfully paid and only once per order.
Q: Can customers complete checkout without entering card details?
Fully discounted orders can be completed without card details. Supported saved-card payment providers also allow qualifying post-purchase upsells to be accepted without entering payment information again.
Q: Can I customize the information collected during checkout?
Yes. You can configure phone and billing address fields as hidden, optional, or required through the project chat. Name and email remain required.
Q: Which workflow trigger should I use for leads collected during two-step checkout?
Use Contact Created for newly created contacts. Two-step checkout does not use Order Form Submission for this initial contact-creation event.
Q: Where can I find orders created through AI Studio?
AI Studio orders appear in Orders. Open an order to review the transaction and its Source details, including the project name, project ID, and domain.
Need Help?
If you have questions or need assistance with a feature, contact support for further guidance. To help resolve your issue efficiently, include a brief description of what you're trying to accomplish, the steps you've already taken, and any relevant screenshots or error messages.