
Workflow AI Builder lets you create complete automations by describing your goal in plain language. Instead of configuring triggers and actions manually, you can generate a workflow, review it, and refine it using AI. You can also use existing records to configure workflow steps automatically, apply targeted edits, and plan automations through conversation. This guide explains access points, building steps, editing options, and best practices.
TABLE OF CONTENTS
- What is Workflow AI Builder?
- What's New in AI Builder v3
- Key Benefits of Workflow AI Builder
- Entry Points
- How to Build Your First AI Workflow
- Configure Steps with Your Account Data
- What You Can Edit
- Point and Edit for Precise Control
- Clarifying Agent in Workflow AI Builder
- Chat Mode
- Post-Generation To-Do List
- Best Practices for Effective Prompts
- Providing Feedback
- Beta Limitations
- Troubleshooting
- Quick Tips
- Frequently Asked Questions
- Need Help?
What is Workflow AI Builder?
Workflow AI Builder converts natural-language prompts into end-to-end workflows. It accelerates automation setup and reduces manual configuration by generating triggers, actions, and workflow structure that you can immediately review and customize.
In Workflows, Workflow AI Builder generates a complete workflow from a clear prompt. You can start from multiple entry points, then adjust the result using conversational edits, Point and Edit selection, or Chat Mode brainstorming.
When your prompt names records that already exist in your account, such as a form, pipeline and stage, email snippet, tag, user, workflow, or custom field, Workflow AI Builder finds them and configures the corresponding steps.
The workflow is built and configured in one process, reducing the need to select these values manually afterward.
What's New in AI Builder v3
AI Builder v3 streams results in real time and shows step-by-step progress while it builds or edits your workflow.
Key improvements include:
- Live streaming progress cards during build and edit requests.
- Multi-step changes in one request, such as "rename, add a 24-hour wait, and turn off re-entry."
- Session memory for follow-up edits, such as "make that 48 hours."
- Confirmation before starting fresh on a canvas that already contains a workflow.
- Session continuity when you close and reopen the AI panel.
- Learn Mode improvements, including streaming answers and suggested follow-up questions.
- Responses that avoid platform-branded terminology.
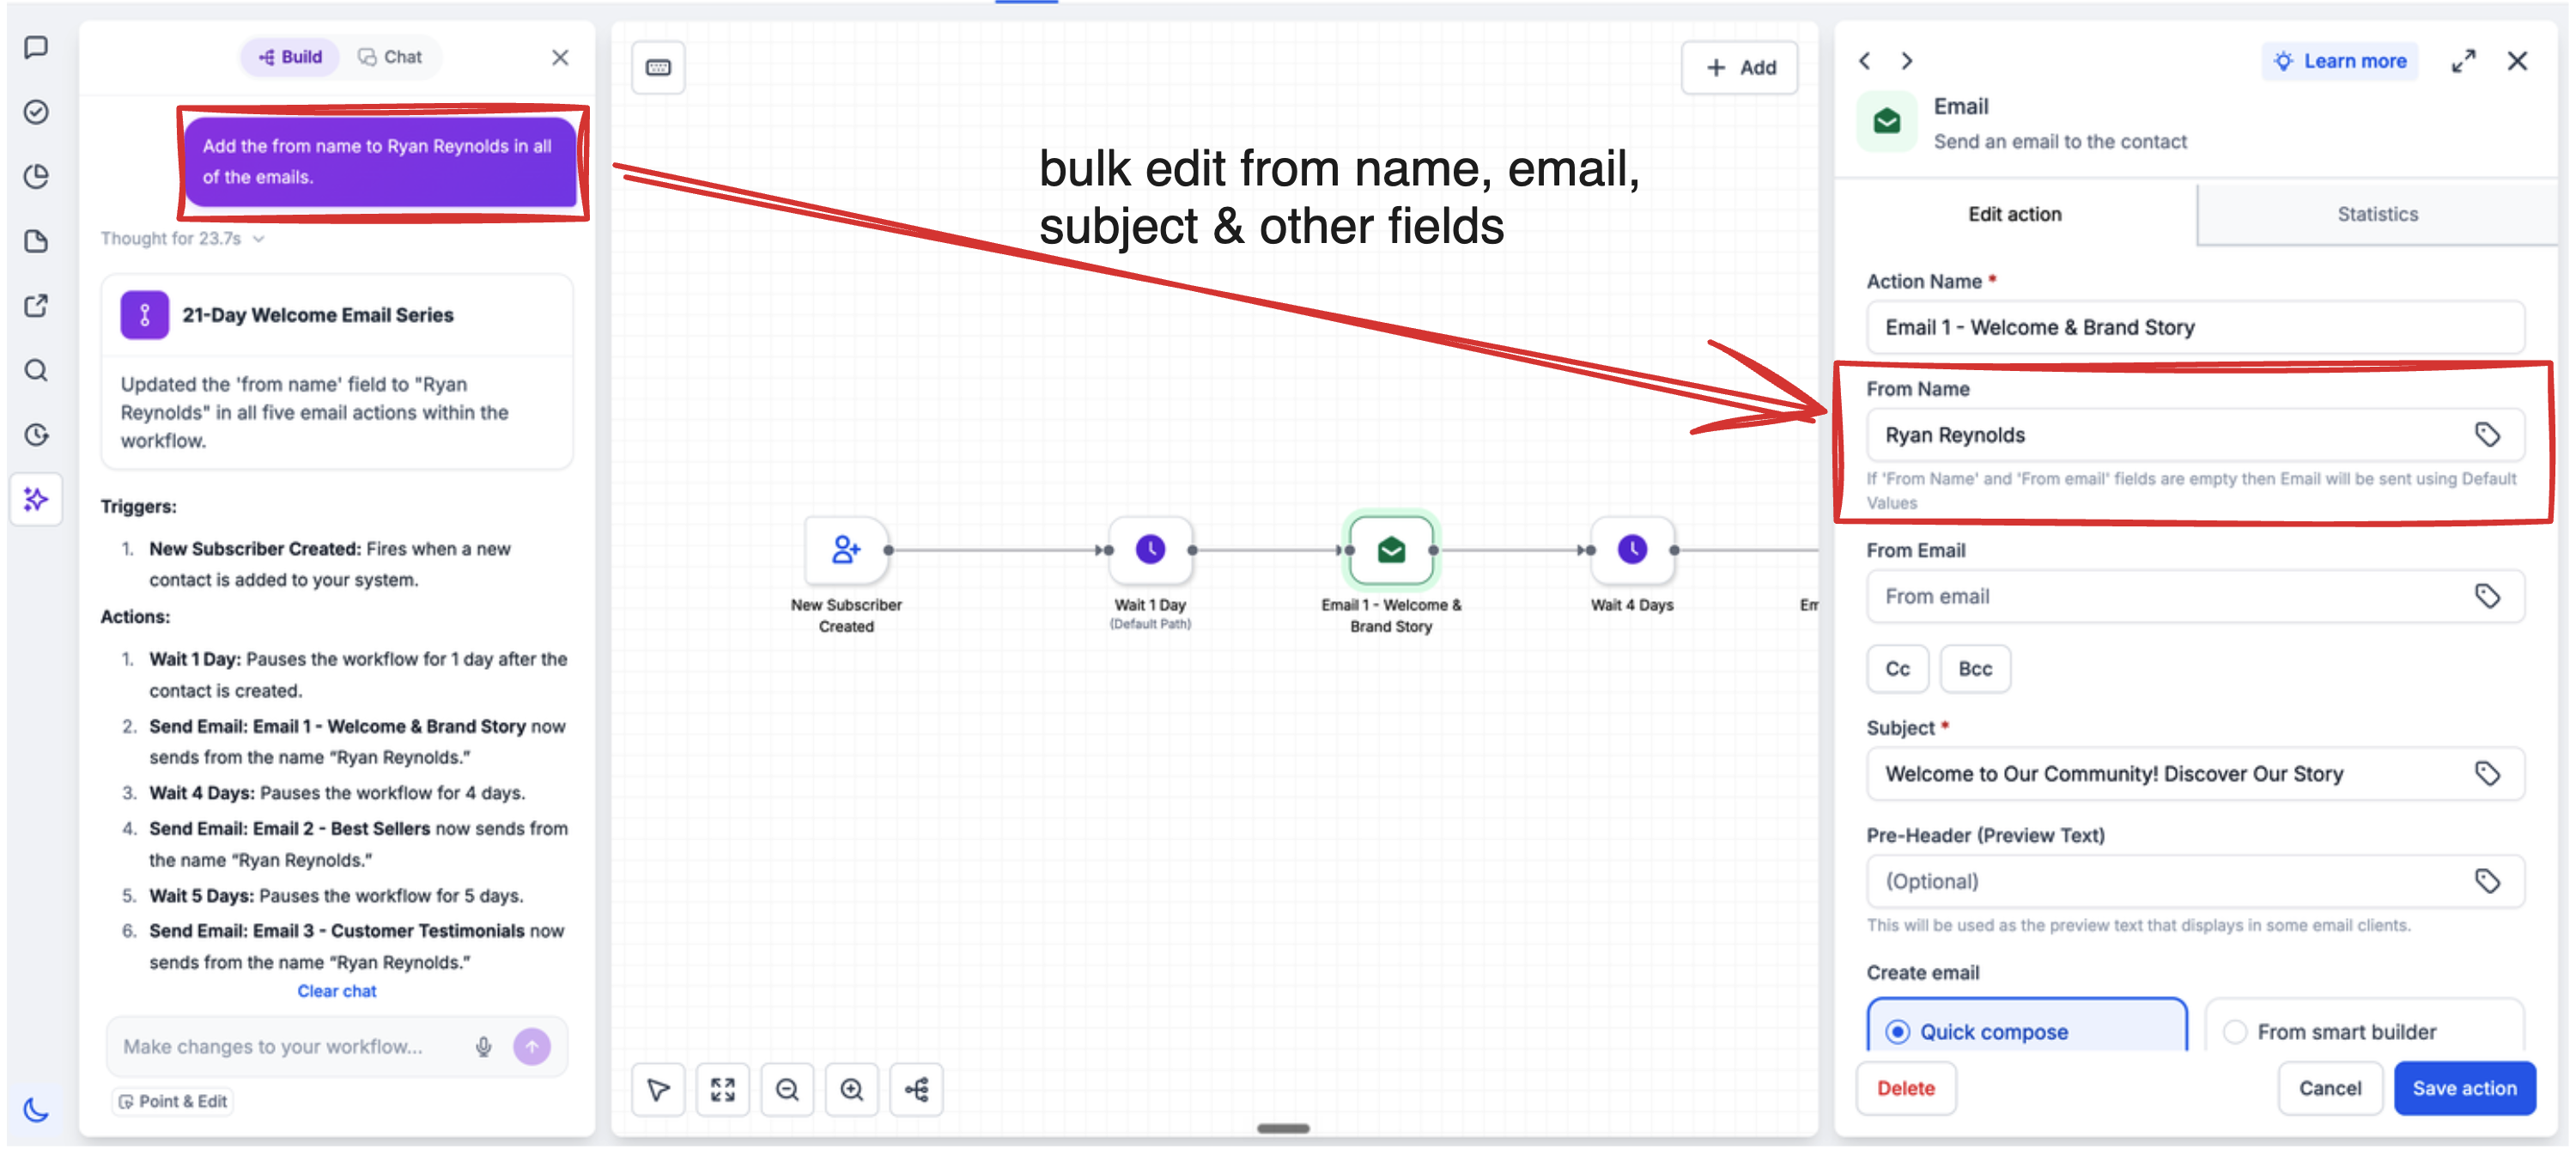
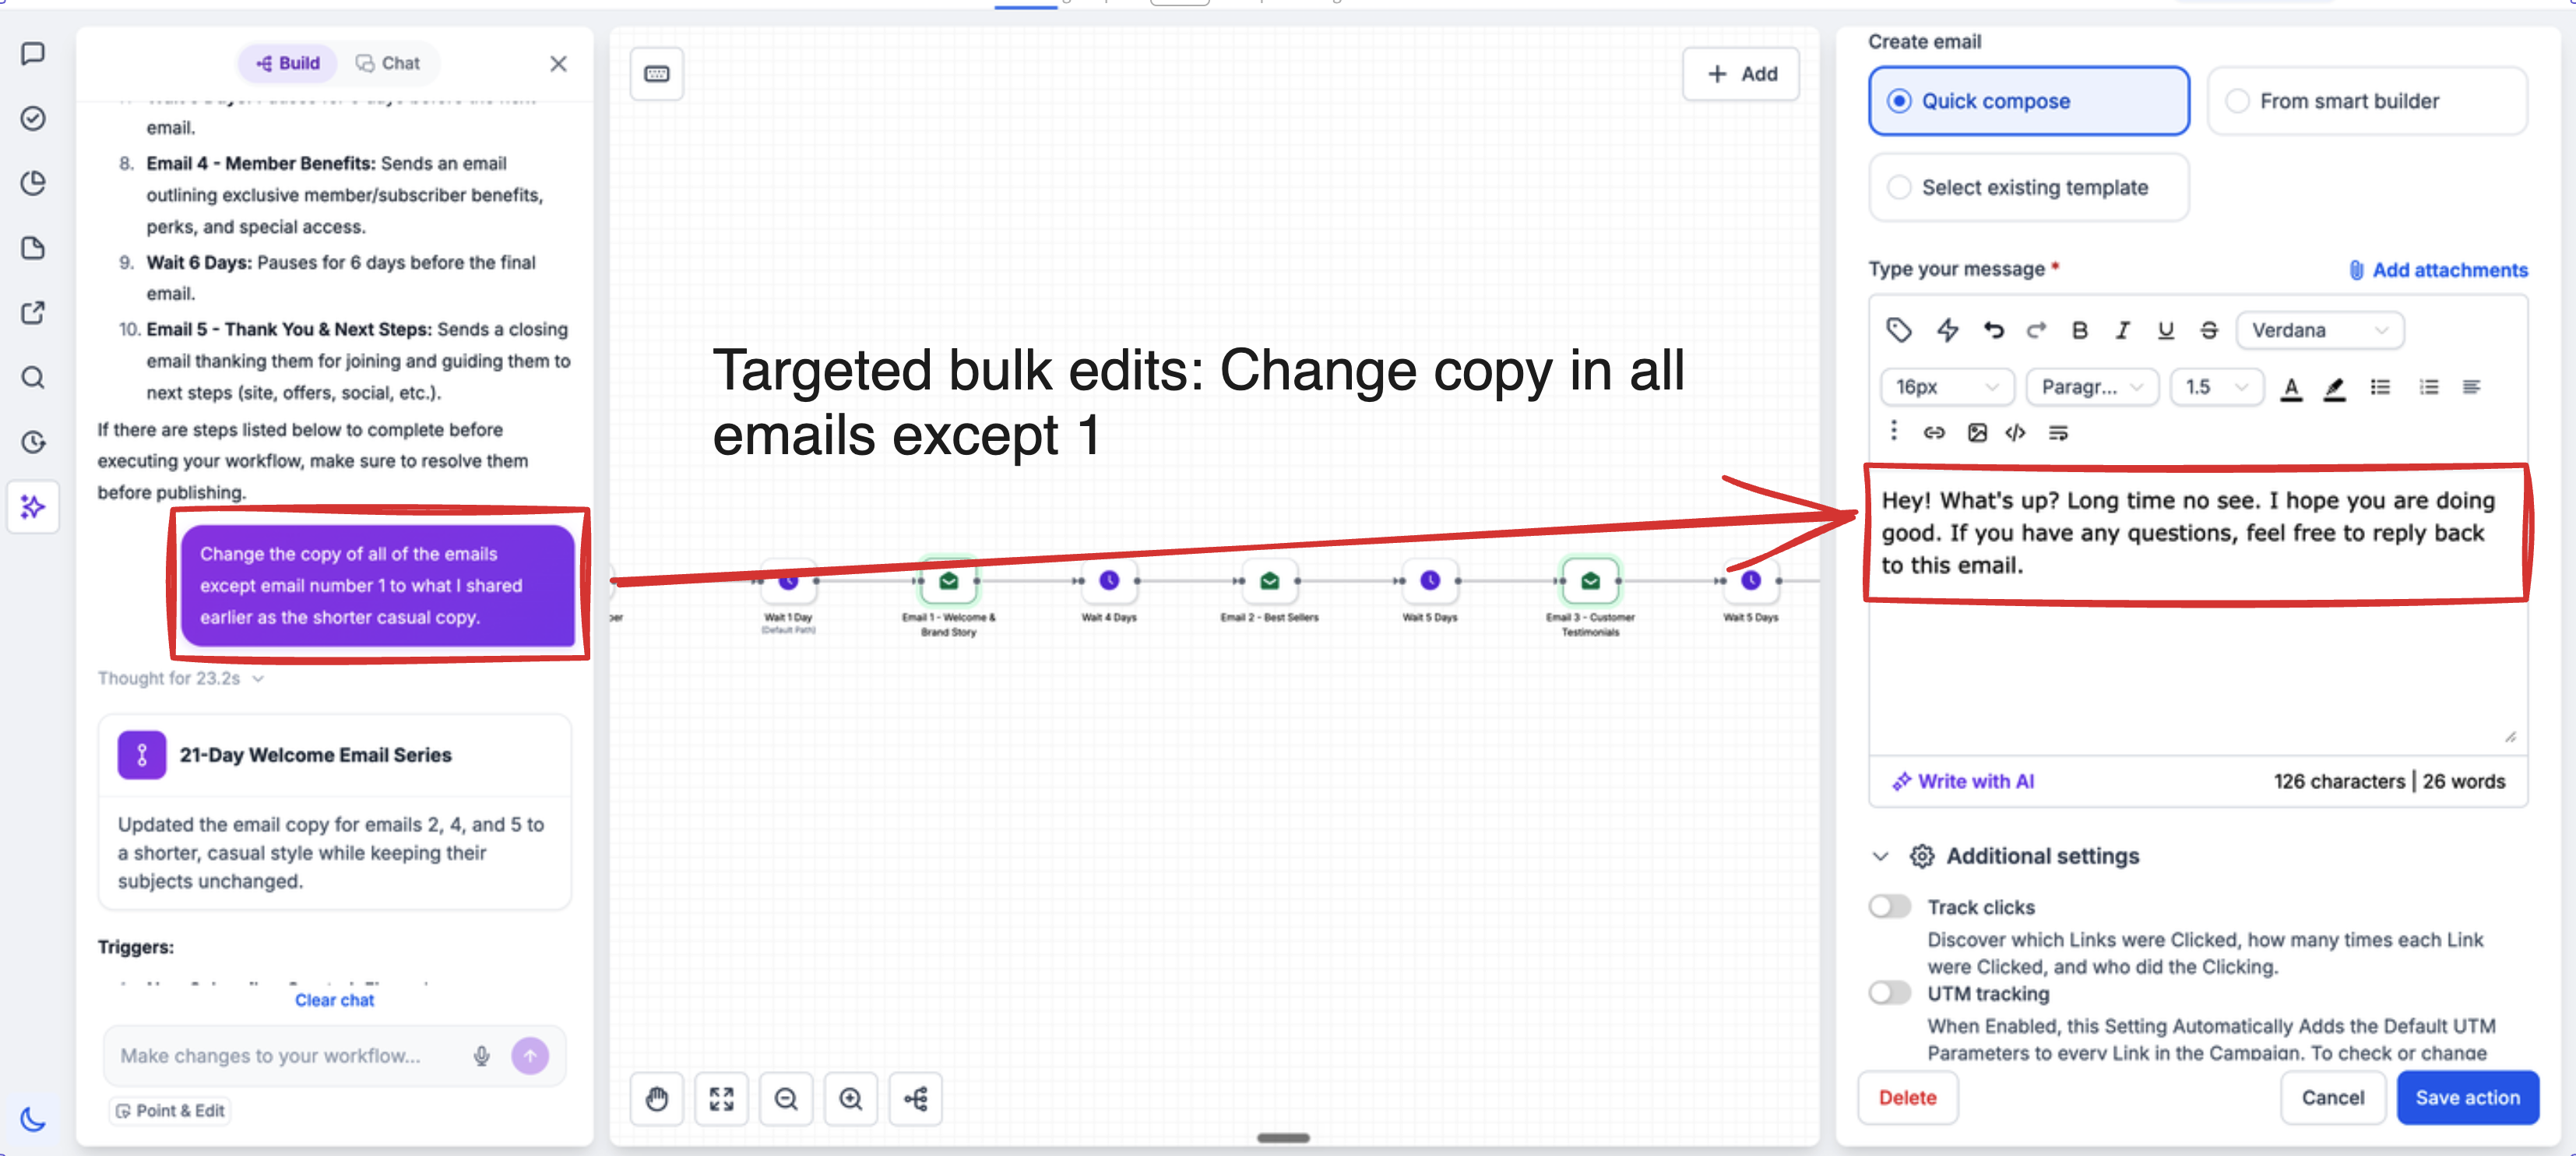
- Targeted bulk edits across all matching steps, a specified number of steps, or specifically identified actions and triggers, while leaving untargeted steps unchanged.
Key Benefits of Workflow AI Builder
Understanding the benefits helps you decide when to use AI instead of manual workflow building and how to combine both approaches for speed and control.
- Speed: Generate an entire workflow from a single prompt in seconds. The source reports an average generation time under 30 seconds, compared with approximately 60 seconds previously.
- Simplicity: Use everyday language without needing to remember specific trigger and action names.
- Consistency: Start with a structured workflow draft and refine it for accuracy.
- Flexibility: Edit your workflows with natural-language instructions or visually target specific steps.
- Scalability: Reuse effective prompt templates and workflow-building practices across your team.
- Configured with your data: Use existing forms, pipelines, snippets, tags, users, workflows, and custom fields when generating workflow steps.
Entry Points
Knowing the different ways to open Workflow AI Builder saves clicks and helps you choose the fastest route for your task. There are three ways to access Workflow AI Builder.
Step 1: From the Workflow List Page
Opening AI Builder directly from the workflow list lets you generate a workflow without first setting up an empty canvas.
- Navigate to Automation > Workflows.
- Click Build using AI.
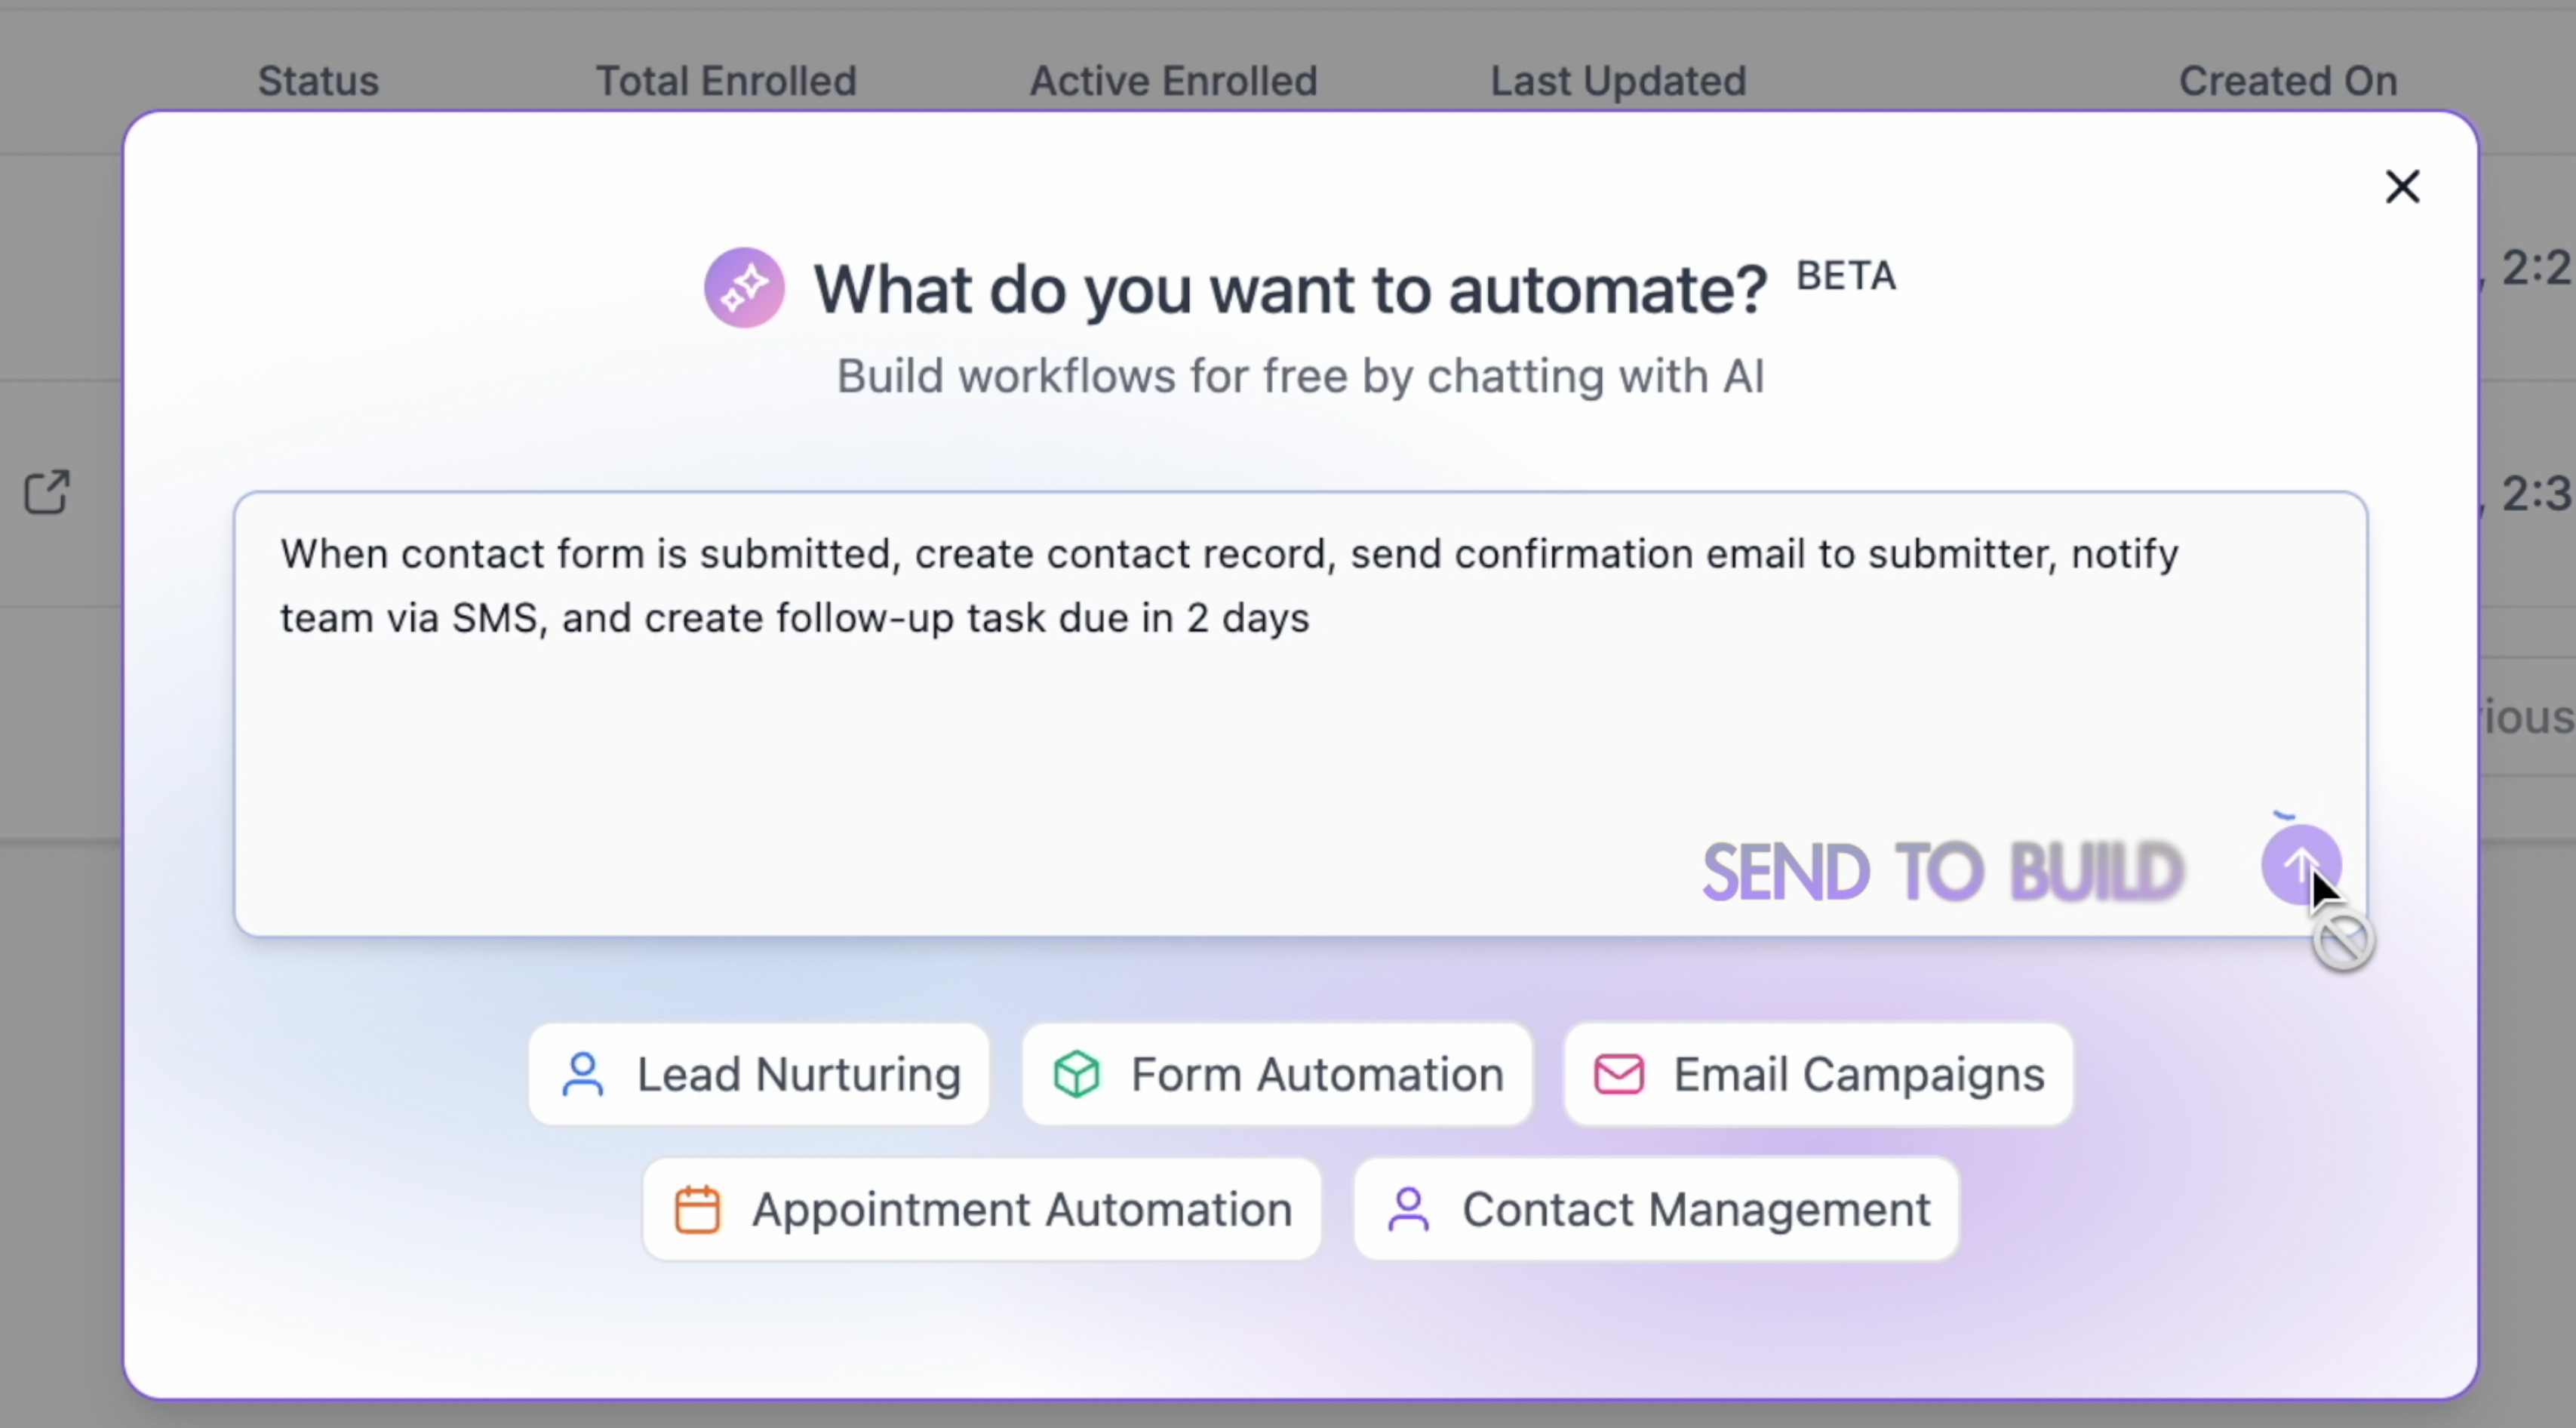
- Enter your workflow requirements in the prompt modal.
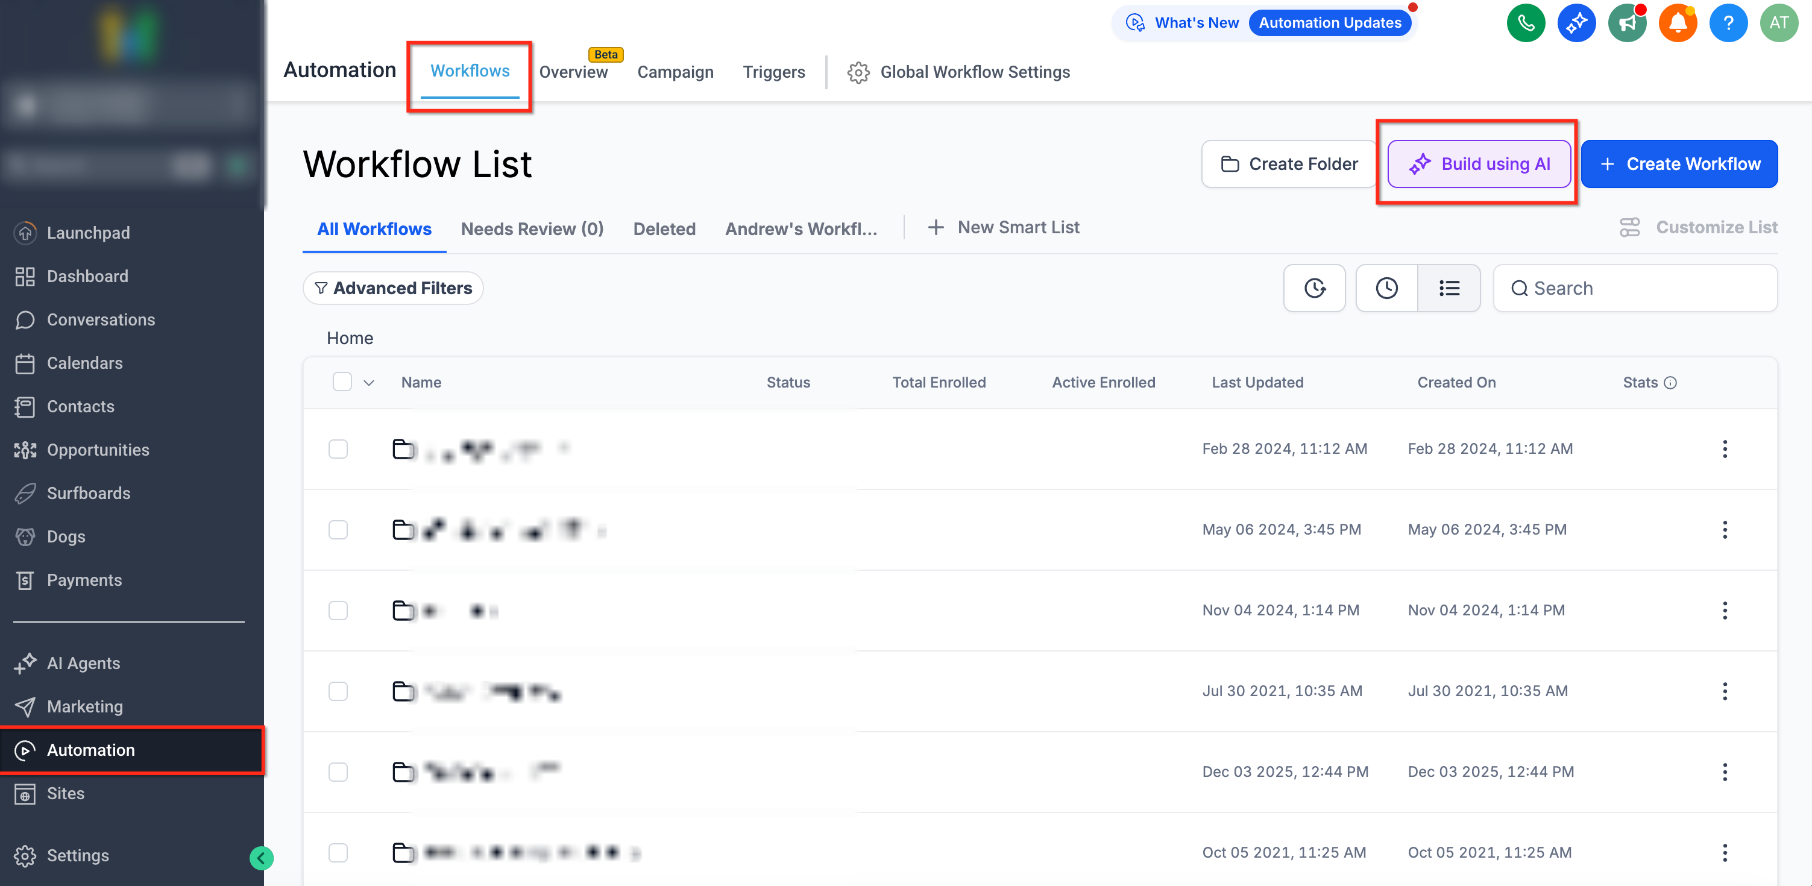
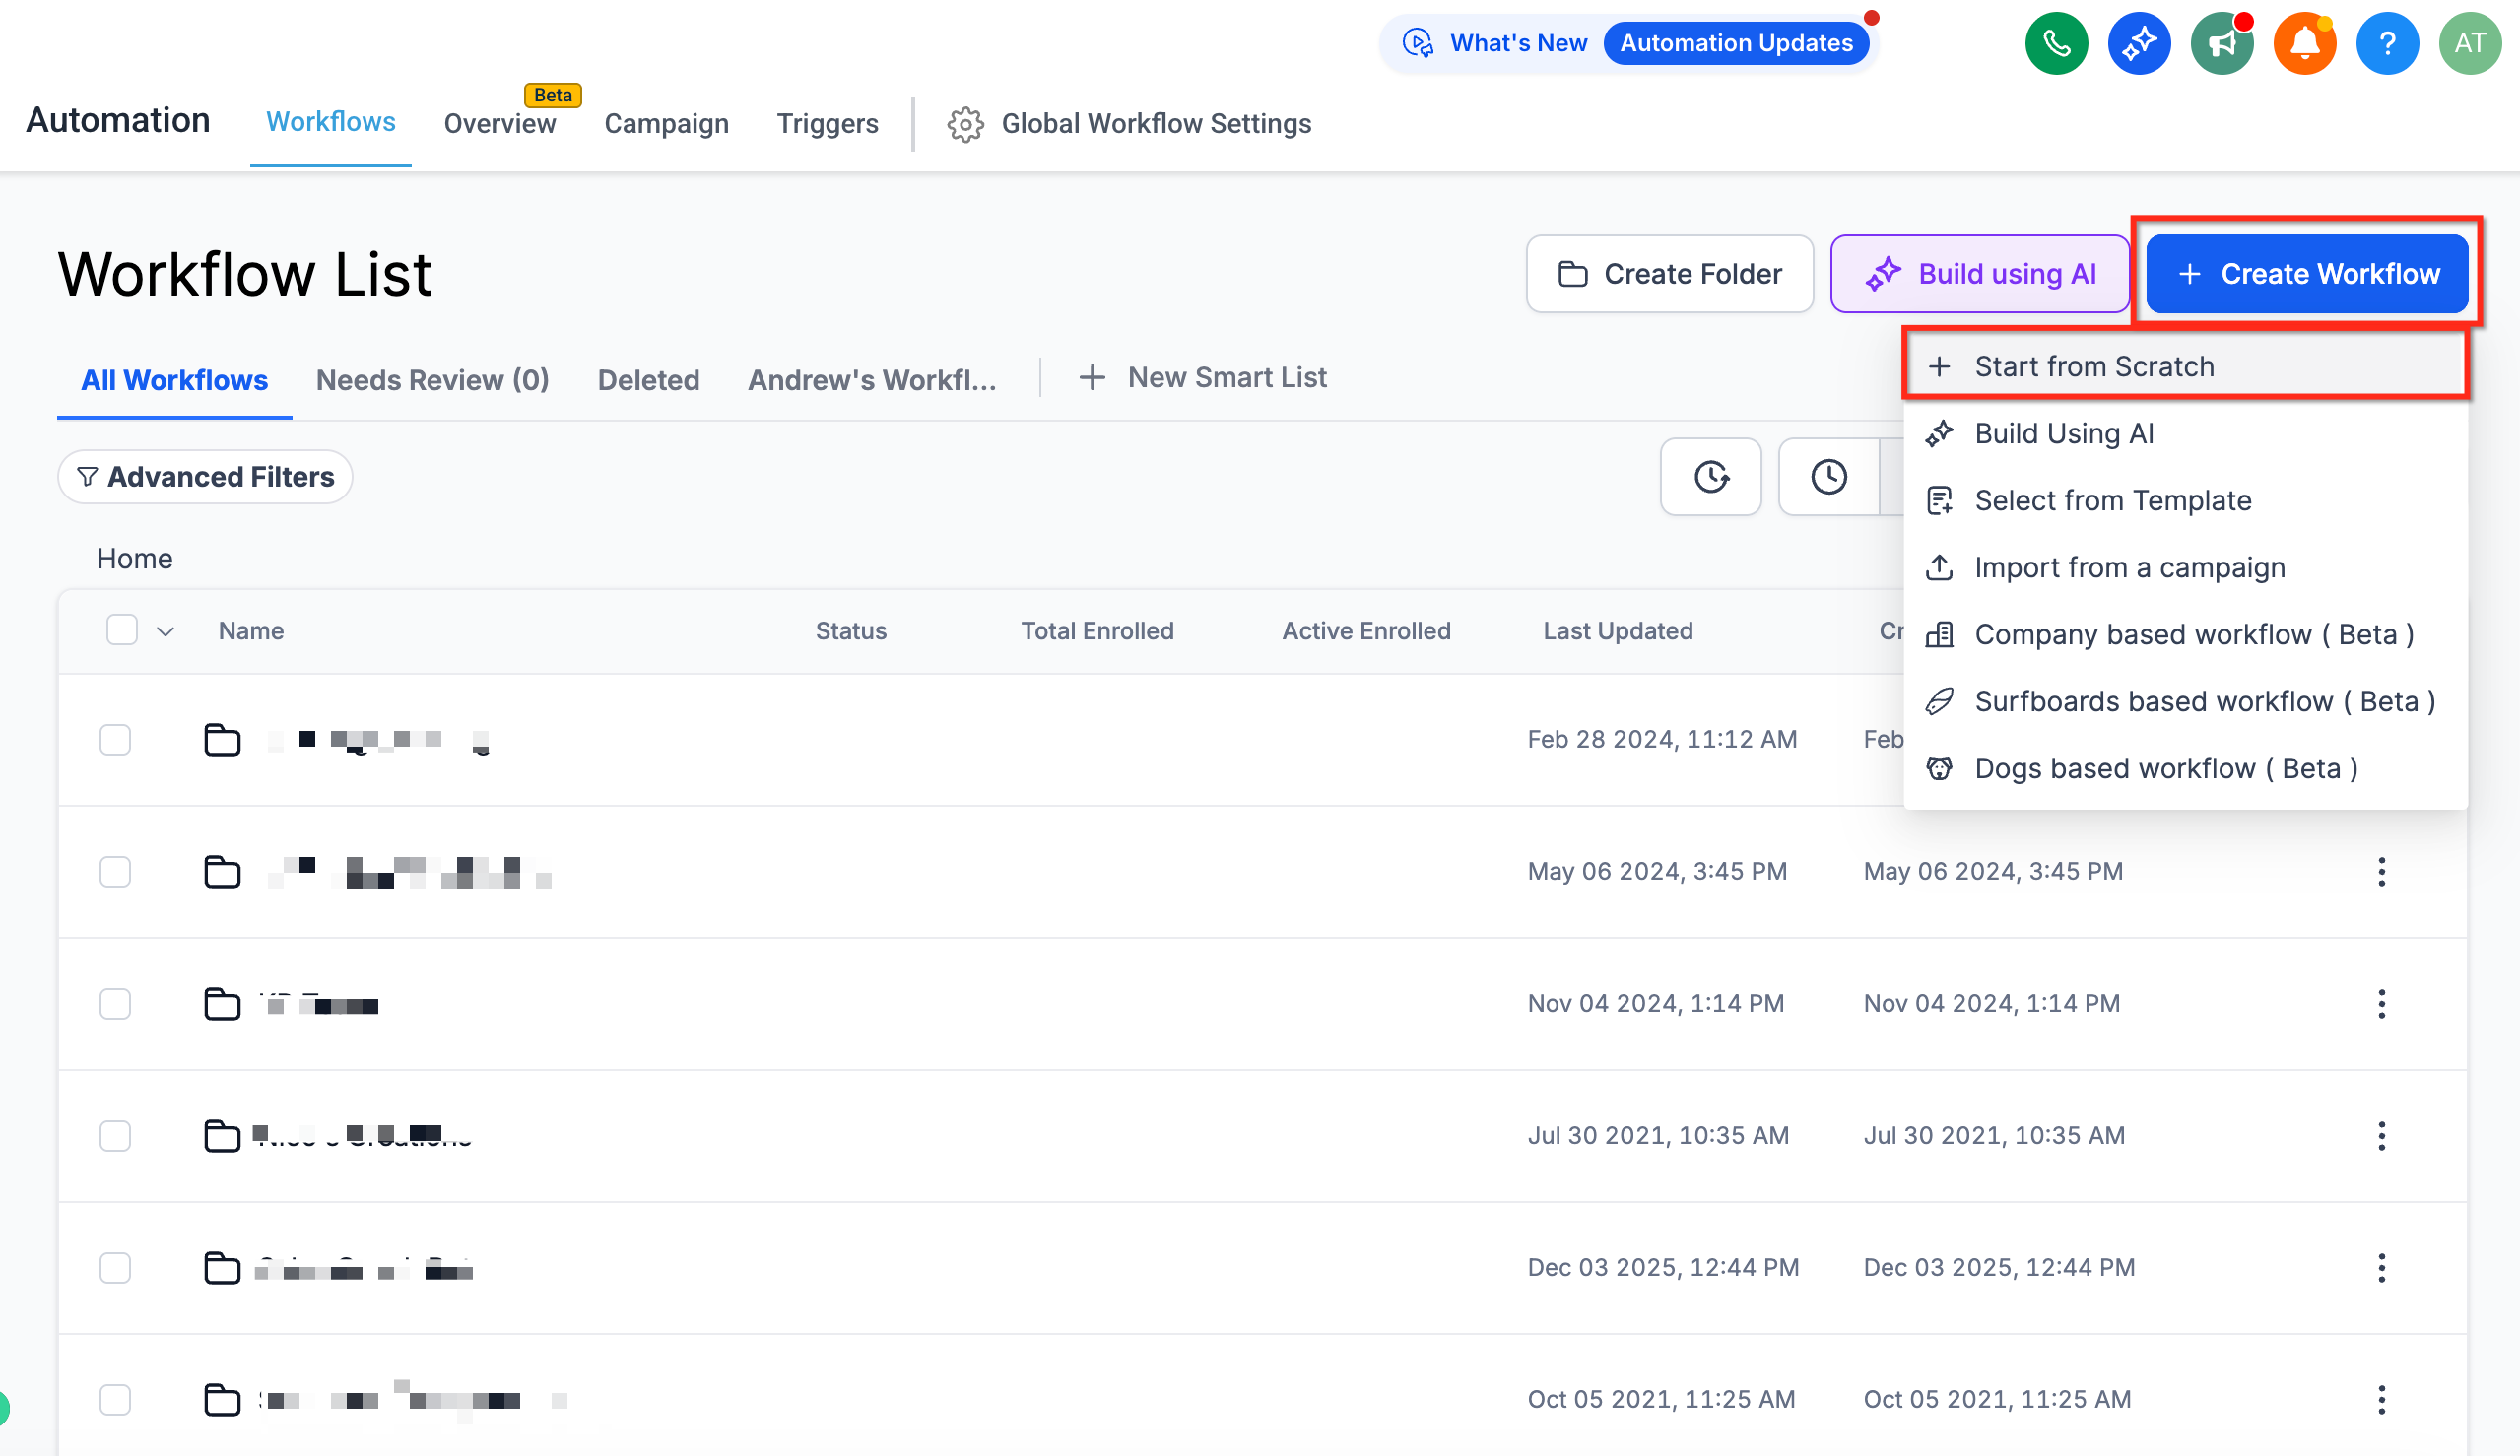
You can also click Create Workflow and then Start from Scratch to open the Workflow Builder.
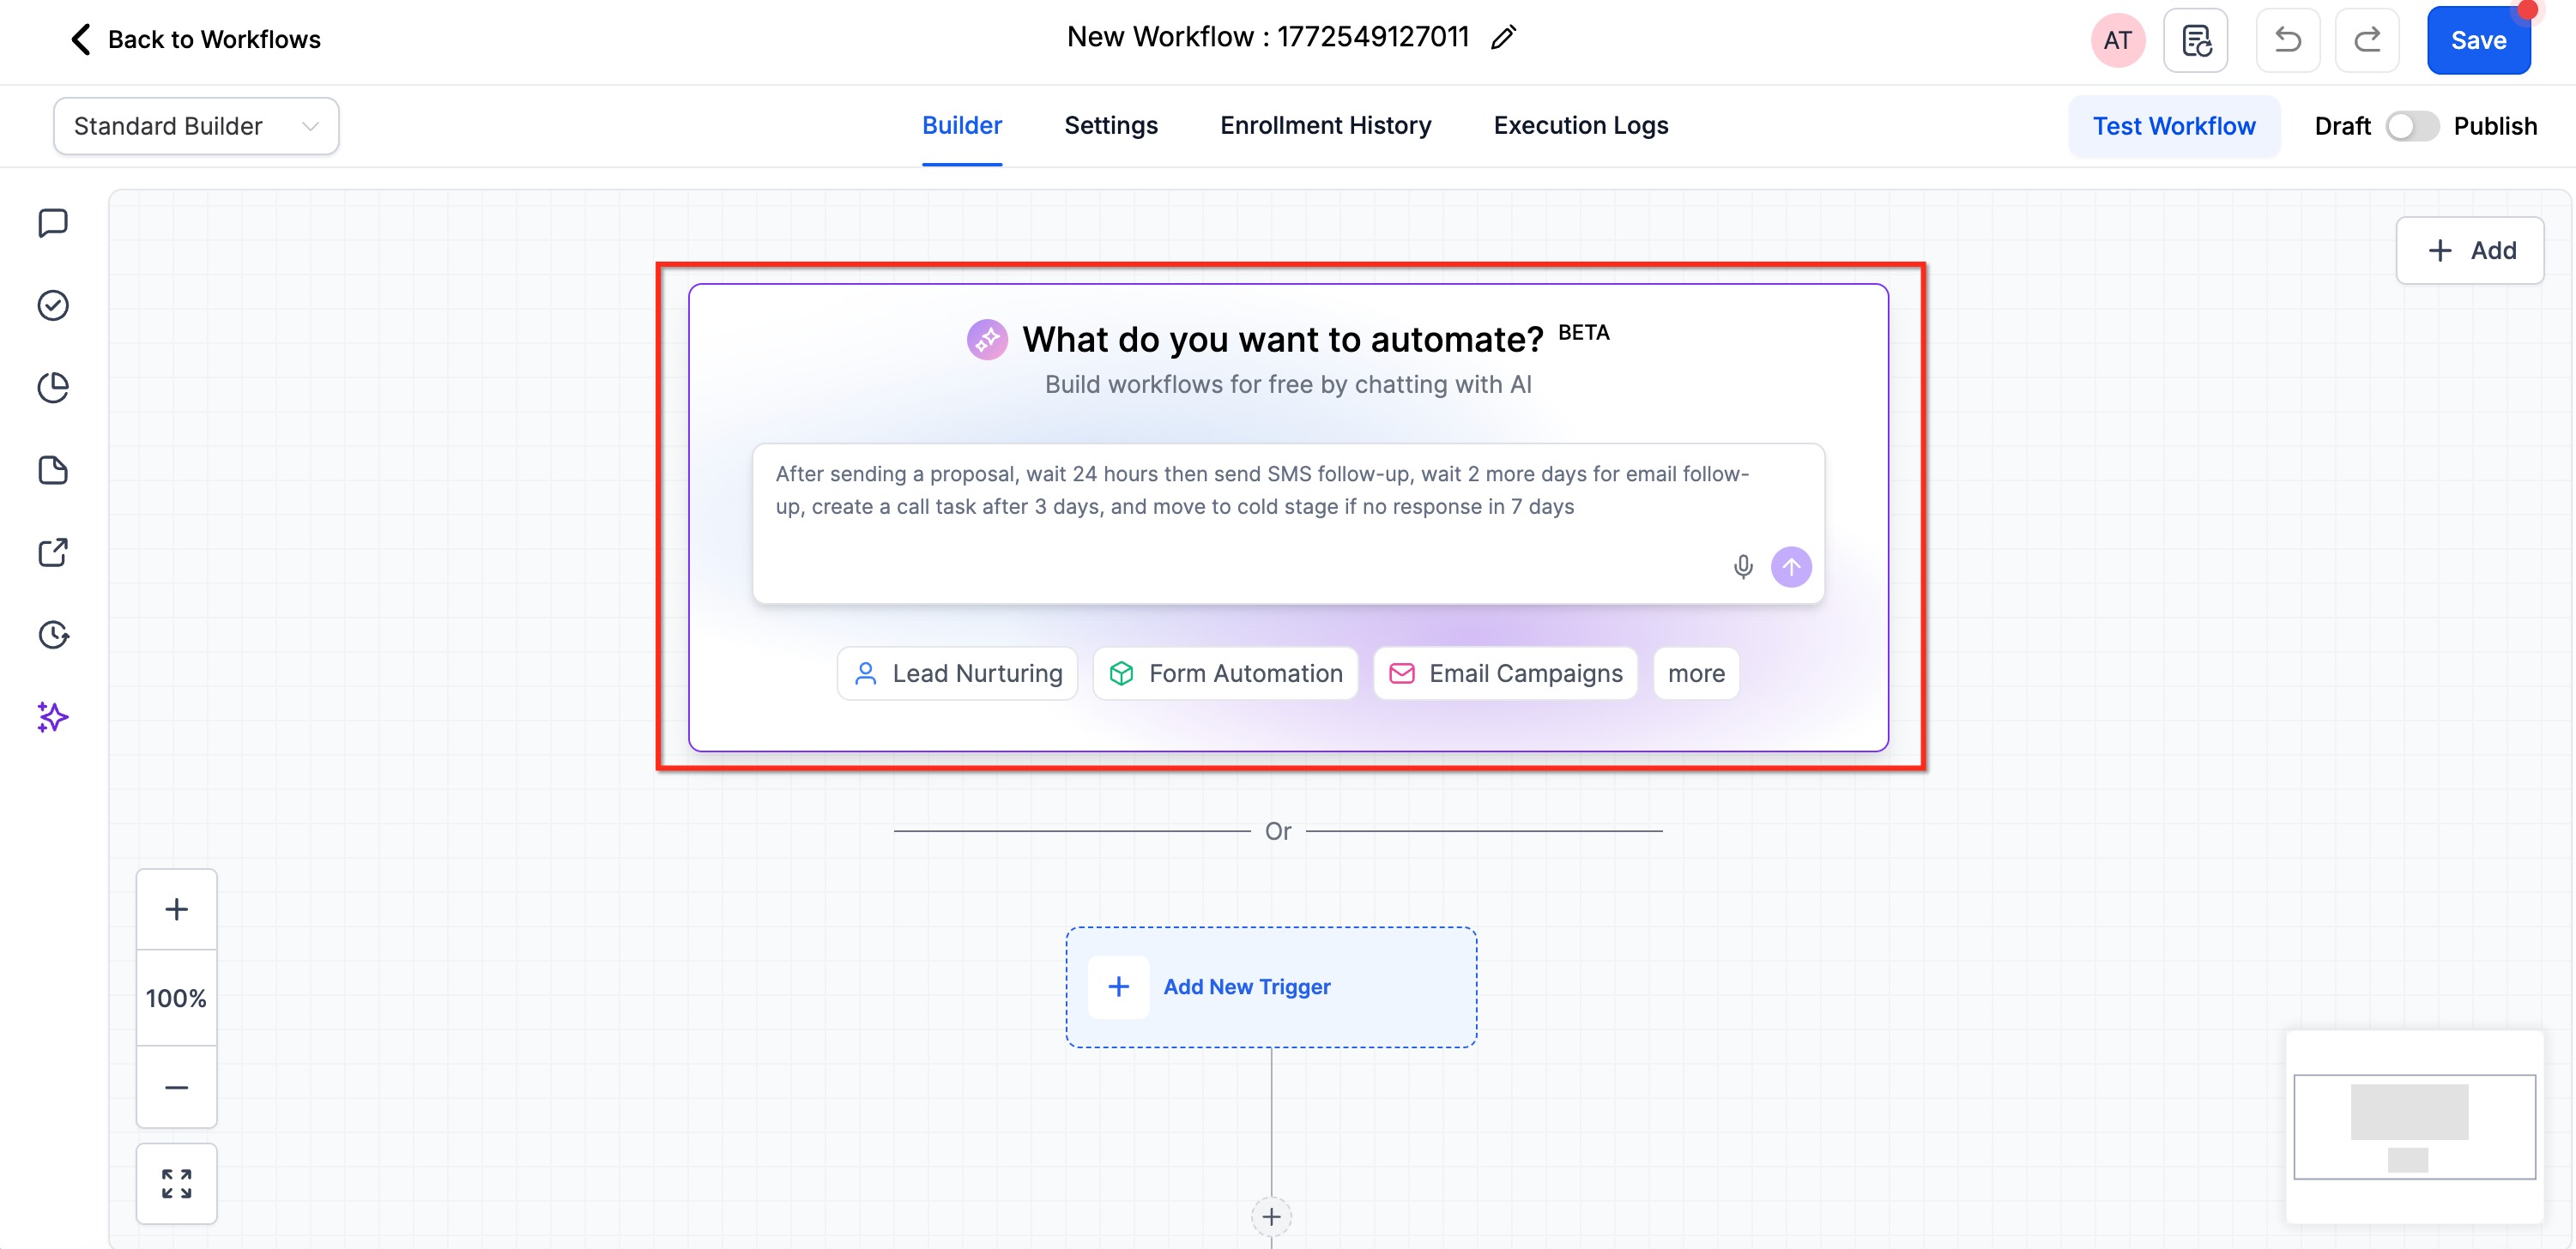
Step 2: From the Prompt Box Inside Workflow Builder
The prompt box lets you describe an automation while creating a workflow from scratch. You can enter instructions by typing or using voice dictation.
When creating a new workflow from scratch, you'll find an AI prompt box inside the Workflow Builder.
Enter your automation requirements in the prompt box or use voice dictation to describe the workflow.
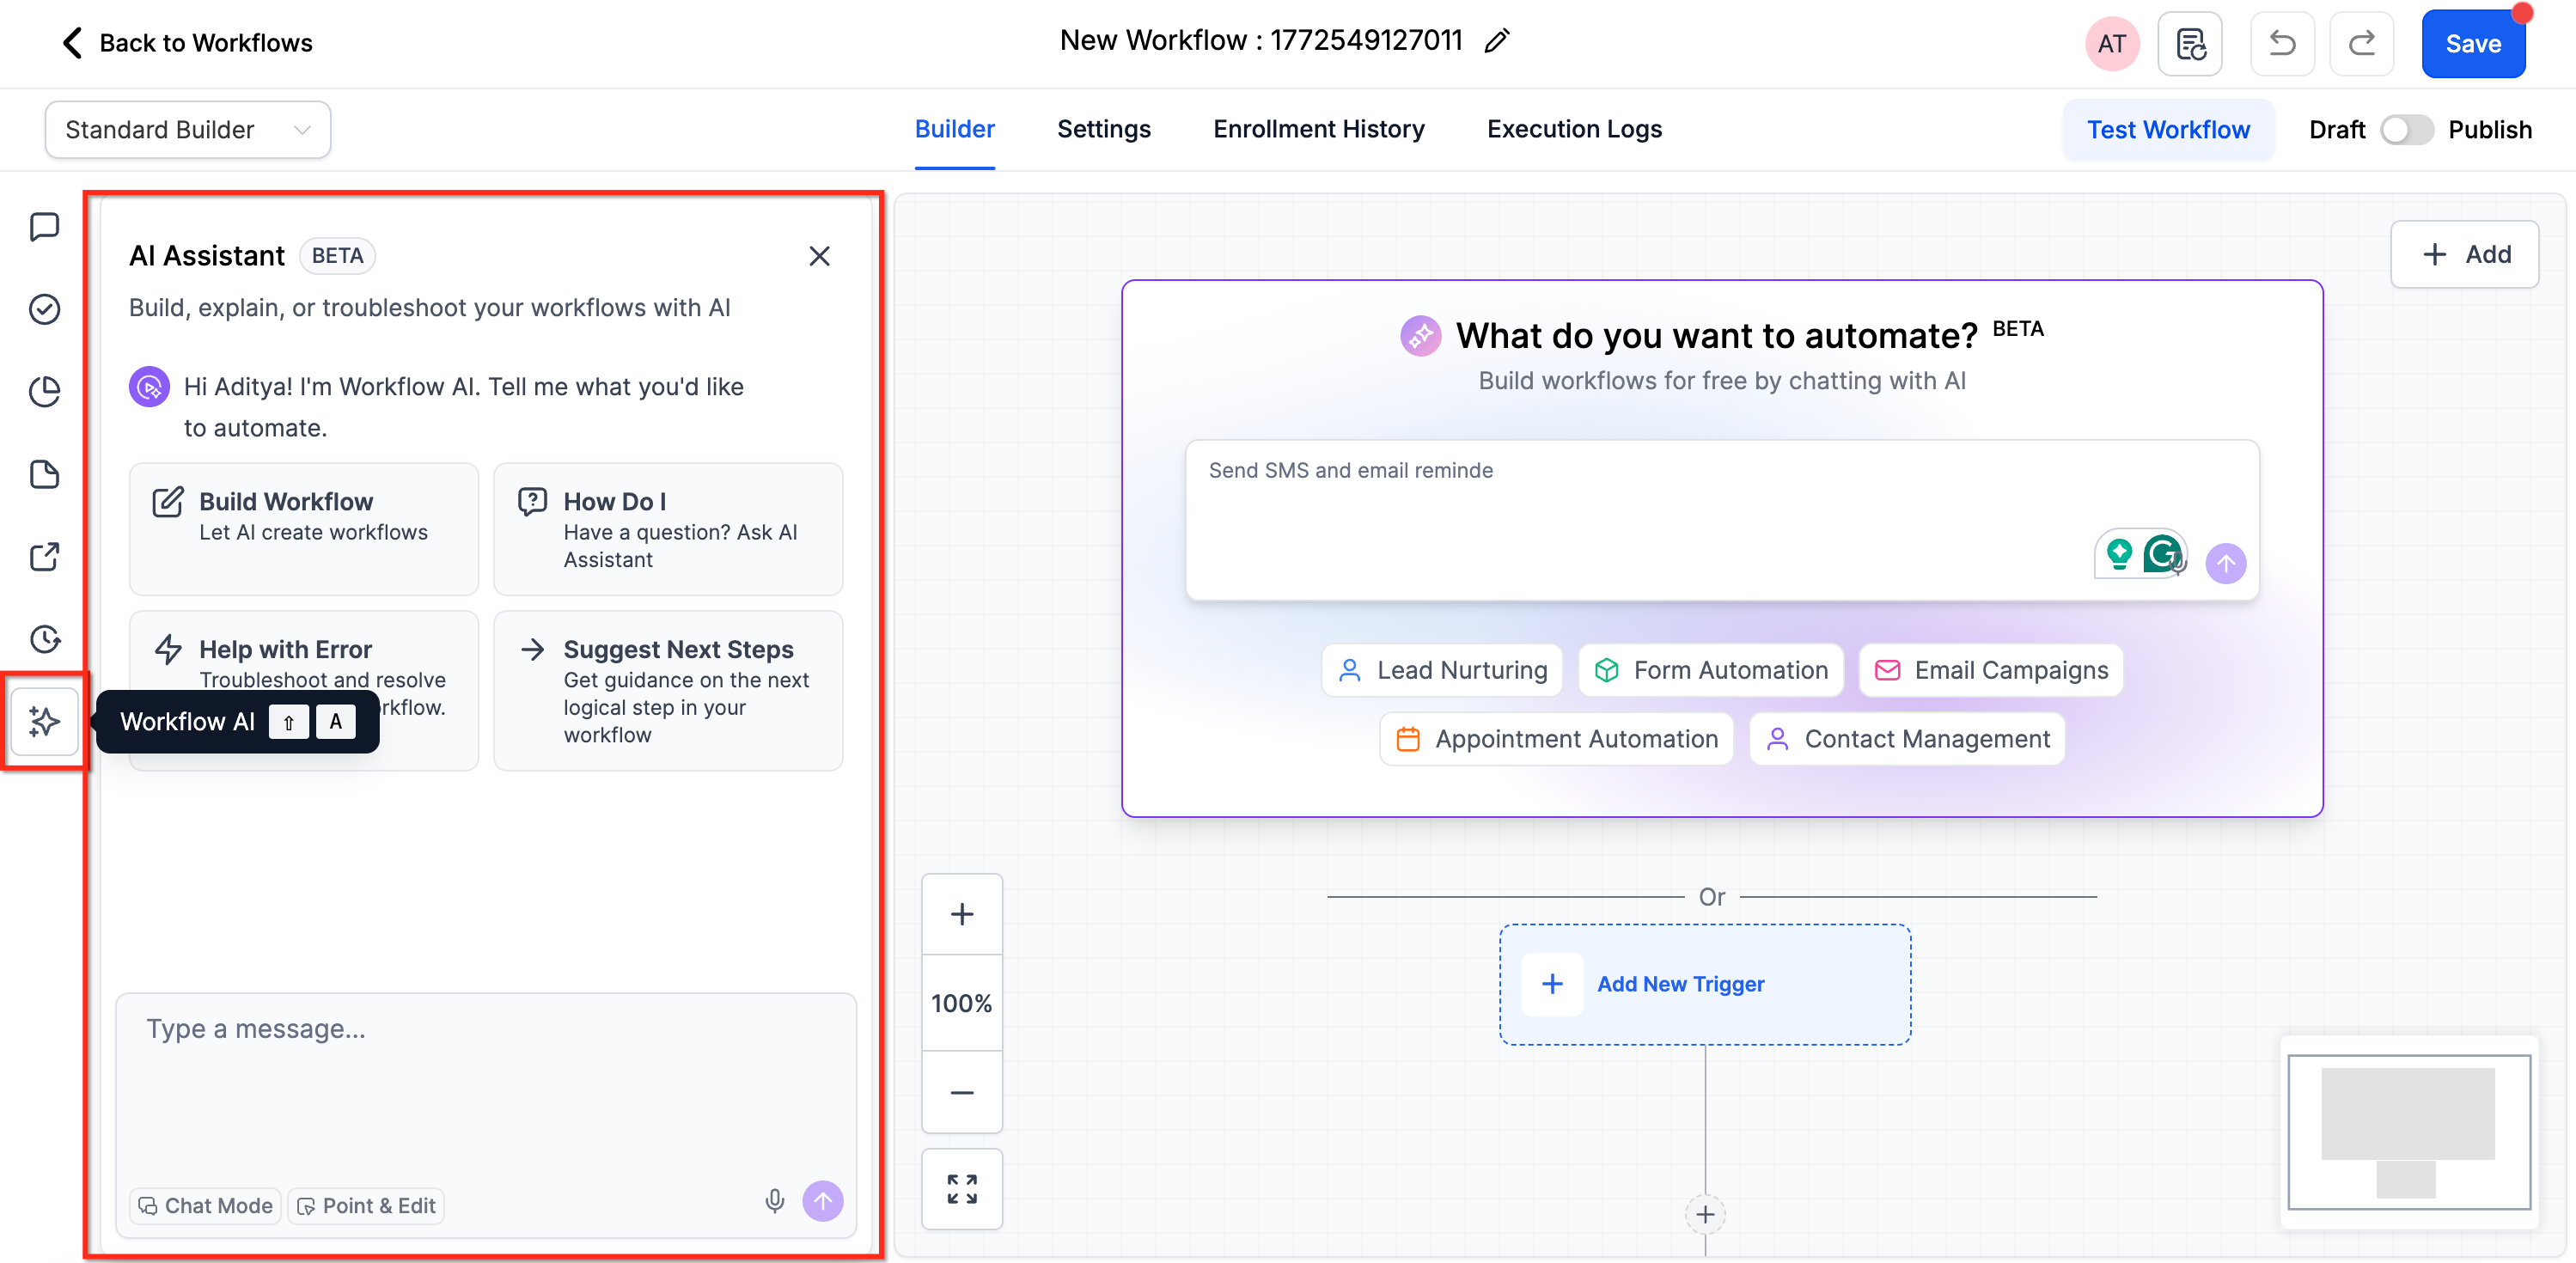
Step 3: Using the AI Chatbot Assistant
The chatbot assistant provides a conversational way to build and refine workflows while working on the canvas.
Inside the Workflow Builder, you can also use the AI chatbot assistant to help build and modify your workflow.
How to Build Your First AI Workflow
A structured process of prompting, generating, reviewing, and refining helps ensure your AI-generated workflow matches your automation goals. You can begin with your own prompt or choose an existing prompt template.
Step 1: Enter Your Prompt
A detailed prompt gives AI Builder the information it needs to create the right workflow structure, triggers, and actions.
Enter your prompt using any of the entry points described above, or ask the AI chatbot to help you create a workflow.
You have two options to get started.
Option 1: Write or dictate your own custom prompt
Describe your automation needs in your own words.
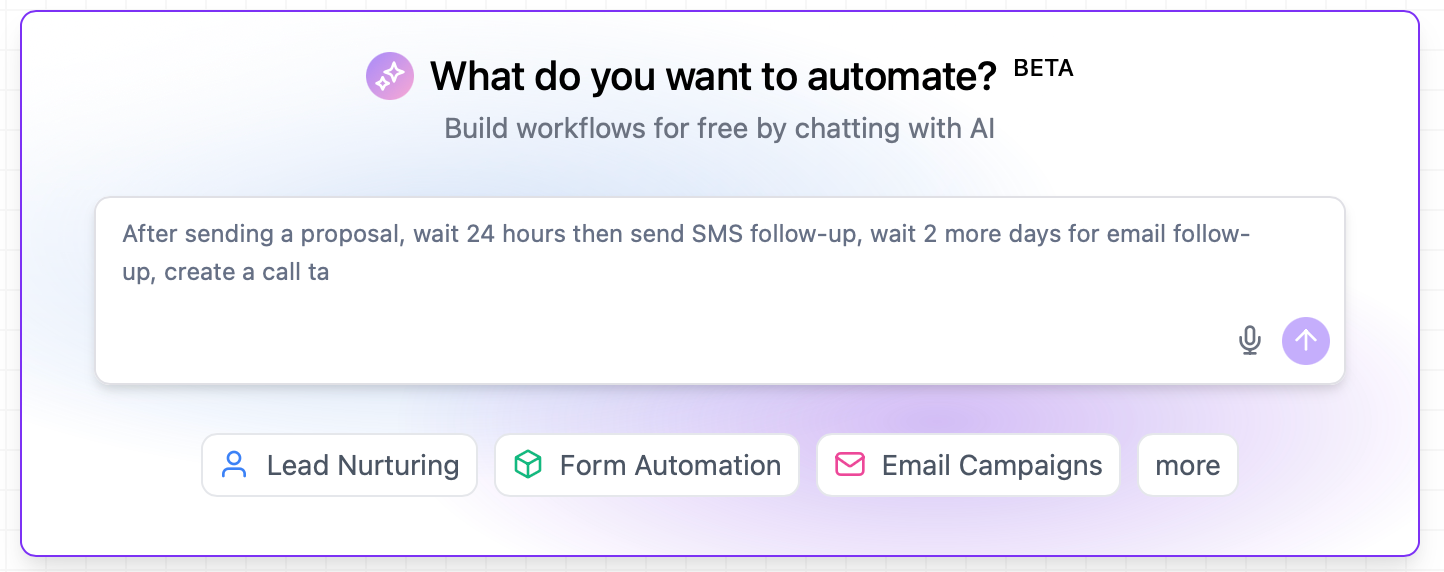
Option 2: Use the provided templates
Select from the prewritten prompt templates available in the interface.
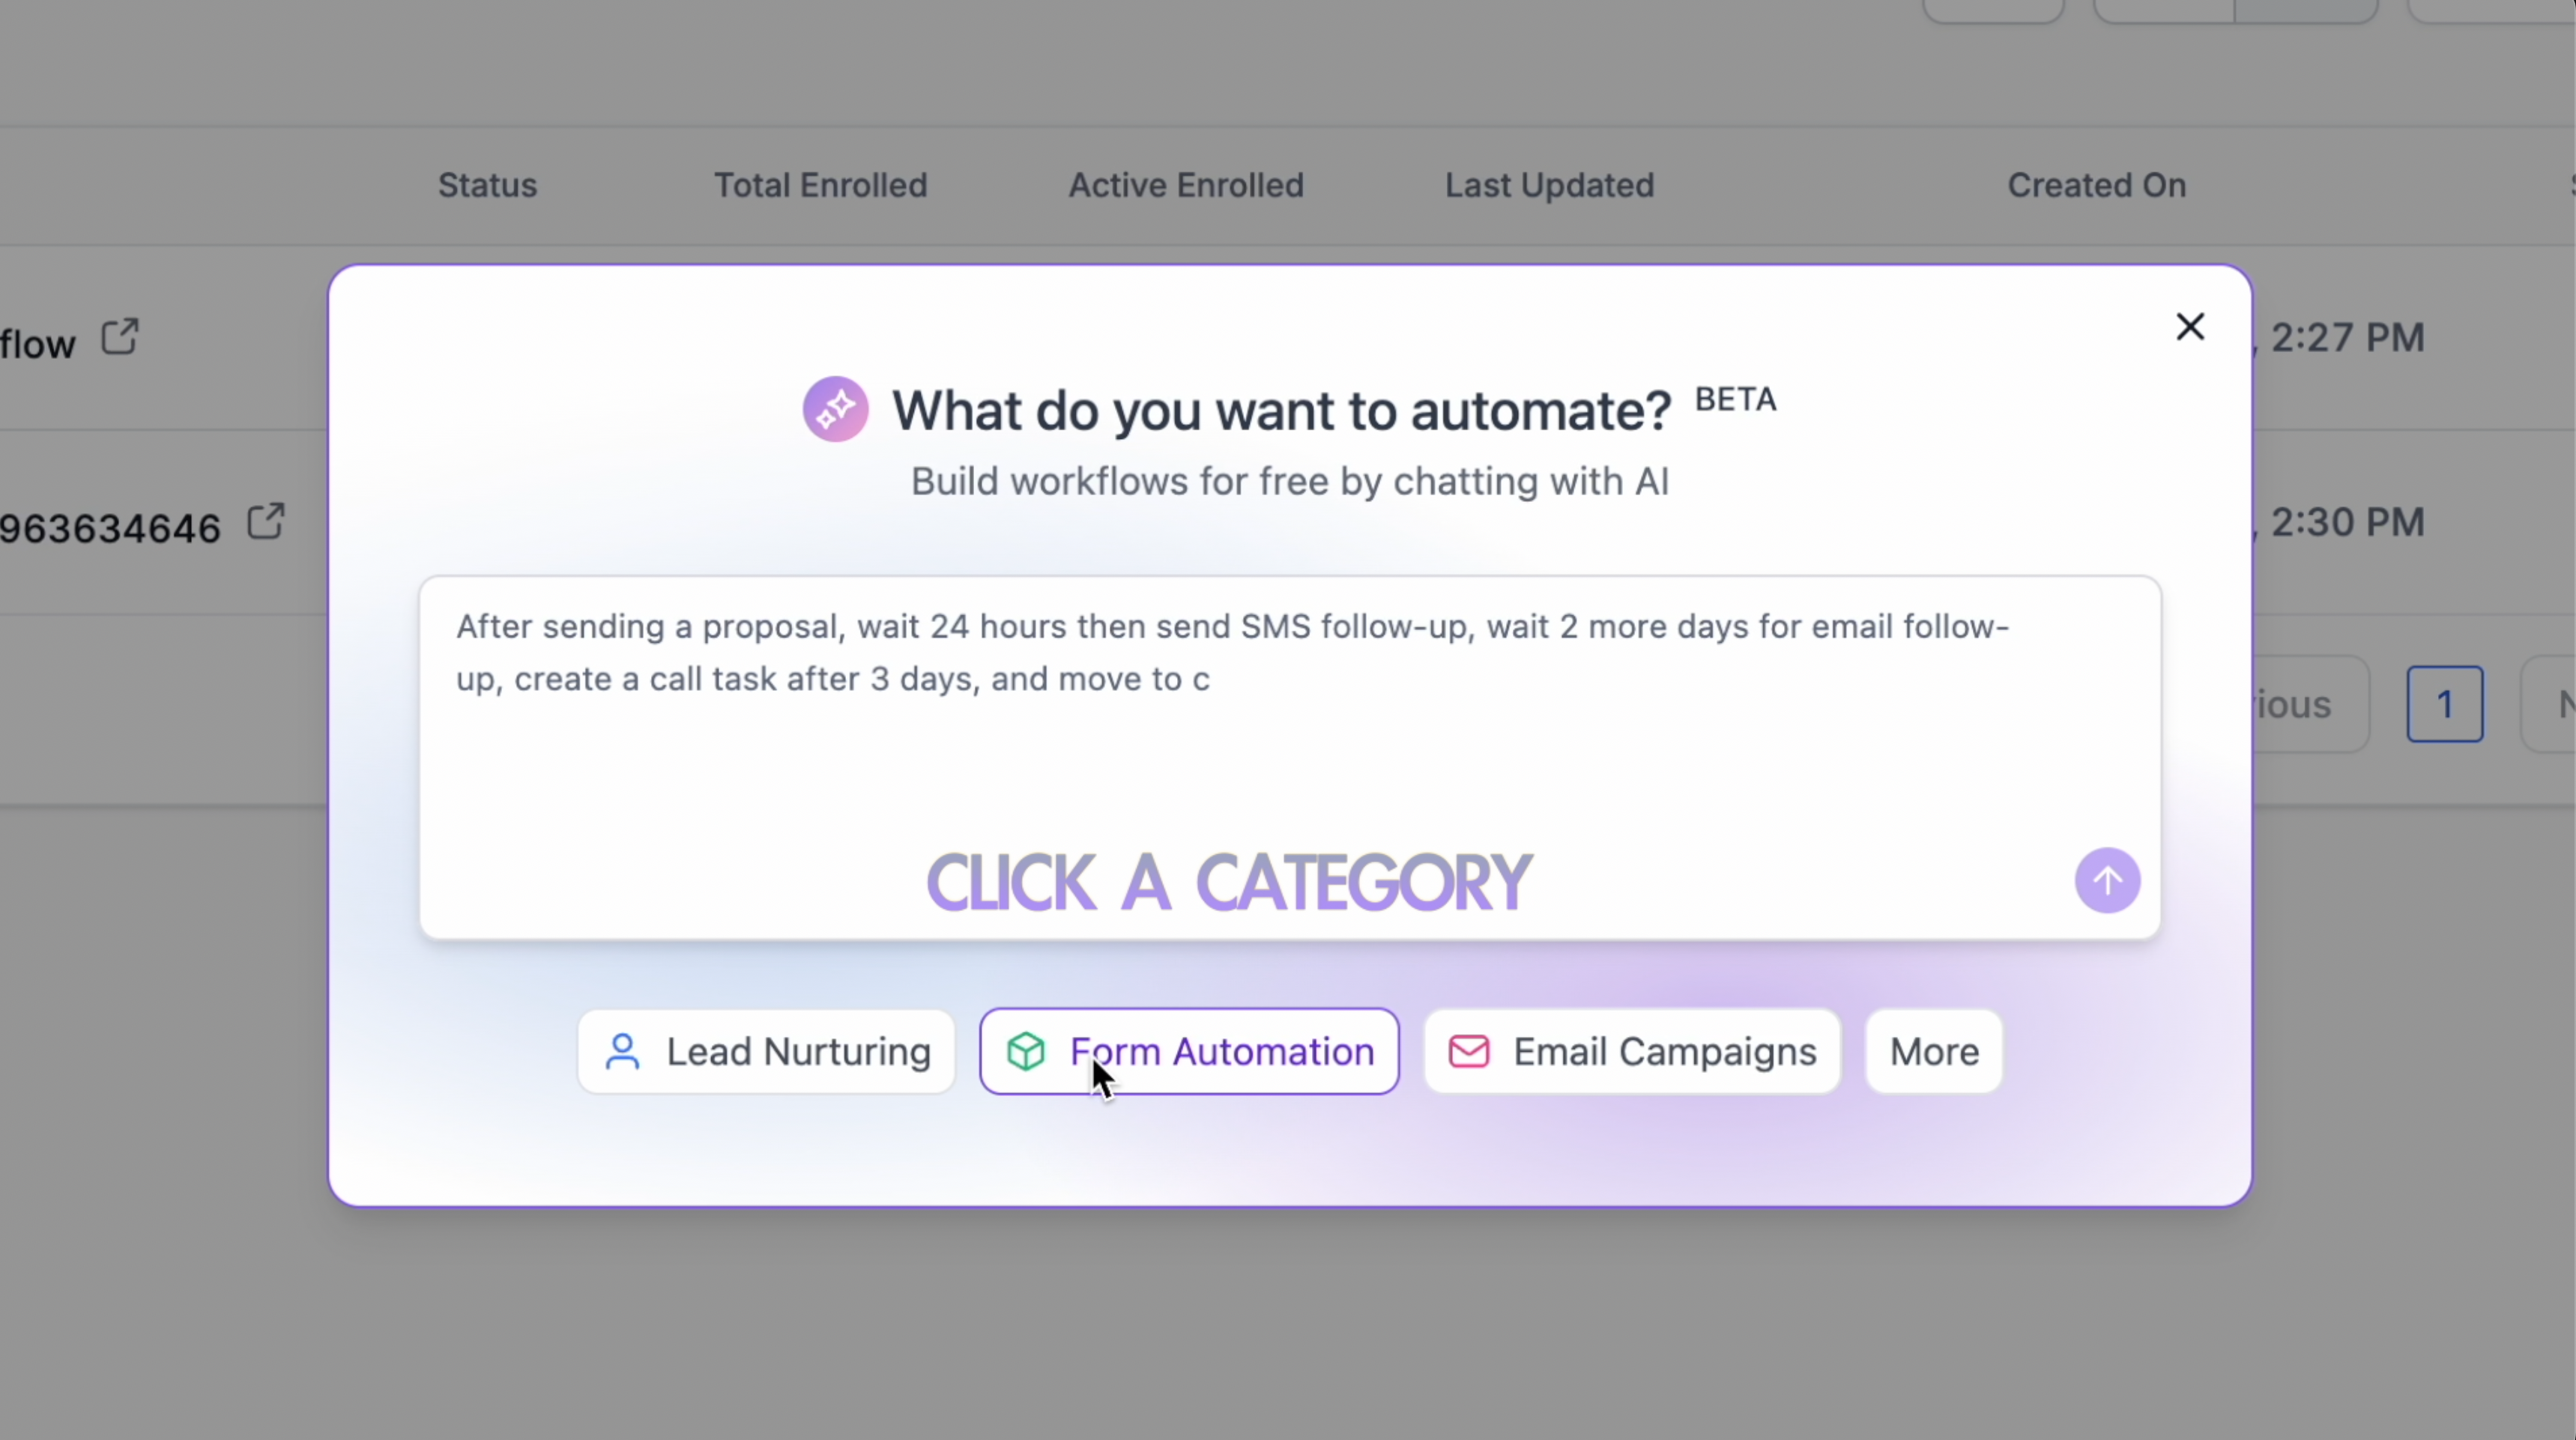
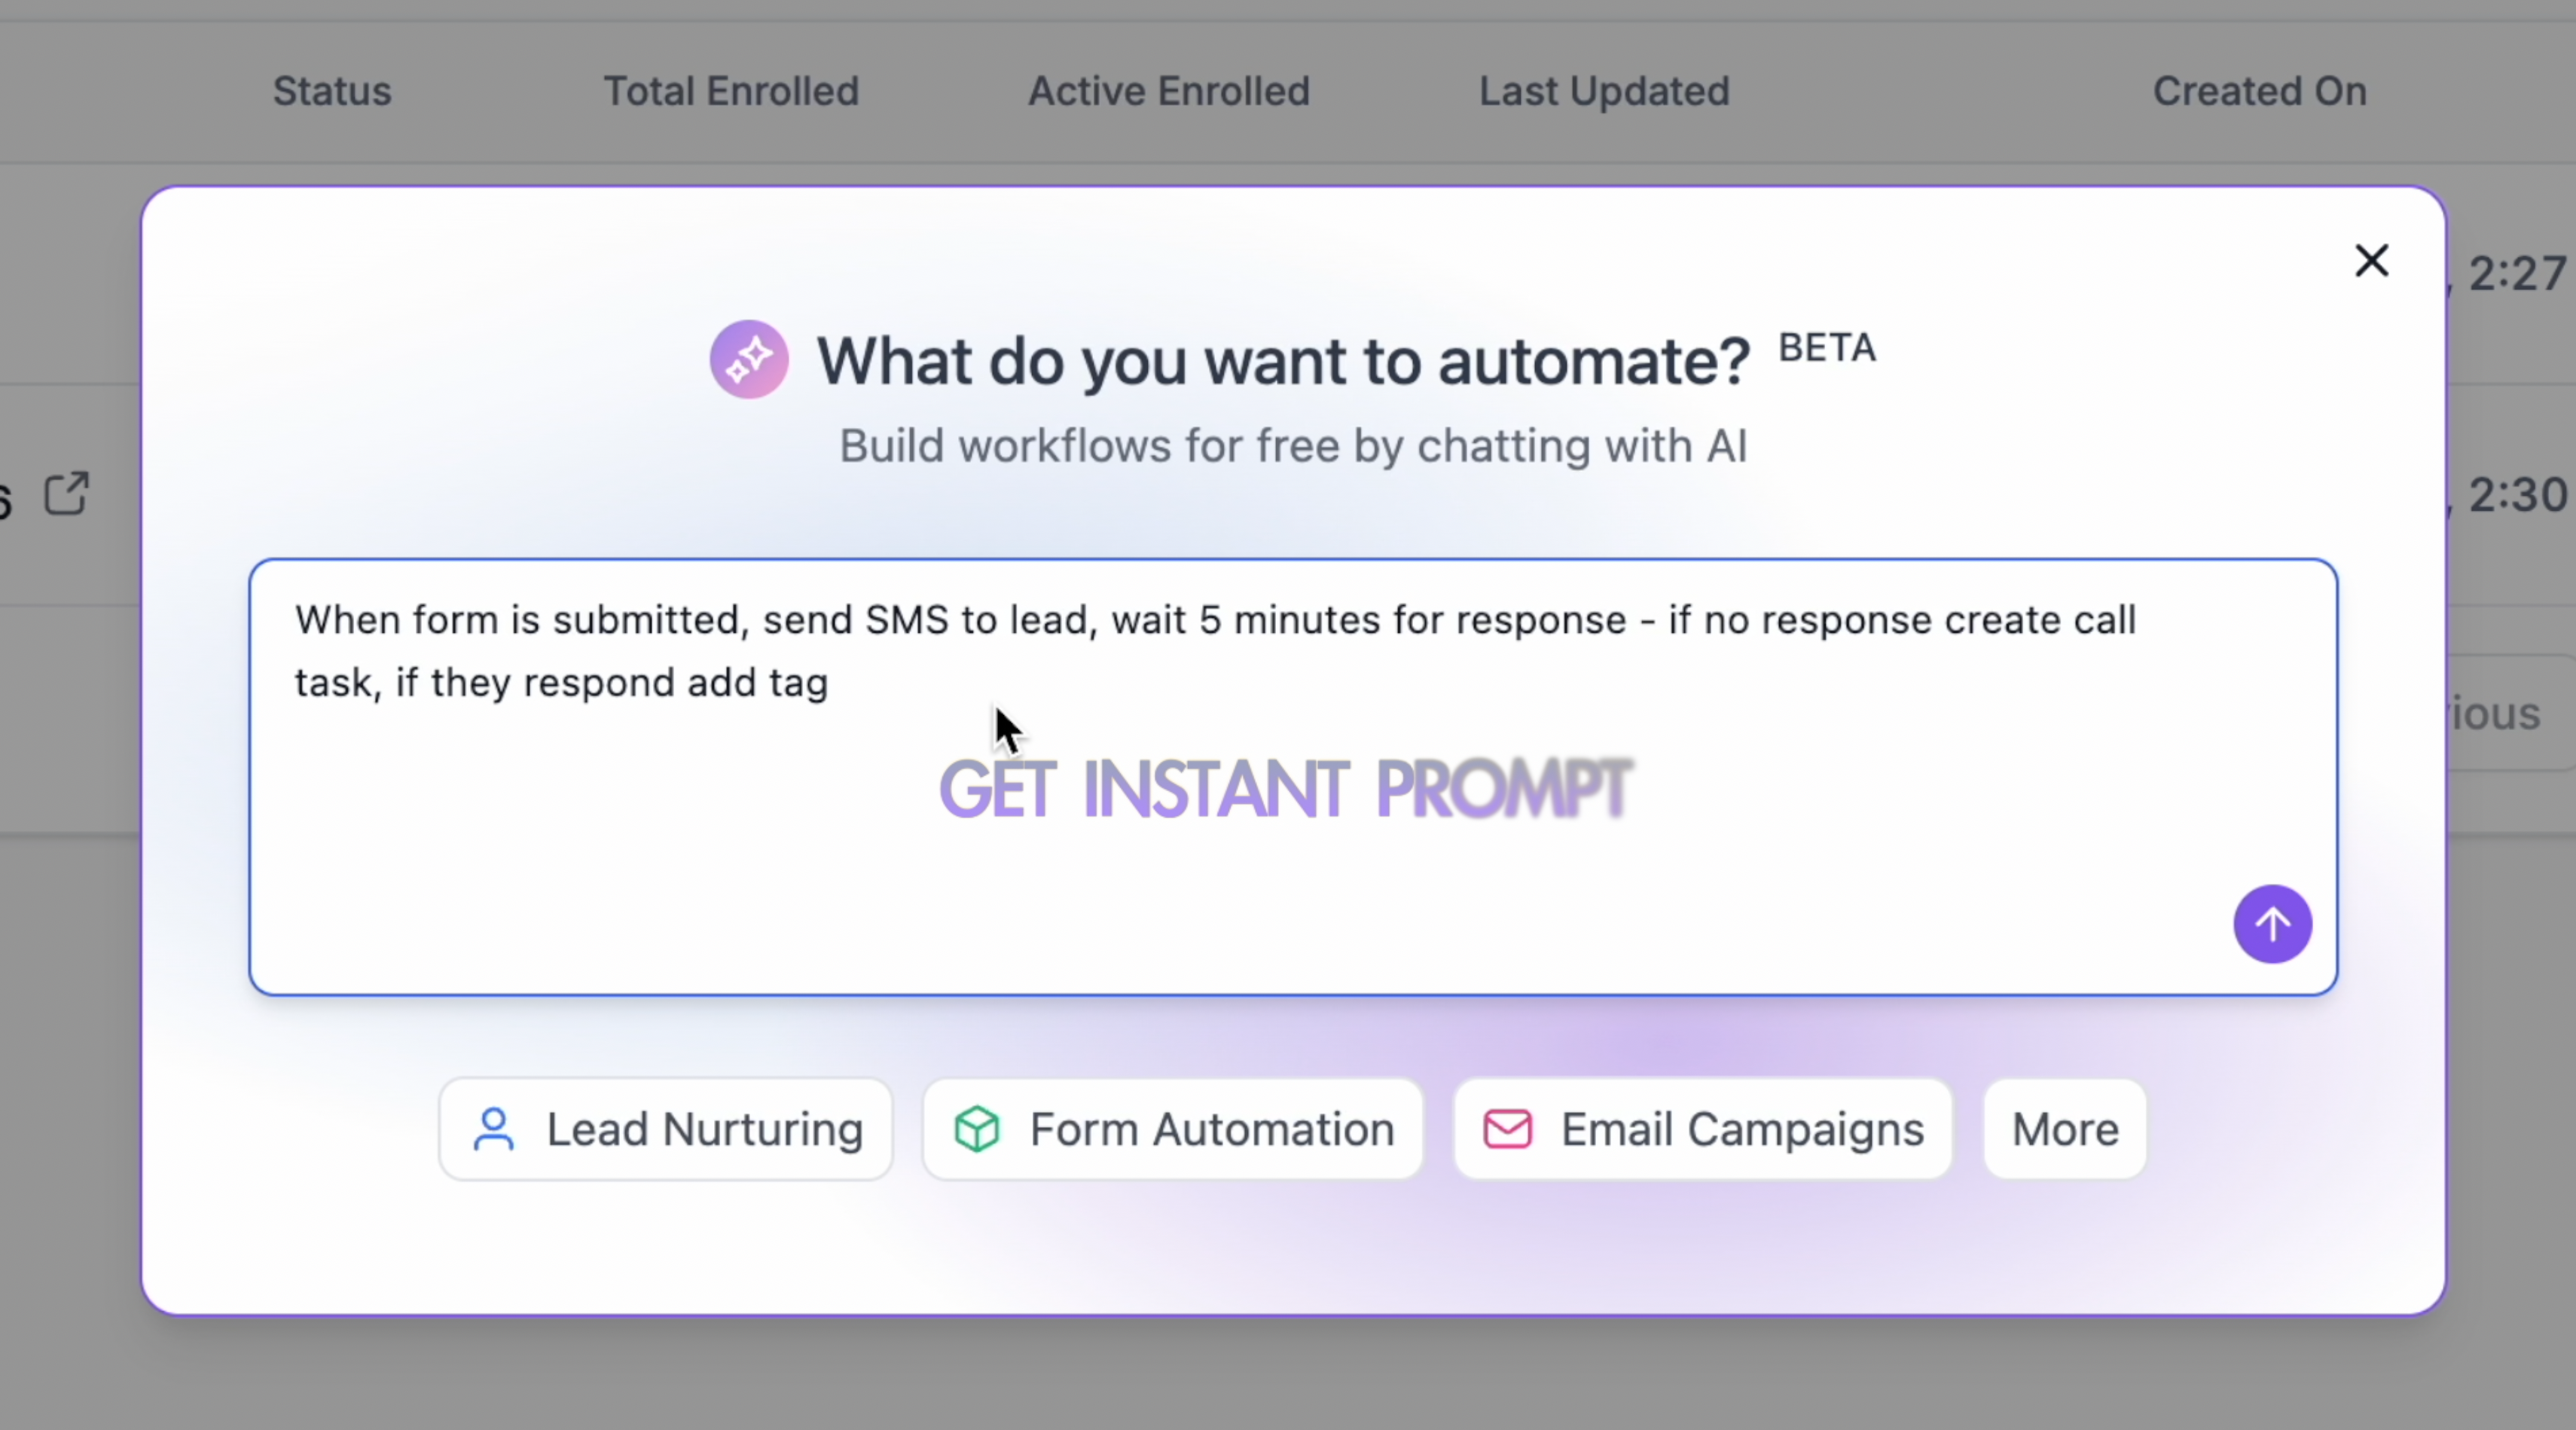
Example prompts you can use:
- "Send a welcome email series when someone fills out my contact form."
- "Create a birthday reminder workflow that sends SMS greetings."
- "Notify my team on Slack when a high-value opportunity is created."
- "Follow up with webinar attendees 24 hours after the event."
- "When the Video Production Request form is submitted, create an opportunity in the Marketing pipeline at the New Lead stage and send the Welcome Email snippet."
Optional details to include:
- The workflow name.
- Any workflow settings you want applied.
- The tools or apps to use, such as "create a task in ClickUp."
- How steps should use data from earlier actions, such as "use the GPT output in the email body."
- The exact names of existing records, including forms, pipelines, stages, email snippets, tags, users, workflows, and custom fields.
Workflow settings you can manage with AI
In your prompt, you can ask AI Builder to view, enable, disable, or update common workflow settings, including:
- Allow Re-entry
- Allow multiple Opportunities
- Stop on Response
- Timezone and Time Window (business hours)
- Sender Details (From Name, From Email, From Number)
- Conversations – Mark as Read
- Workflow name, including renaming during generation or renaming an existing workflow
Example prompt:
Rename this to Appointment Follow Up v2, update the sender email to support@mybusiness.com, restrict messages to Monday–Friday 9 AM–6 PM, and confirm re-entry is off.
Step 2: Generate the Workflow
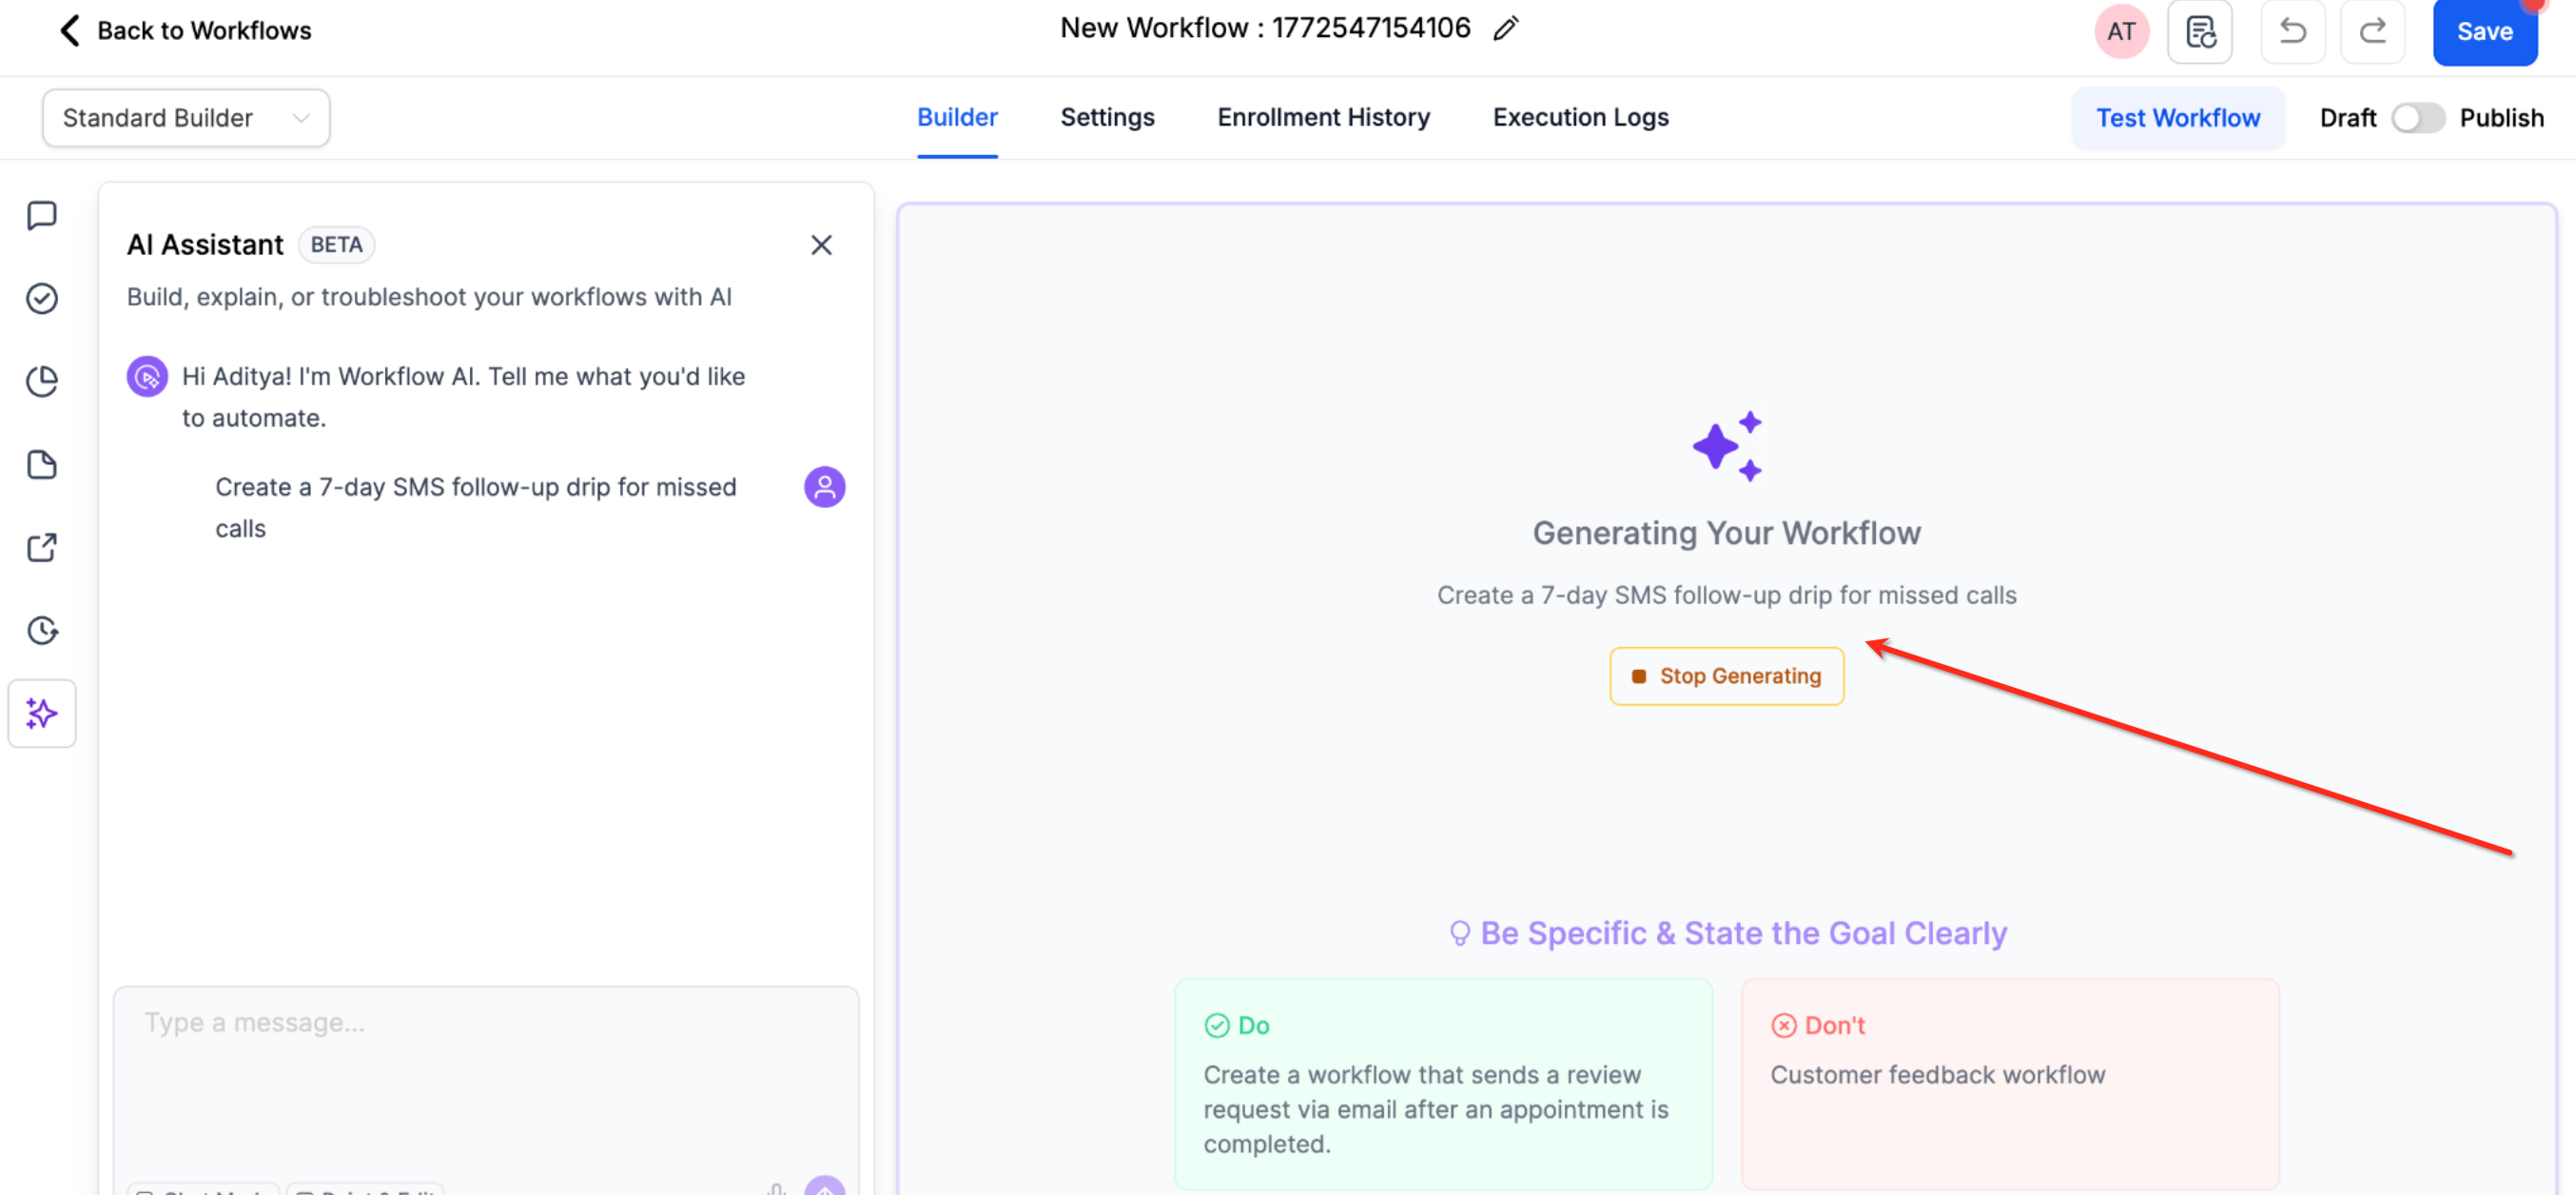
Generating the workflow turns your instructions into a structured automation and displays progress while the requested steps are created.
- Click Build Workflow or Send, depending on your entry point.
- Wait while AI processes your request and builds the workflow.
- Review the live progress cards showing the steps being generated or updated.
Step 3: Review and Customize
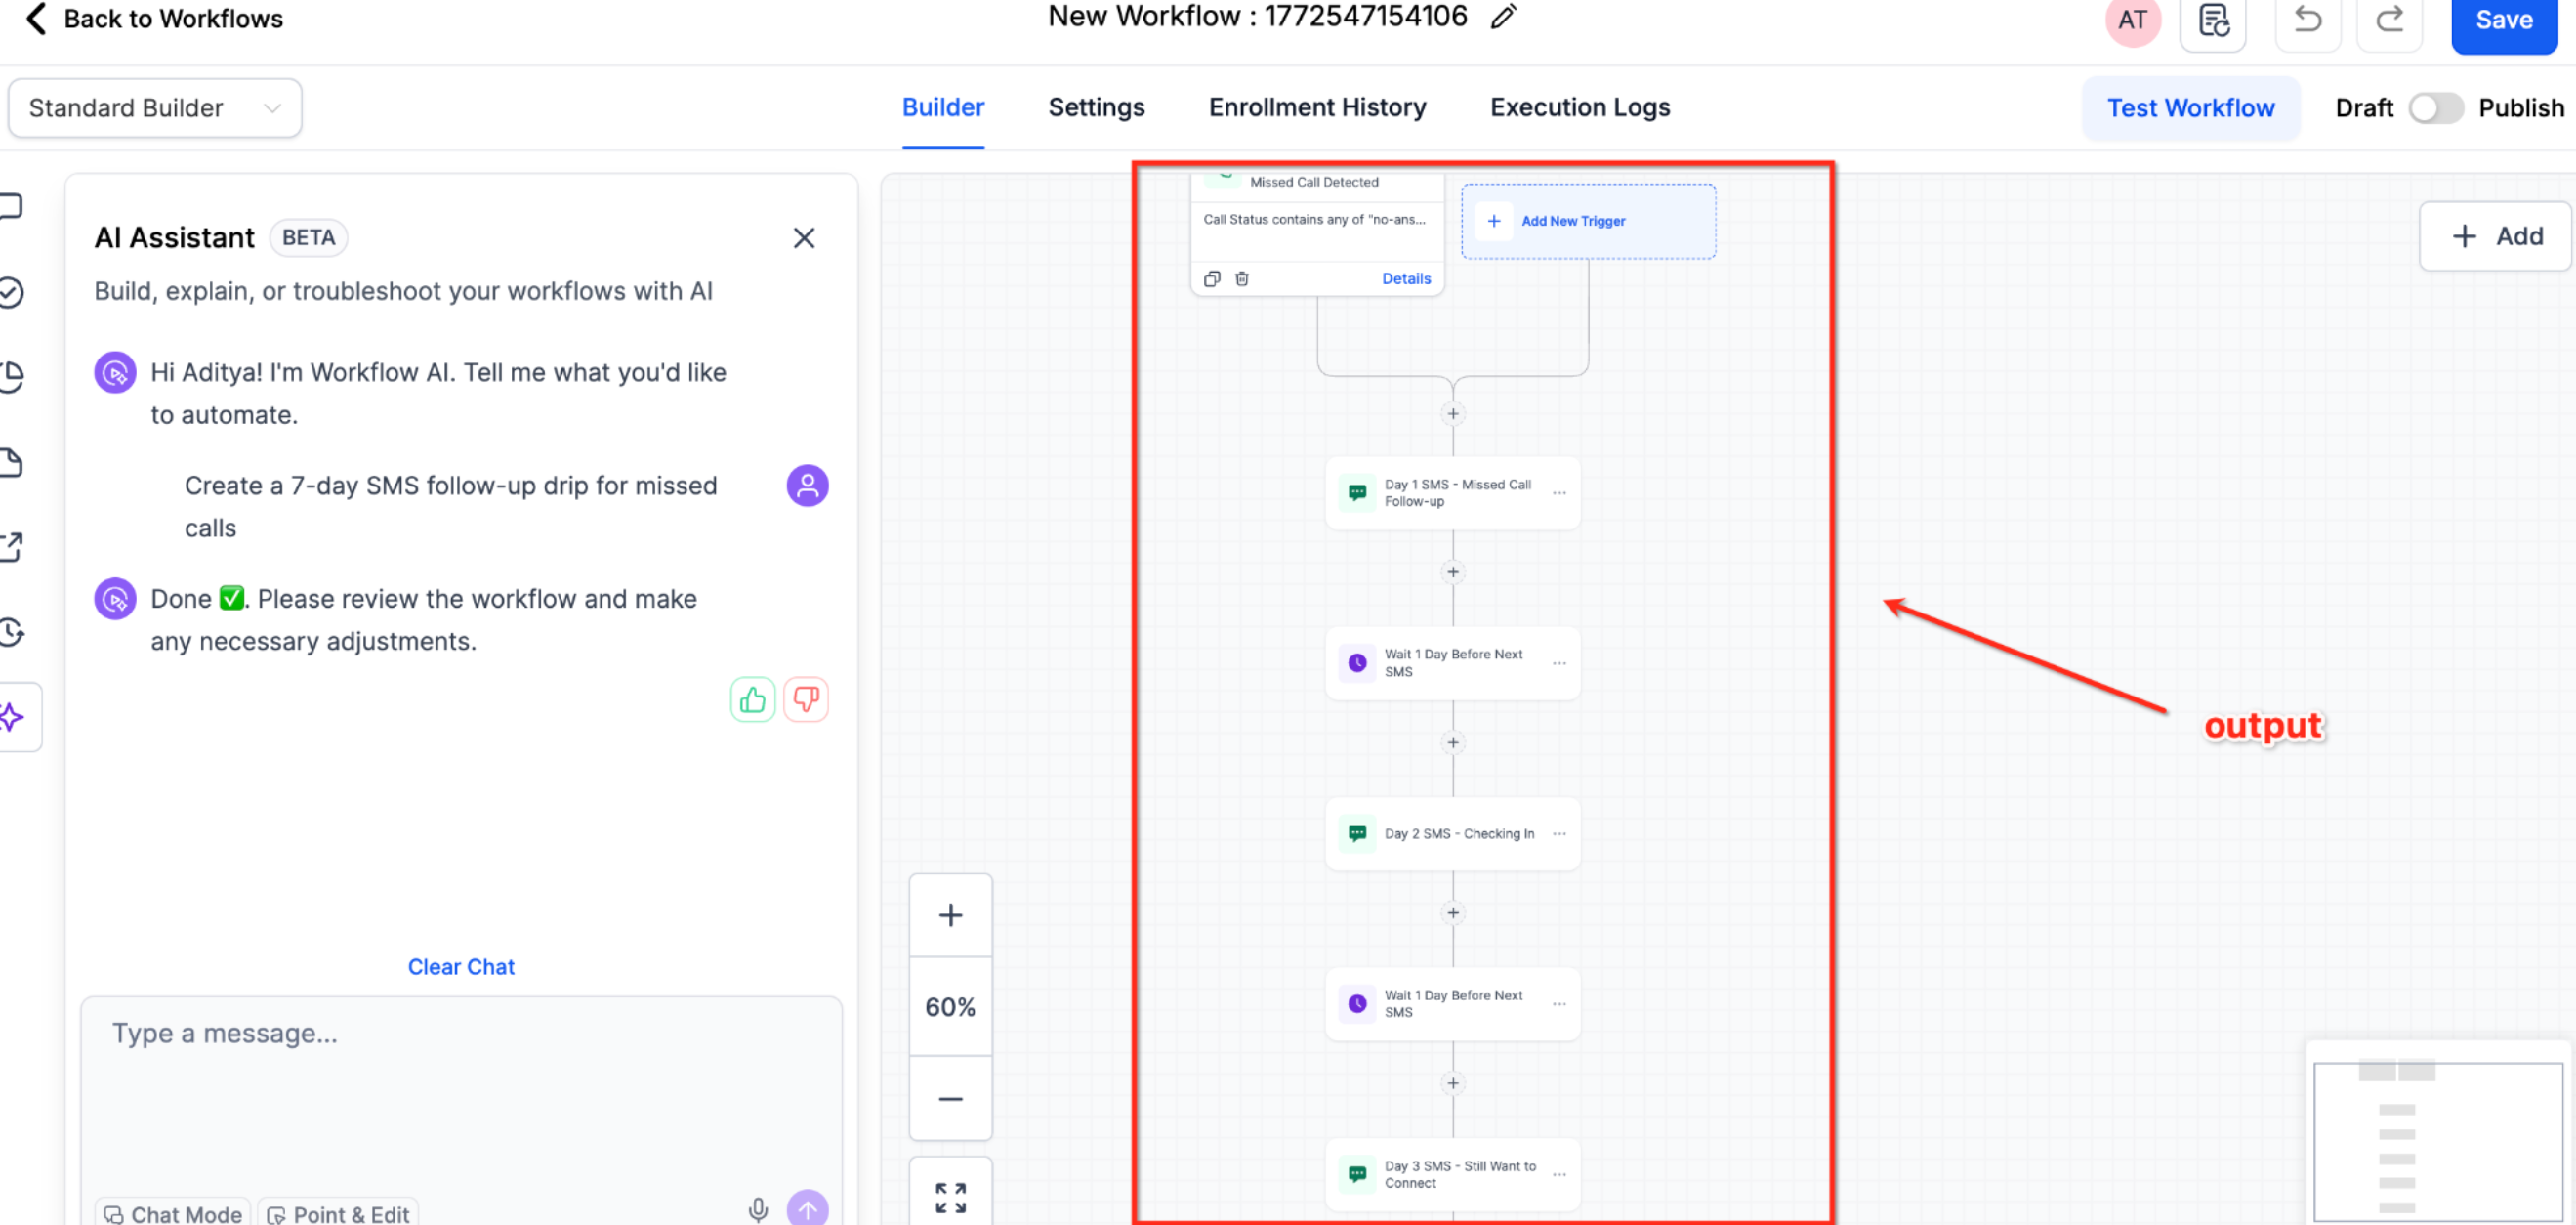
Reviewing the generated workflow helps you confirm that AI Builder selected the intended triggers, actions, records, and configuration values.
When AI completes the workflow, it provides a summary of the generated automation.
- If you used the Workflow List Page entry point, you'll be taken to the Workflow Builder.
- If you used the prompt box or chatbot inside the builder, the workflow is generated in your current builder view.
After generation:
- Review the overall workflow structure.
- Check each trigger configuration.
- Verify the action settings and parameters.
- Confirm that each step uses the correct forms, pipelines, snippets, users, and fields you named.
Step 4: Edit Using AI
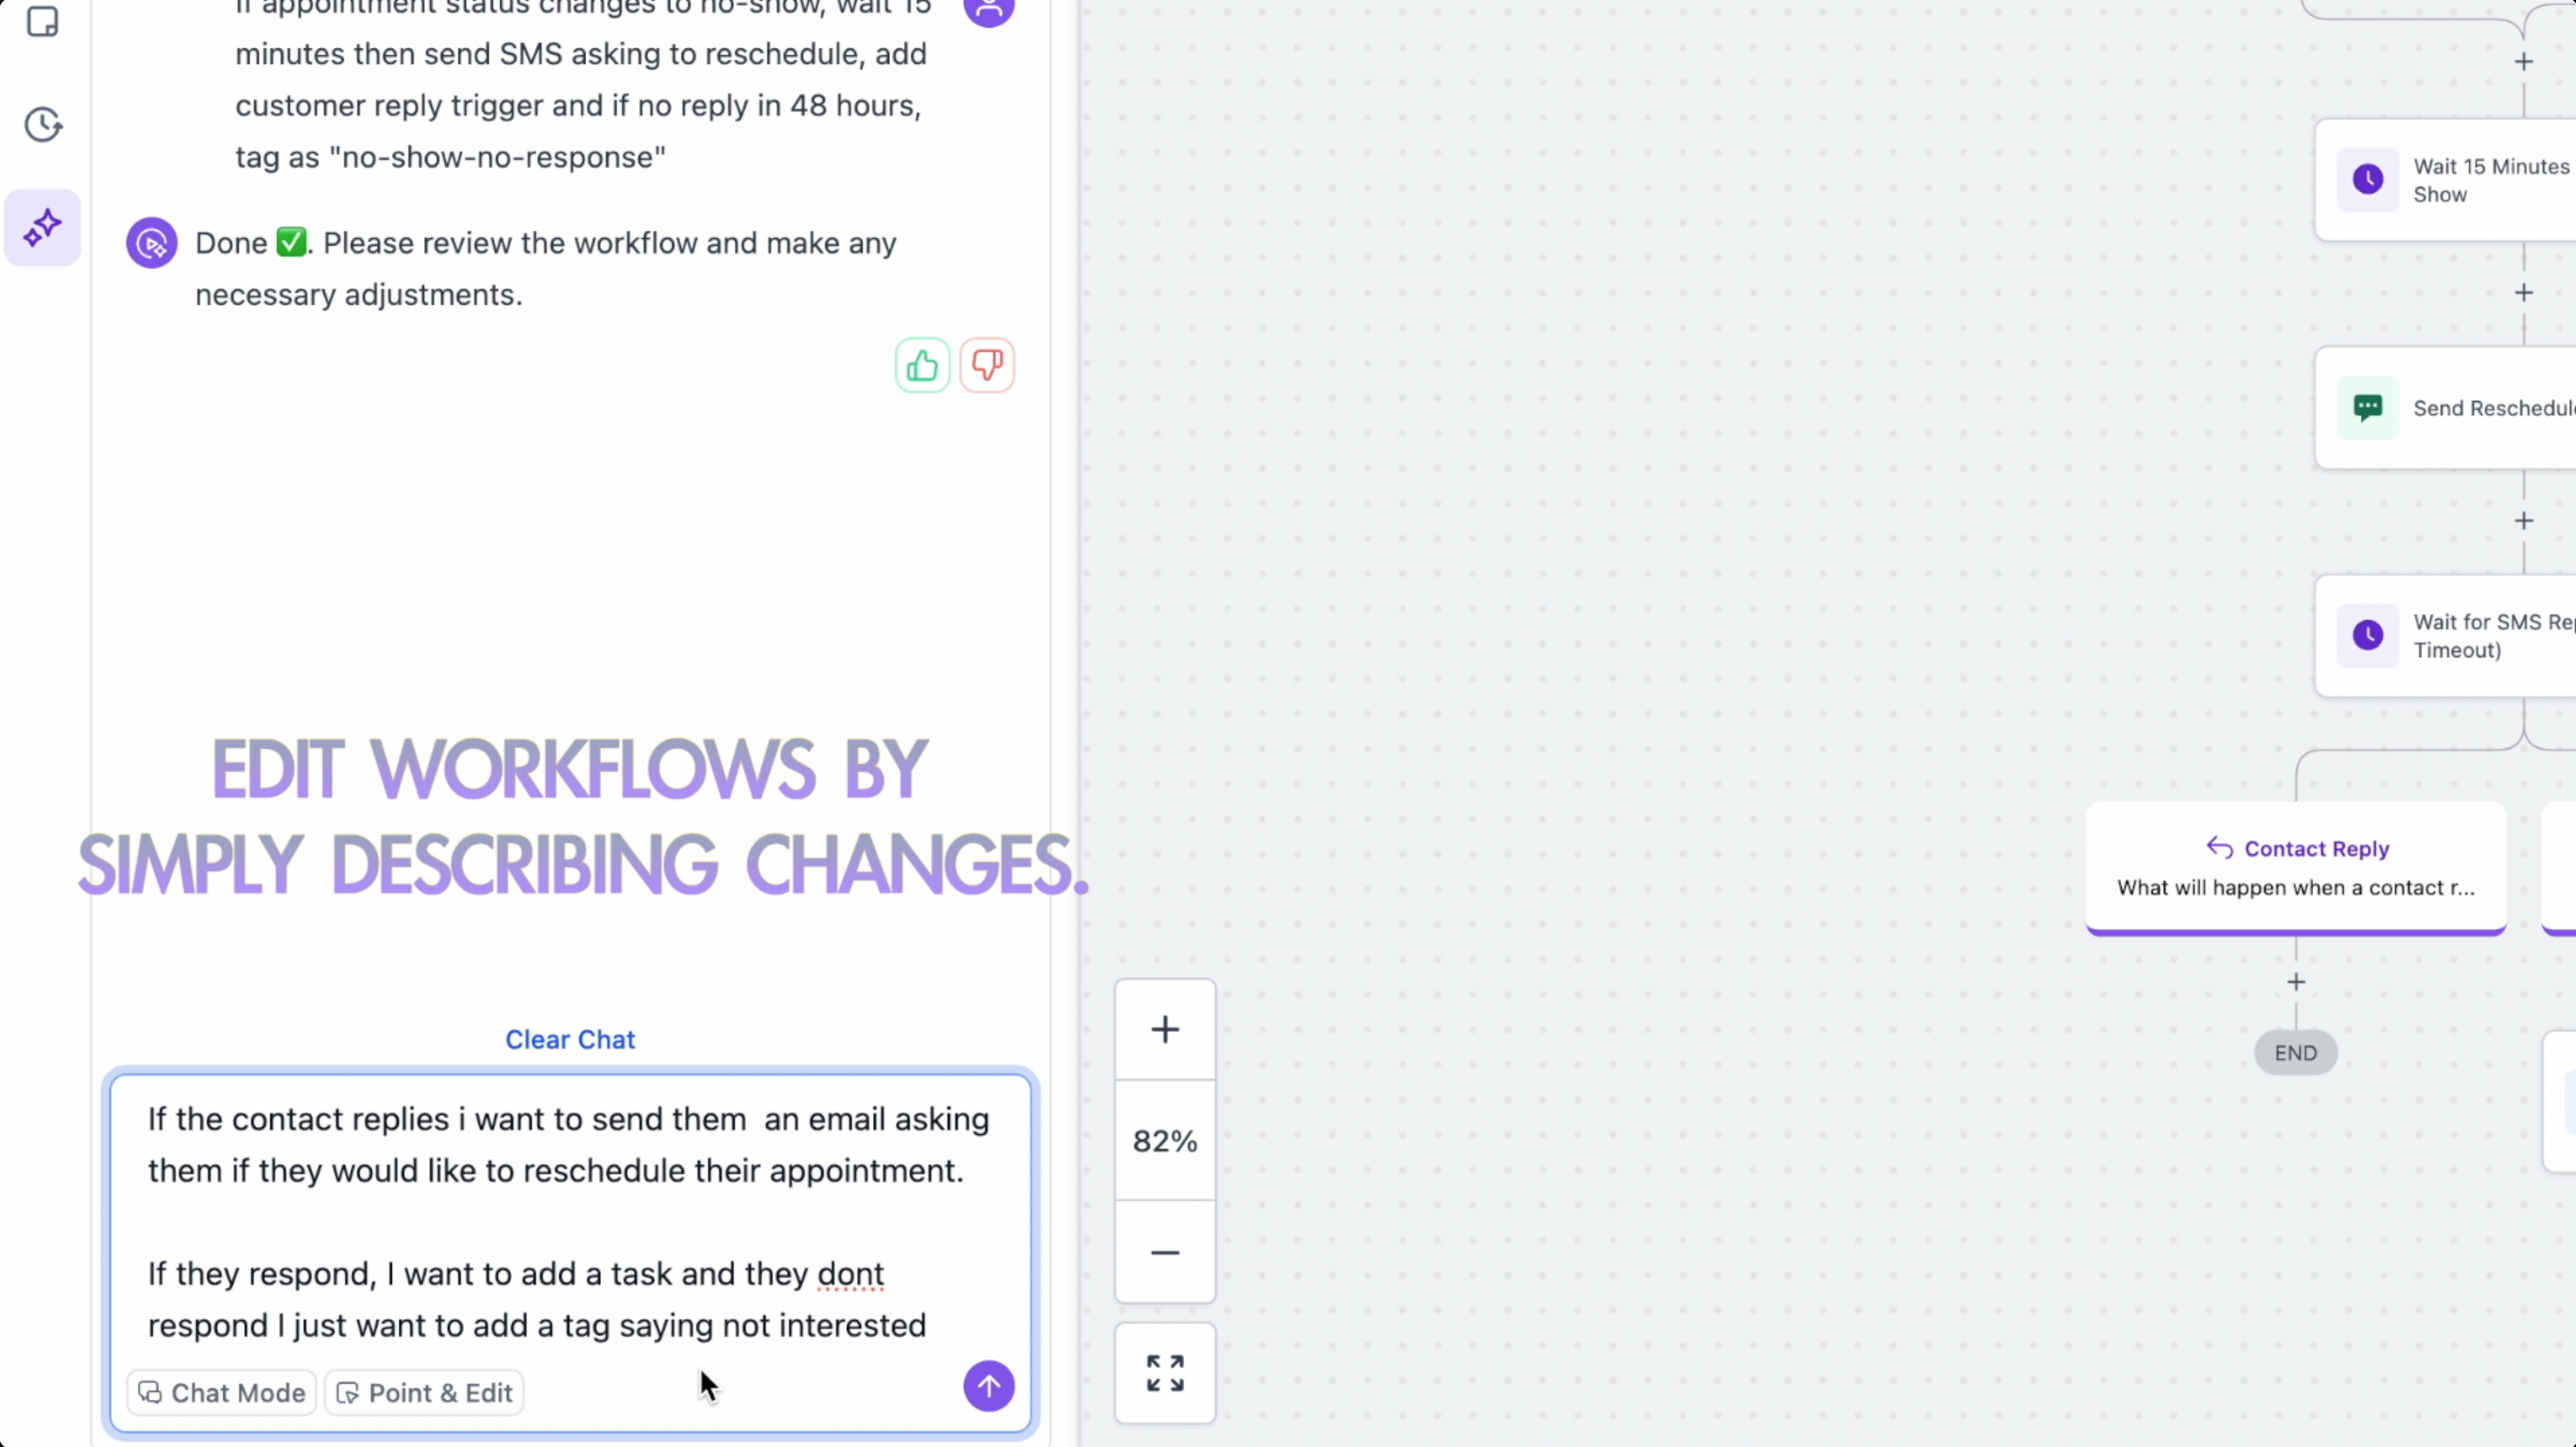
Conversational editing lets you refine an existing workflow without manually rebuilding its steps. You can describe exactly what should change and which actions or triggers should be affected.
After reviewing the generated workflow, refine it with natural-language instructions in the AI chatbot.
Describe the change and define its scope. Specify whether the change applies to all matching steps, a set number of steps, or specific actions and triggers.
Workflow AI Builder updates the targeted scope and leaves untargeted steps unchanged.
You can also edit complex actions such as If/Else and Wait conversationally. This includes changing conditions, adding or removing branches, modifying wait settings, and refining existing workflow logic.
Additional supported edits include:
- Renaming the workflow.
- Checking, enabling, or disabling workflow settings such as re-entry, multiple opportunities, stop on response, time windows, sender details, and marking conversations as read.
- Updating later actions to reference outputs from earlier workflow steps.
Undo and Redo AI-Generated Changes
Undo and redo let you return to earlier AI-generated workflow states during your current editing session.
- Press Ctrl+Z on Windows or Cmd+Z on Mac to undo the last AI-generated change.
- Press Ctrl+Y on Windows or Cmd+Y on Mac to redo the AI-generated change you just undid.
Undo and redo work with AI-generated changes such as adding actions, editing steps, or restructuring workflows.
Previous AI-generated versions remain available in the undo history for the current session.
You can also use Recent Changes inside the Workflow Builder to review recent edits.
Configure Steps with Your Account Data
Workflow AI Builder finds existing records named in your prompt and configures matching triggers and actions as it builds. It reuses existing tags, workflows, and snippets instead of creating duplicates. Use exact record names as they appear in your account to improve matching accuracy.
You can name the following records in your prompt.
| Category | Records You Can Name in a Prompt |
|---|---|
| Workflows and automation | Workflows, campaigns |
| CRM and account | Users, teams, tags, trigger links, countries, phone numbers, number pools |
| Opportunities | Pipelines, pipeline stages, opportunity custom fields |
| Calendars | Calendars, calendar services, calendar service categories, calendar service locations |
| Forms and content | Forms, surveys, funnels, videos, certificates |
| Products and memberships | Global products, membership products, membership categories, membership lessons, membership offers, affiliate campaigns |
| Fields, objects, and values | Custom values, contact standard fields, contact custom fields, business custom fields, custom objects, custom object fields |
| Templates | Email templates, SMS templates, estimate templates, invoice templates |
| Social | Facebook pages, Facebook forms, Instagram pages |
Step 1: Name the Records in Your Prompt
Providing exact record names helps AI Builder identify the correct existing data for each workflow step.
List each step and the exact record it should use, matching the names in your account.
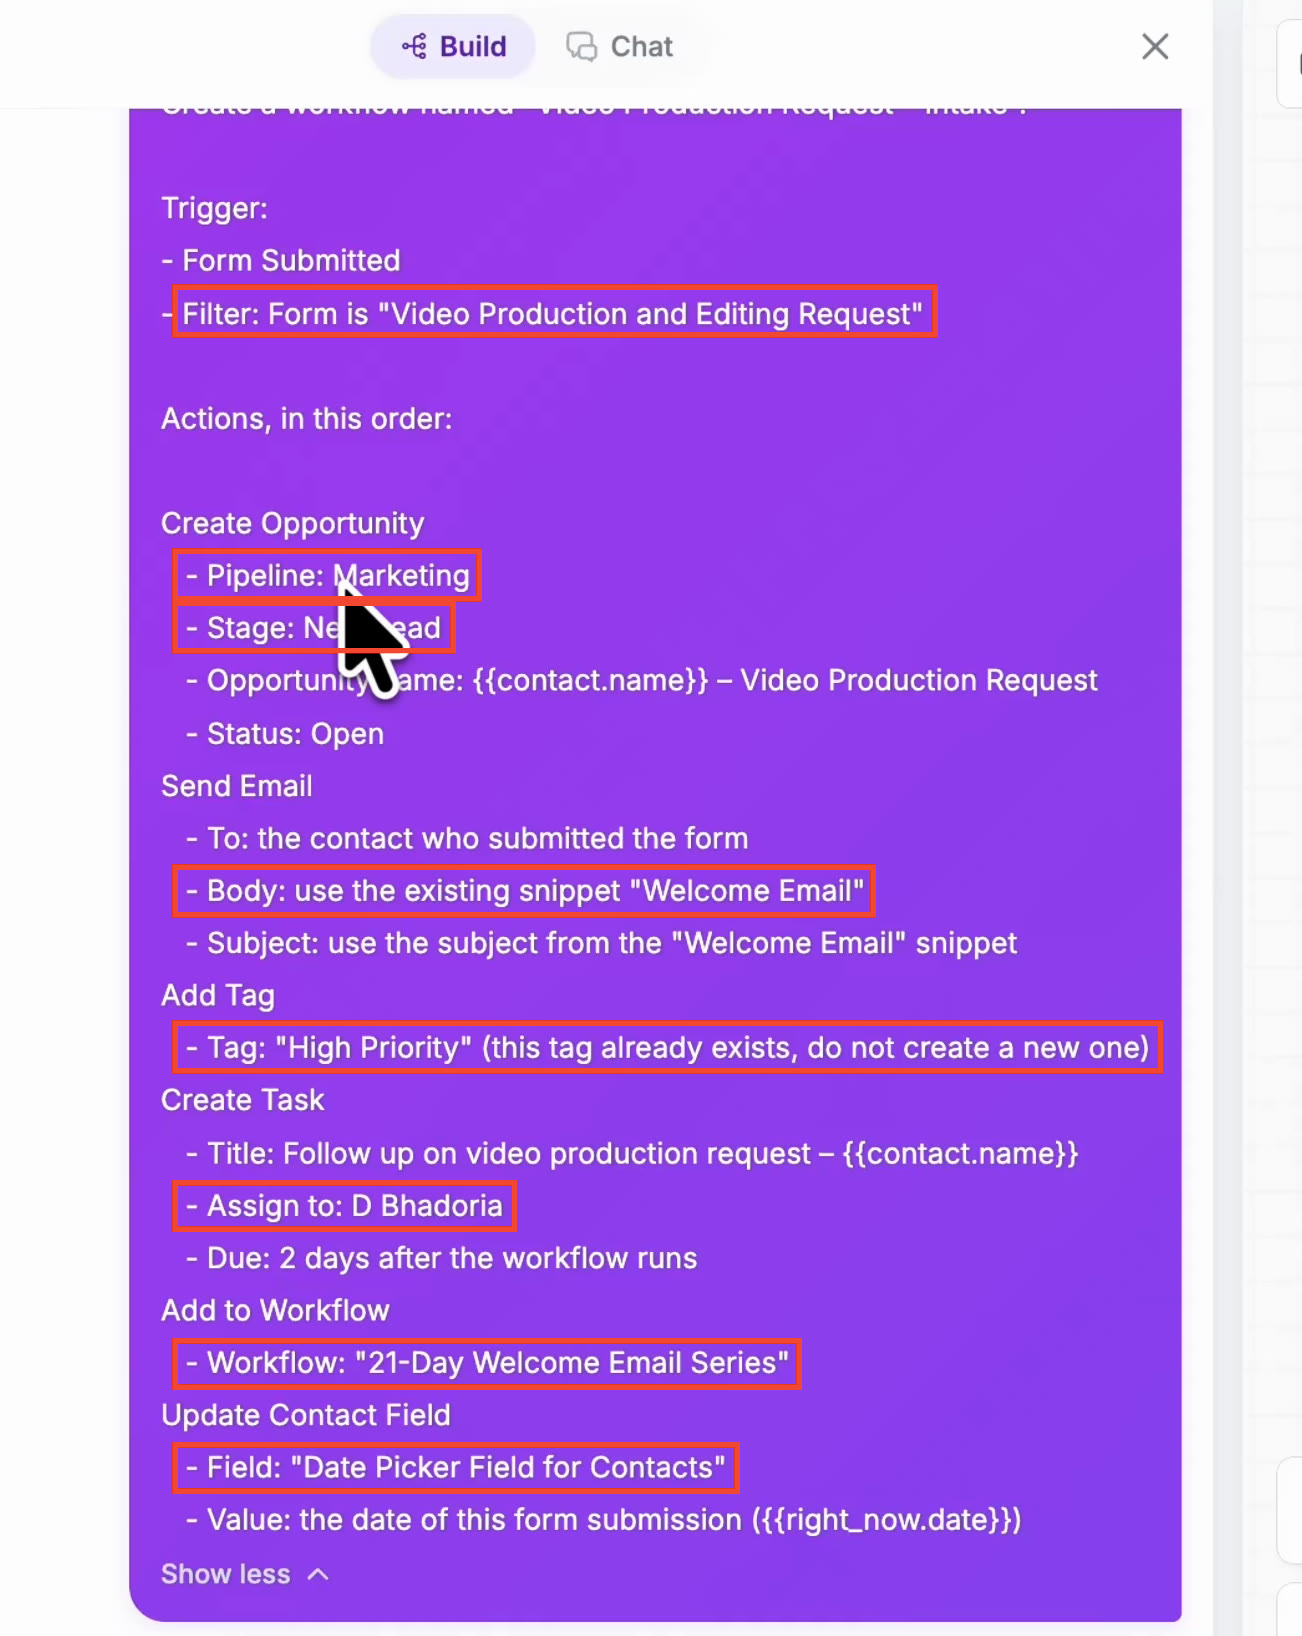
Example prompt naming a form, pipeline, stage, email snippet, tag, user, workflow, and custom field.
Step 2: Let AI Builder Find the Records While It Builds
Matched-record progress cards help you see which existing records AI Builder identified before the workflow is complete.
As AI Builder builds your workflow, progress cards display matched existing records.
Examples include:
- Found form
- Found pipeline
- Found email template
These indicators let you see which records AI Builder identified before reviewing the configured steps.
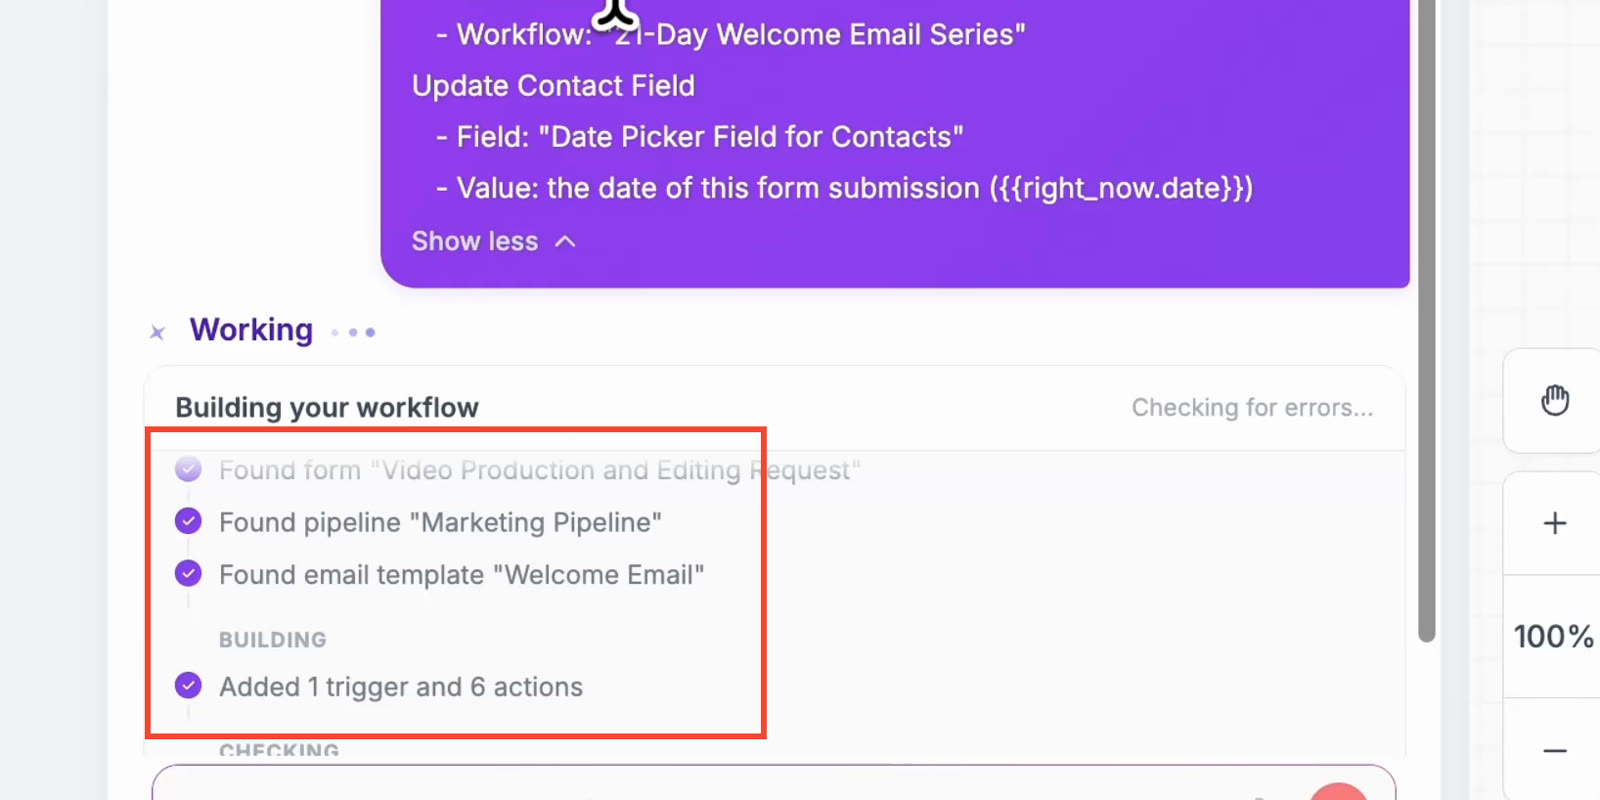
The progress card identifies the form, pipeline, and email template found in the account.
Step 3: Review the Configured Steps
Checking each trigger and action confirms that the workflow uses the records you intended instead of an incorrect match.
Open each trigger and action to confirm the selected values.
In this example:
- Form Submitted: The trigger filter uses the existing form named in your prompt.
- Create Opportunity: Selects the specified pipeline and stage.
- Send Email: Links the existing email snippet, including its subject and body.
- Add Tag: Uses an existing tag instead of creating a duplicate.
- Create Task: Assigns the task to the named user.
- Add to Workflow: Selects the existing workflow named in your prompt.
- Update Contact Field: Selects the existing custom field.
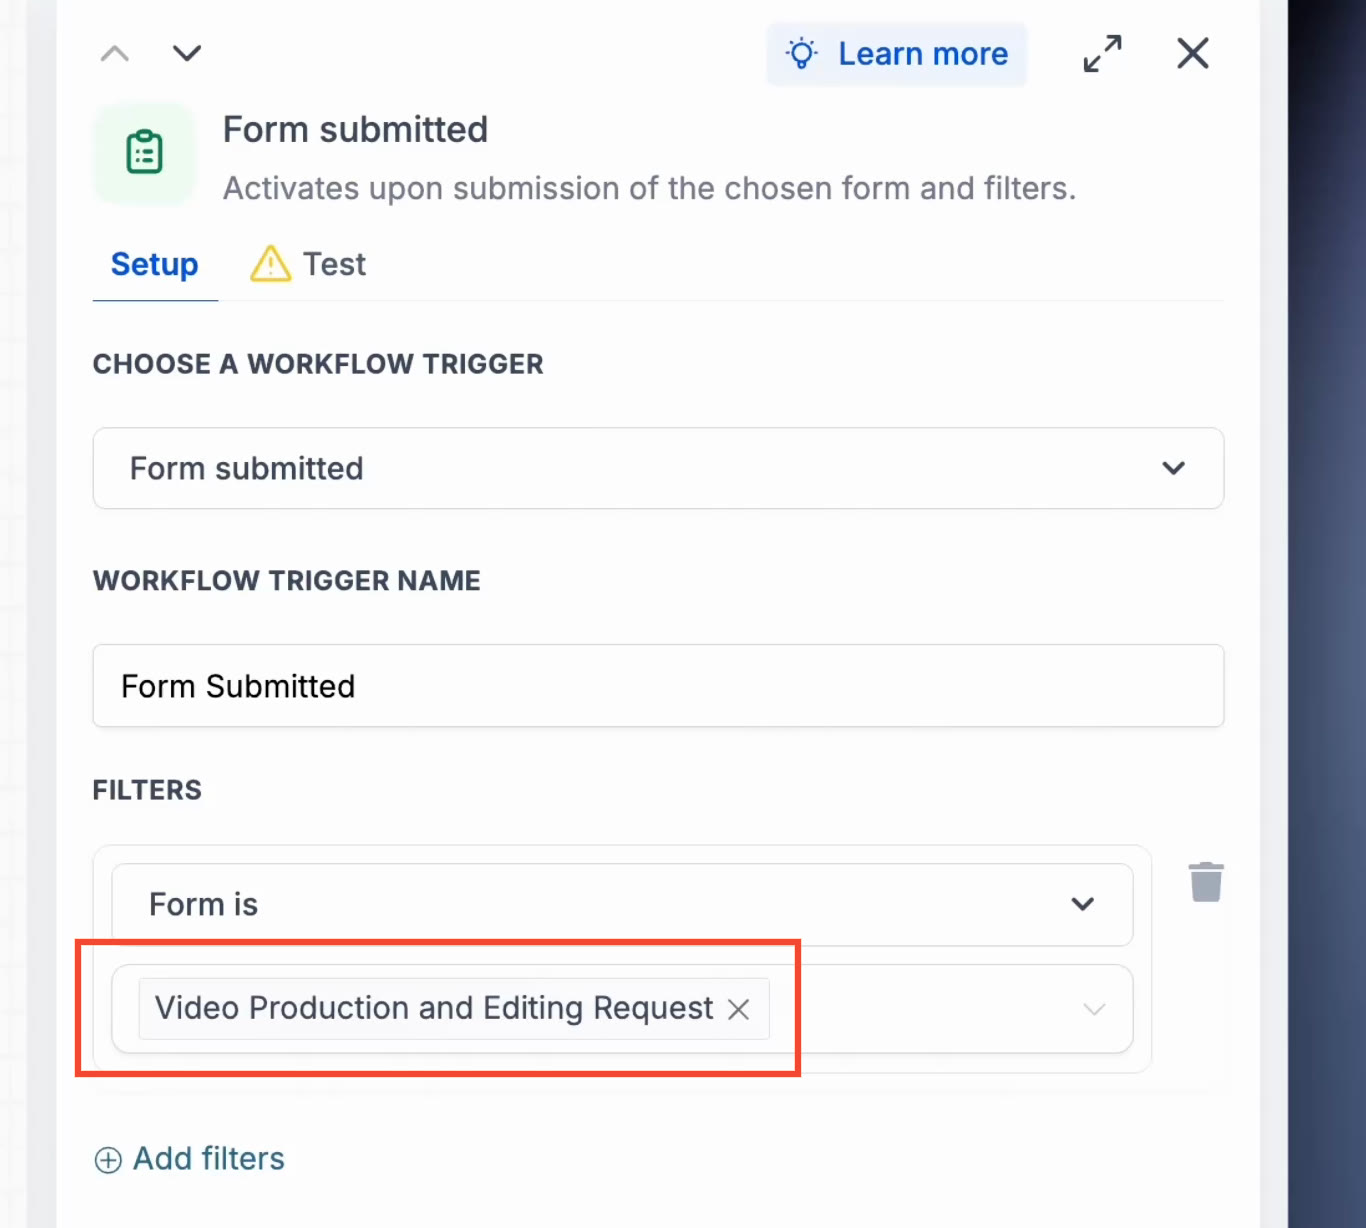
Form Submitted trigger: the filter uses the existing form.
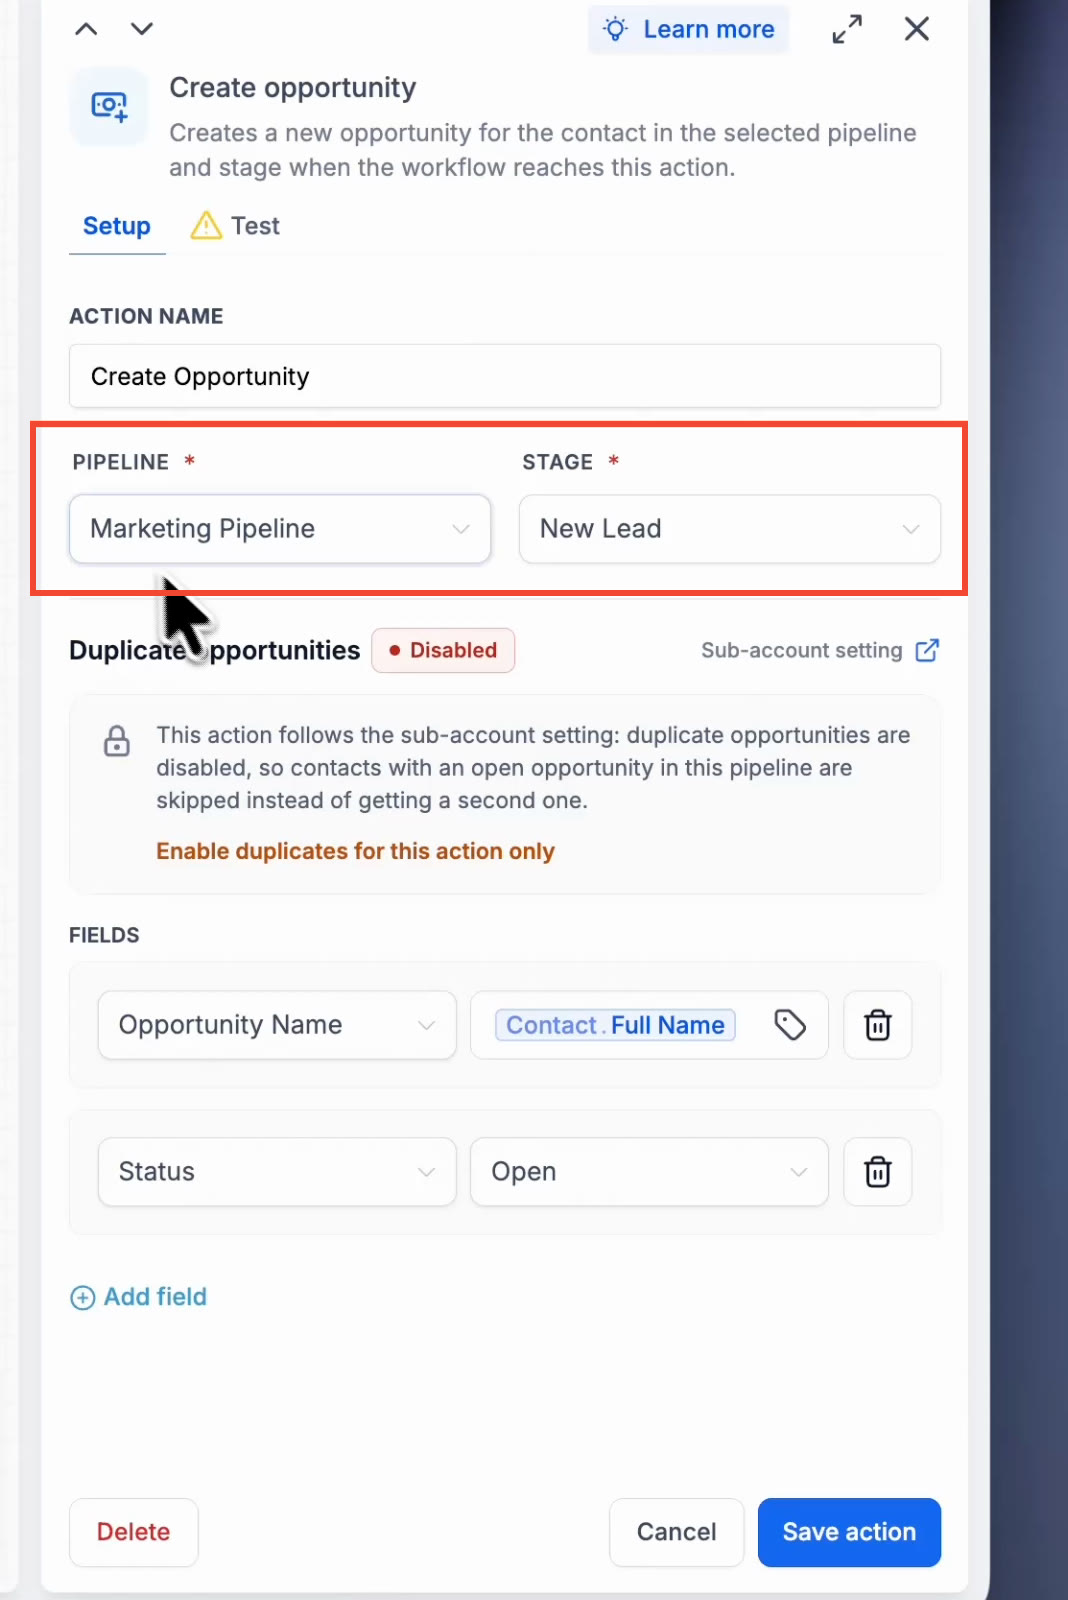
Create Opportunity: pipeline and stage from the account.
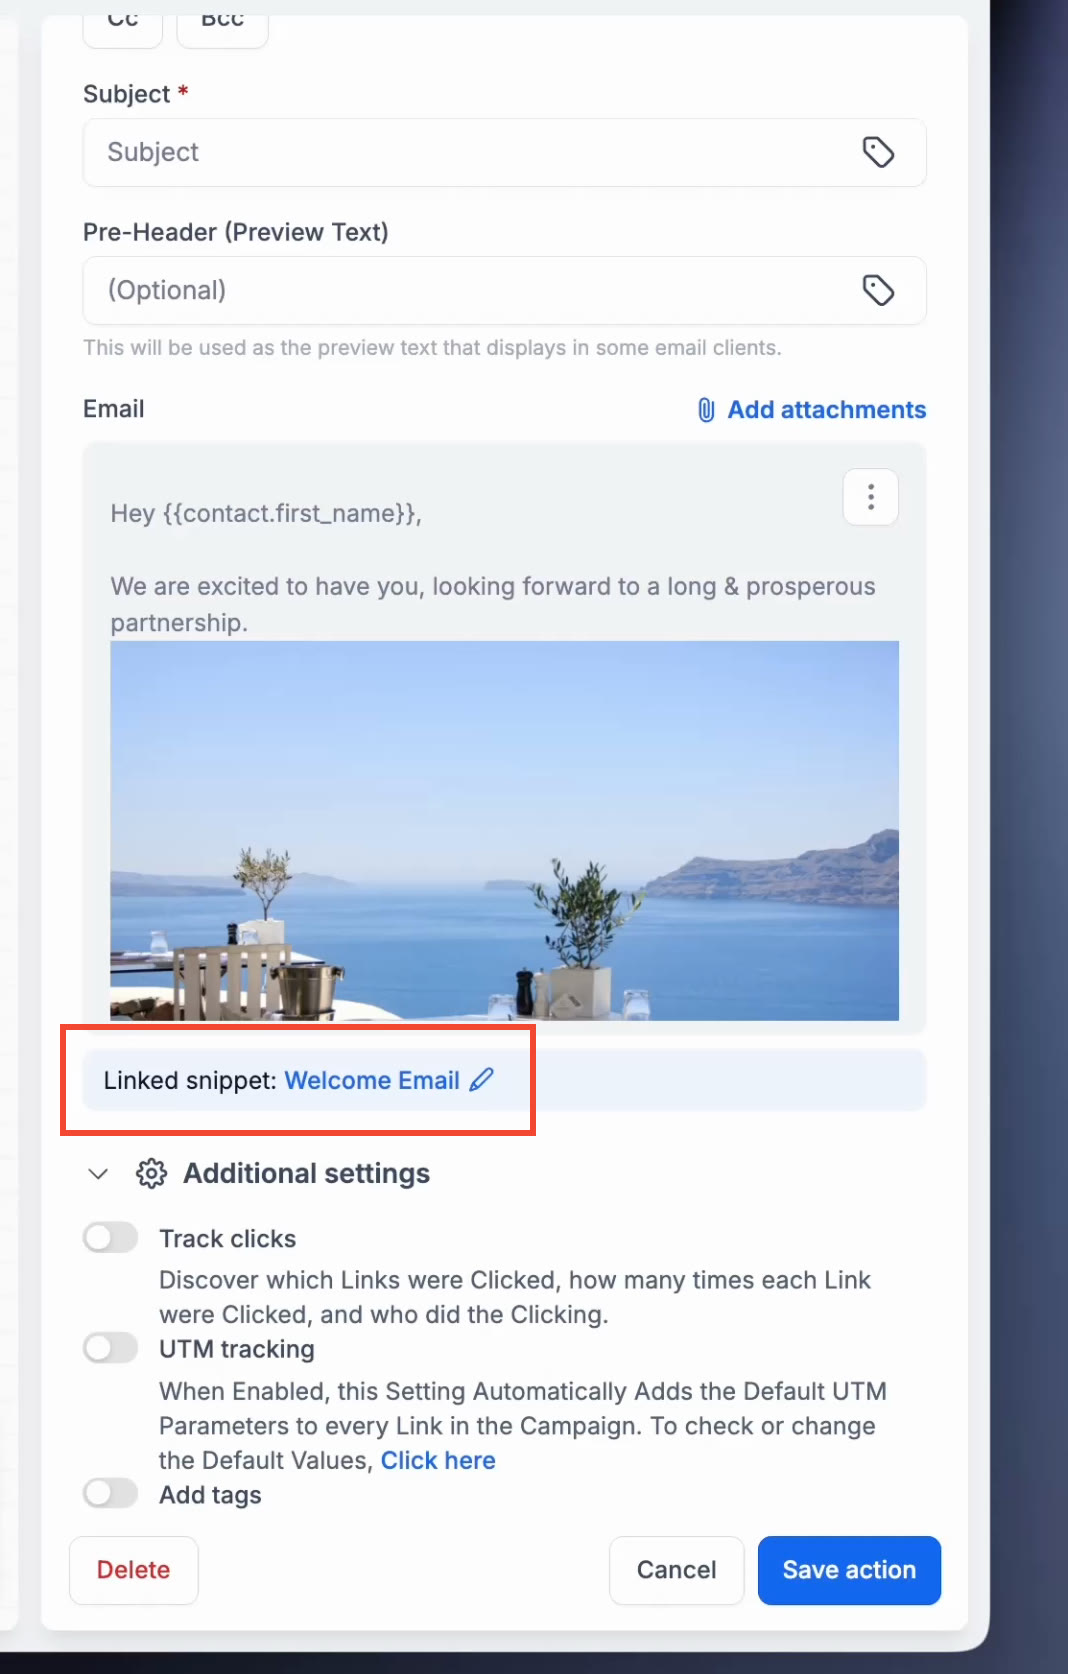
Send Email: linked to the existing email snippet.
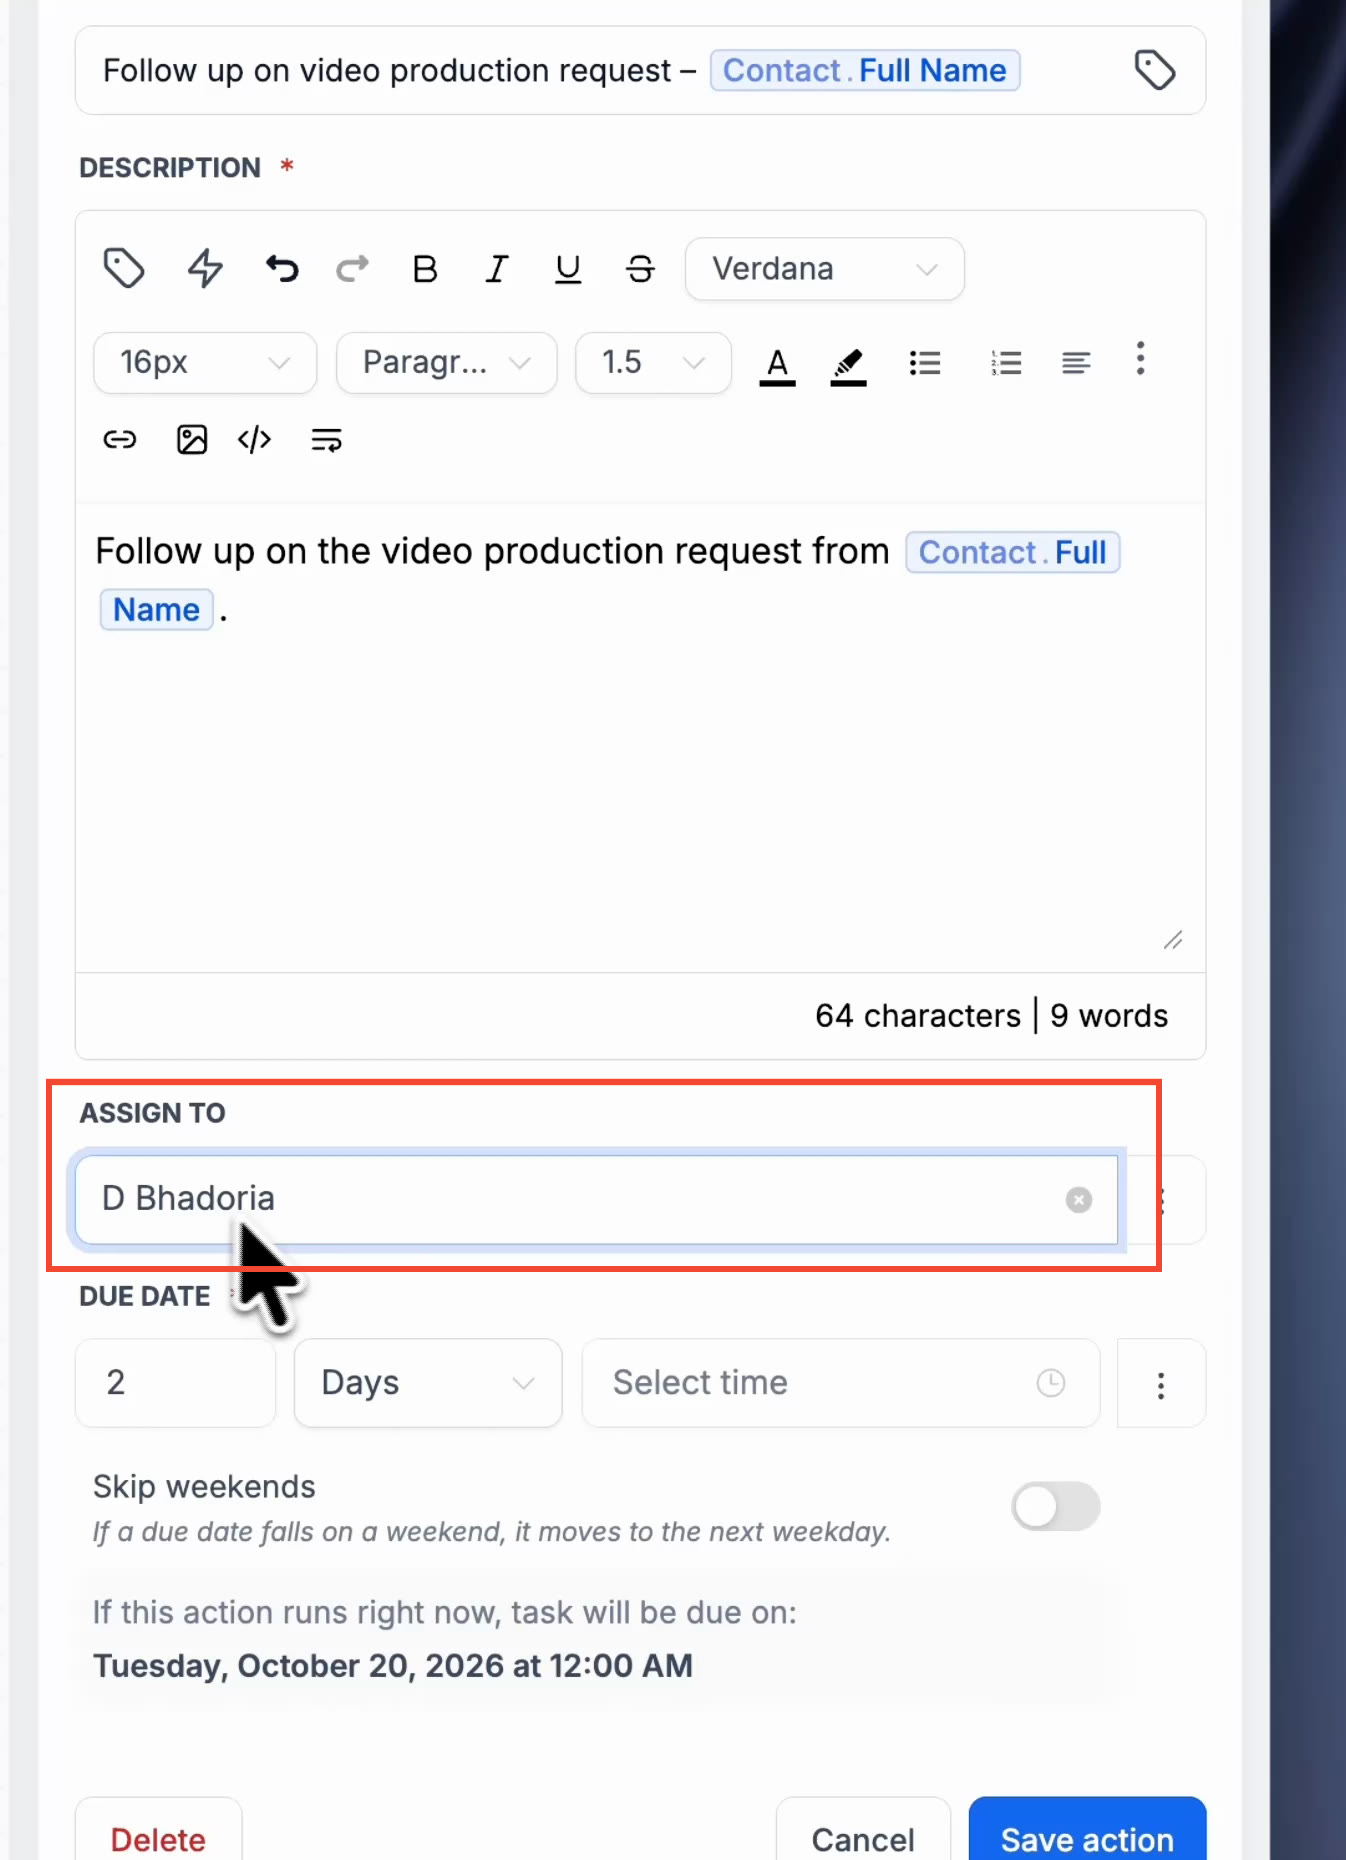
Create Task: assigned to a user in the account.
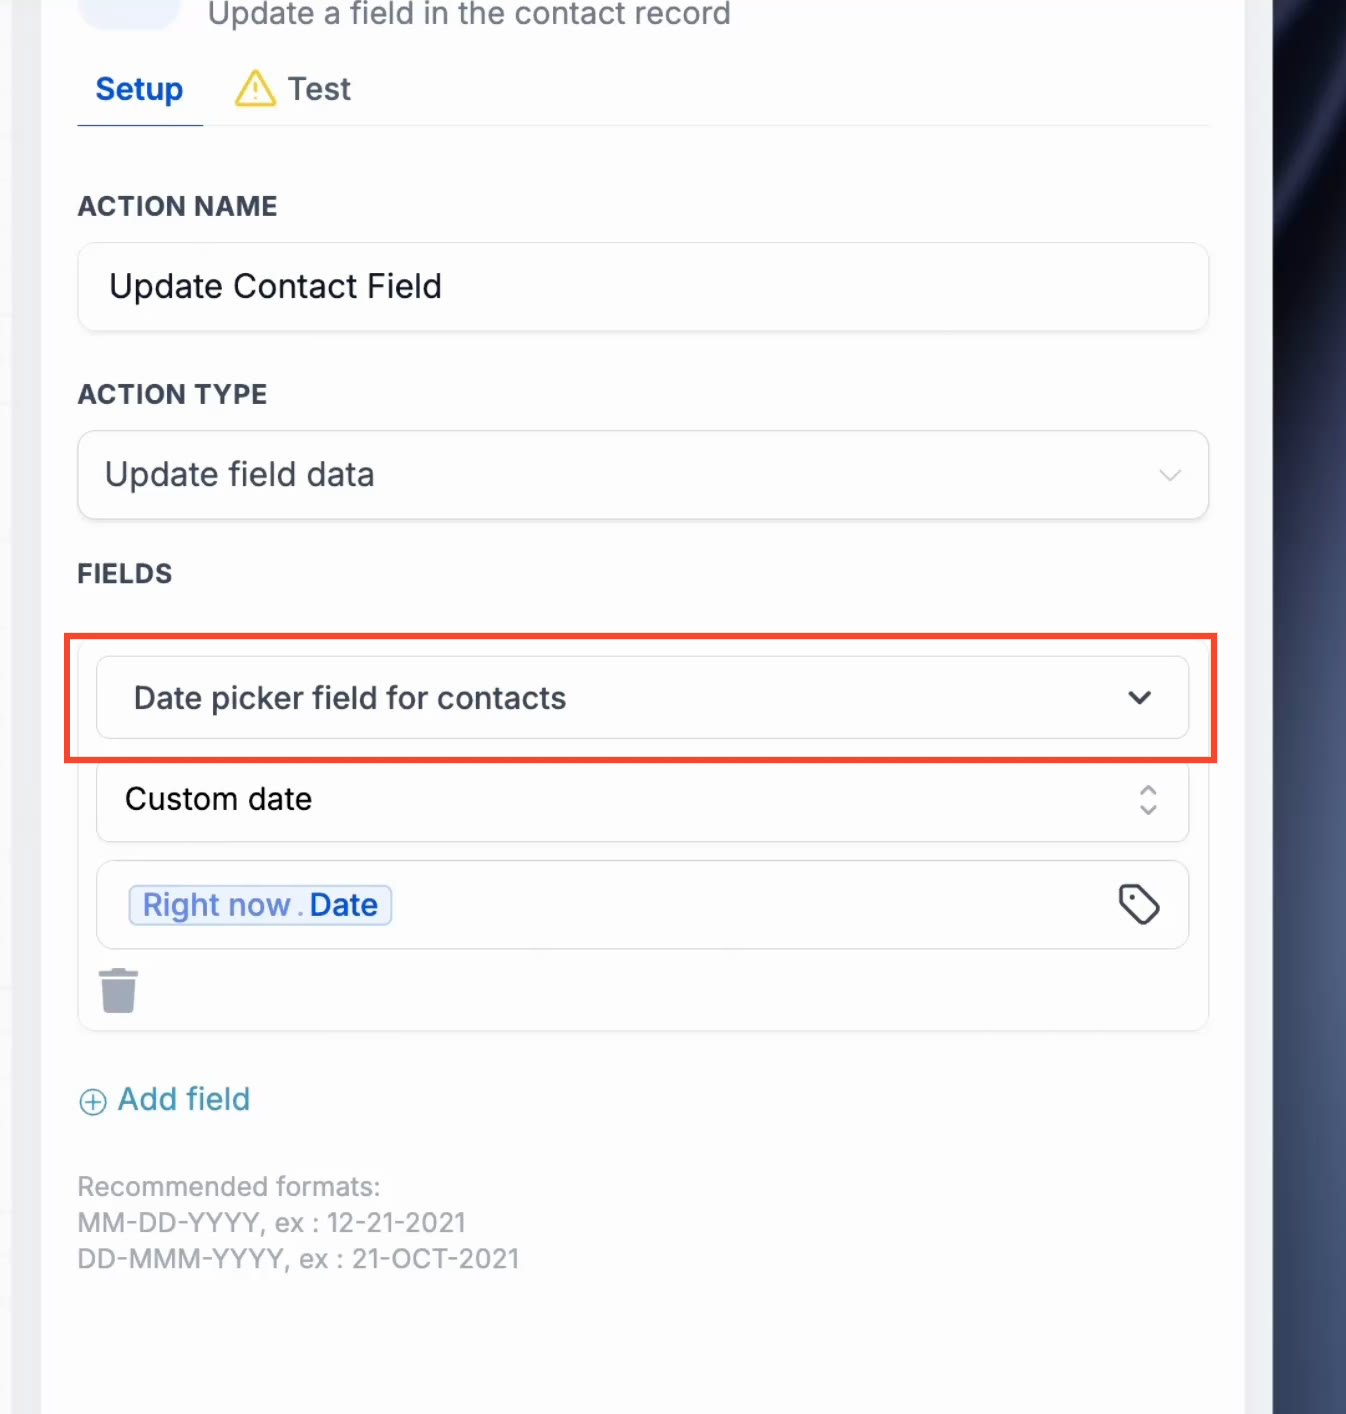
Update Contact Field: the existing custom field is selected.
What You Can Edit
Workflow AI Builder supports conversational edits to workflow actions, triggers, settings, and complex logic. These capabilities let you refine an existing workflow without rebuilding it manually.
Actions
Action editing lets you change the steps that perform tasks, send communications, and process information inside a workflow.
- Add new actions anywhere in your workflow.
- Remove unwanted actions, including single-path and multi-path actions.
- Replace existing actions with different ones.
- Modify action configurations and settings.
- Update actions to use values from previous steps through data linking.
- Add or update actions that use integration apps, such as task creation actions.
- Move actions to different positions in the workflow.
Triggers
Trigger editing lets you update the events and conditions that start a workflow without recreating the entire automation.
- Add additional triggers.
- Remove existing triggers.
- Replace triggers with different types.
- Modify trigger configurations.
Complex Edits
Complex editing allows AI Builder to handle several changes in one request and modify advanced workflow logic through conversation.
You can combine multiple changes into one prompt.
If/Else actions
- Add, remove, or update segments within branches.
- Change AND/OR operators for branches and segments.
- Add or remove branches.
- Respond to clarification requests when the intended branch or segment is unclear.
Wait actions
- Update wait attributes.
- Adjust reply or window settings.
- Add or remove timeout branches.
- Change the wait type.
Targeted and Bulk Edits
Targeted edits help you apply the same change to a defined group of steps without affecting the rest of the workflow.
Use one instruction to apply the same change across all matching steps, a specified number of steps, or particular actions and triggers.
Workflow AI Builder updates only the scope you define.
Supported targeted edits include:
- Updating copy across multiple email, SMS, or supported communication actions.
- Changing pipeline stages across all or specified actions and triggers.
- Setting From Name and From Email across all or selected email actions.
- Applying exact copy to a defined group of actions without changing the remaining actions.
Example Edit Prompts
Specific prompts help AI Builder identify the actions to change and the intended result.
- "Add a 3-day wait between the welcome email and the follow-up."
- "Replace the SMS action with a Slack notification."
- "Update the SMS copy in only the first two actions."
- "Replace the copy in the first 20 email actions and leave the remaining email actions unchanged."
- "Change the trigger from form submission to contact created."
- "Add an if/else condition to check if the contact has made a purchase."
- "Remove the timeout branch from this wait action."
Point and Edit for Precise Control
You can target workflow steps by defining the scope in your instructions or using Point and Edit. Visual selection is especially useful when several similar actions exist or when describing the intended steps in a prompt would be difficult.
How Point and Edit Works
Point and Edit lets you select the actions on the workflow canvas before describing the change you want AI Builder to make.
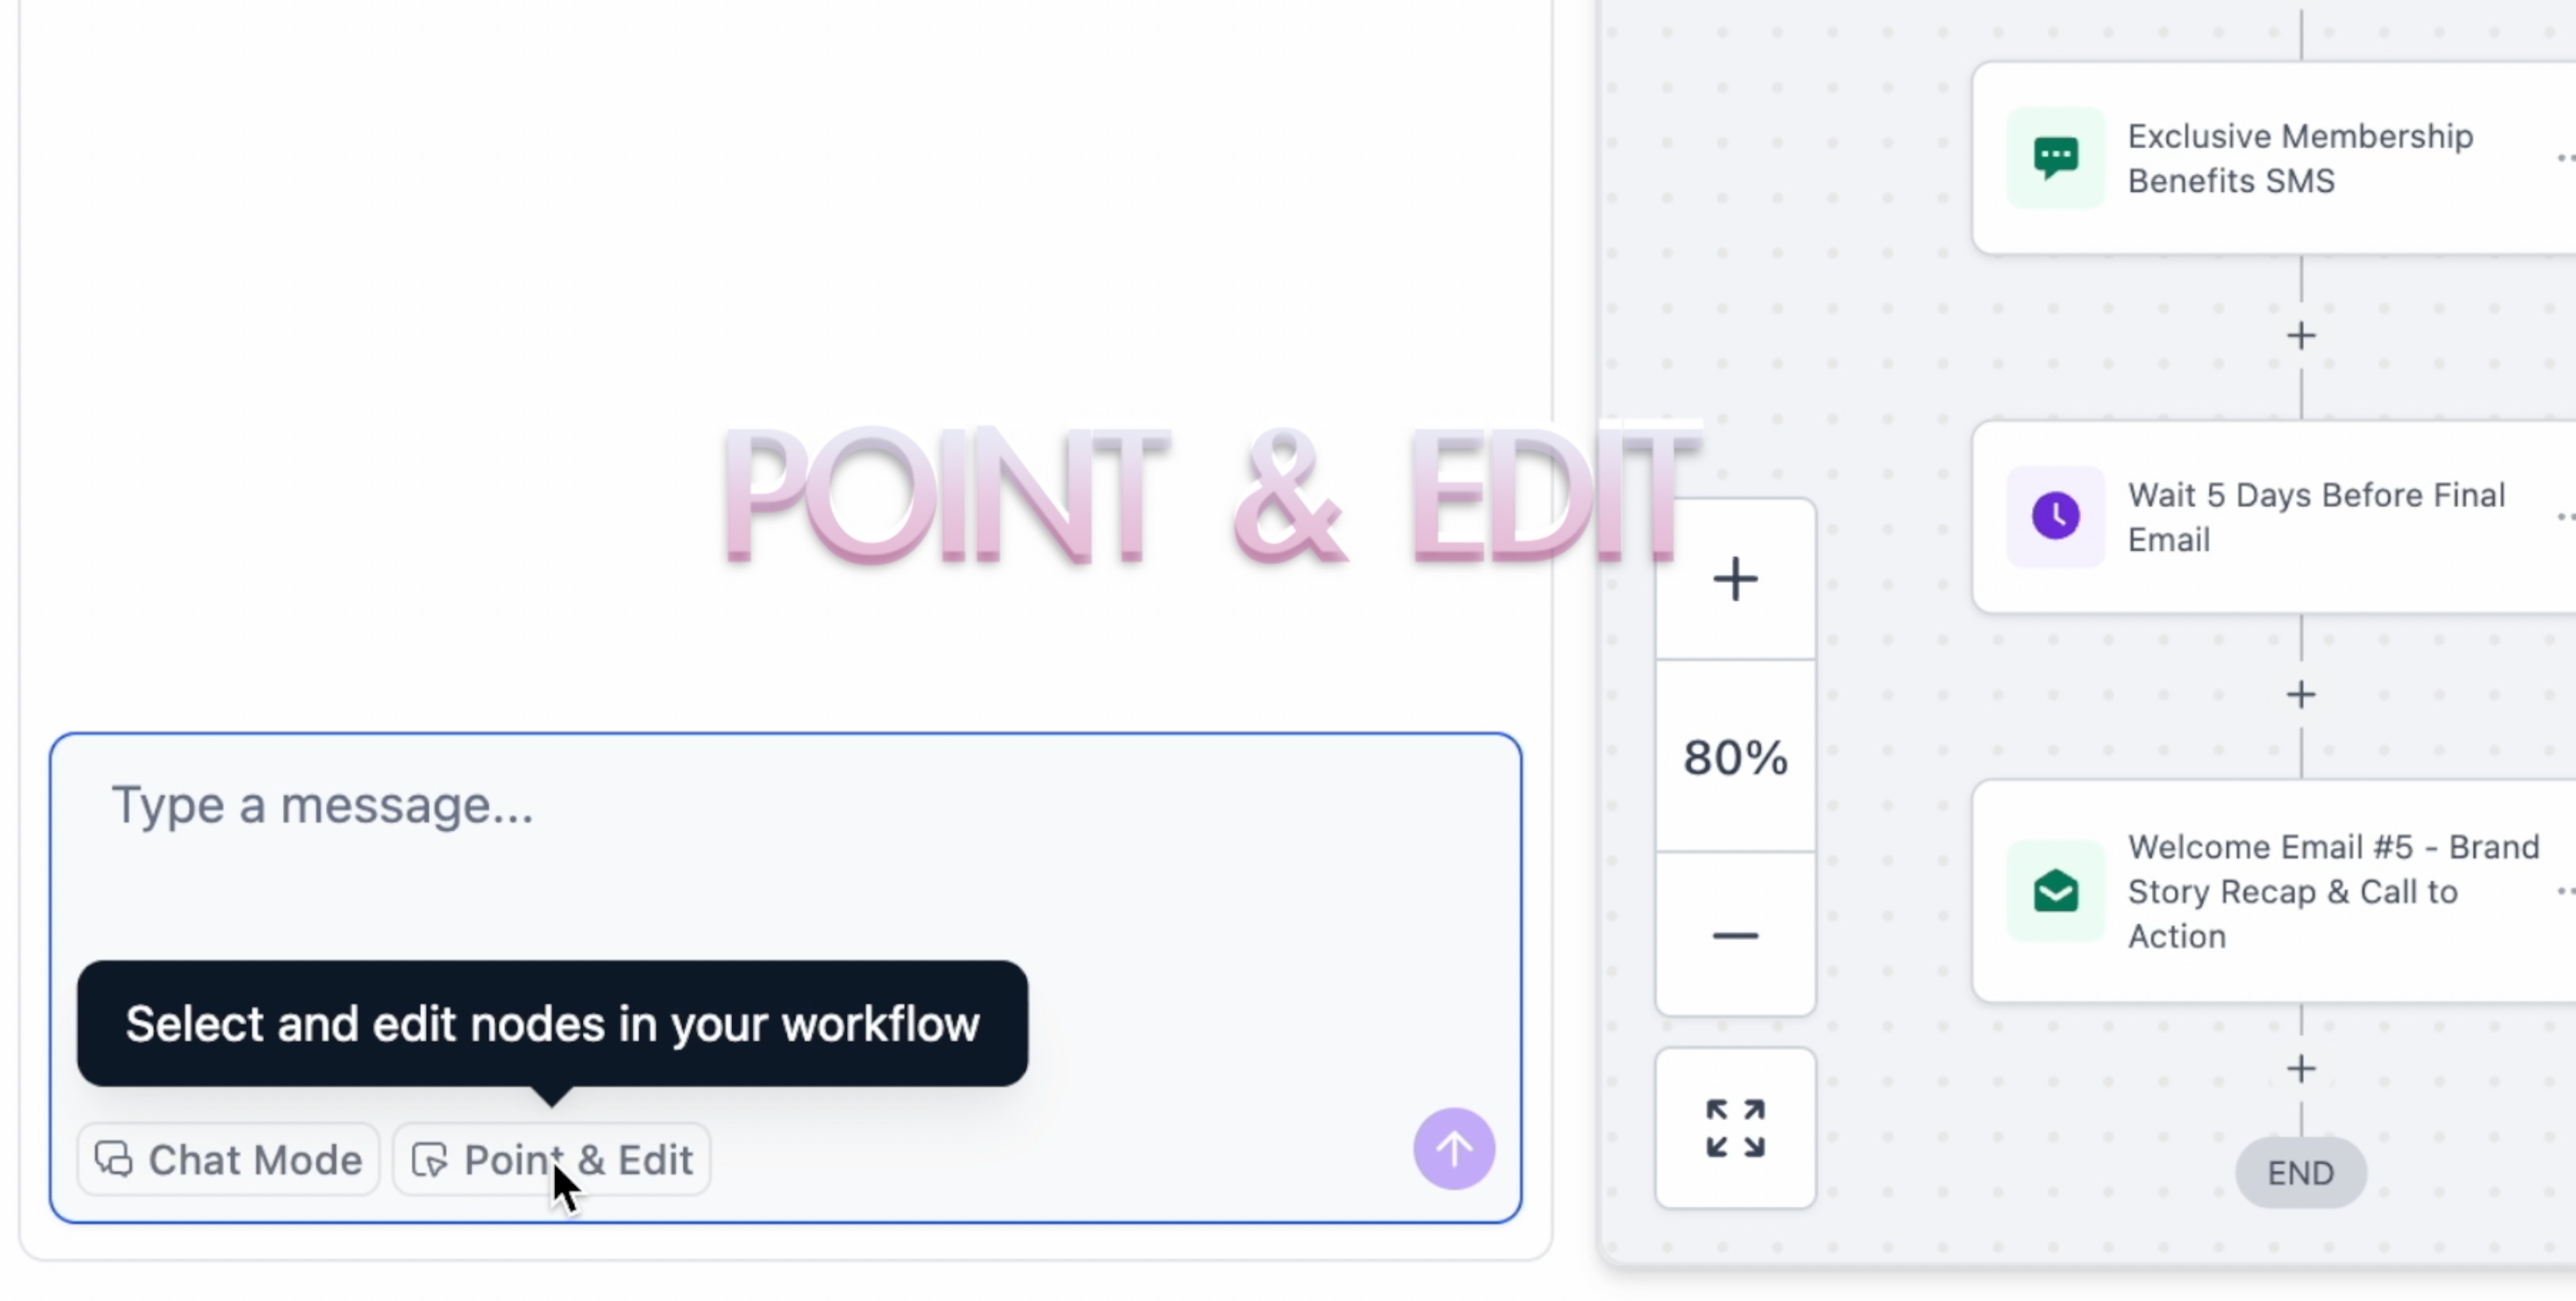
In the AI chatbot interface, click Point and Edit to activate selection mode.
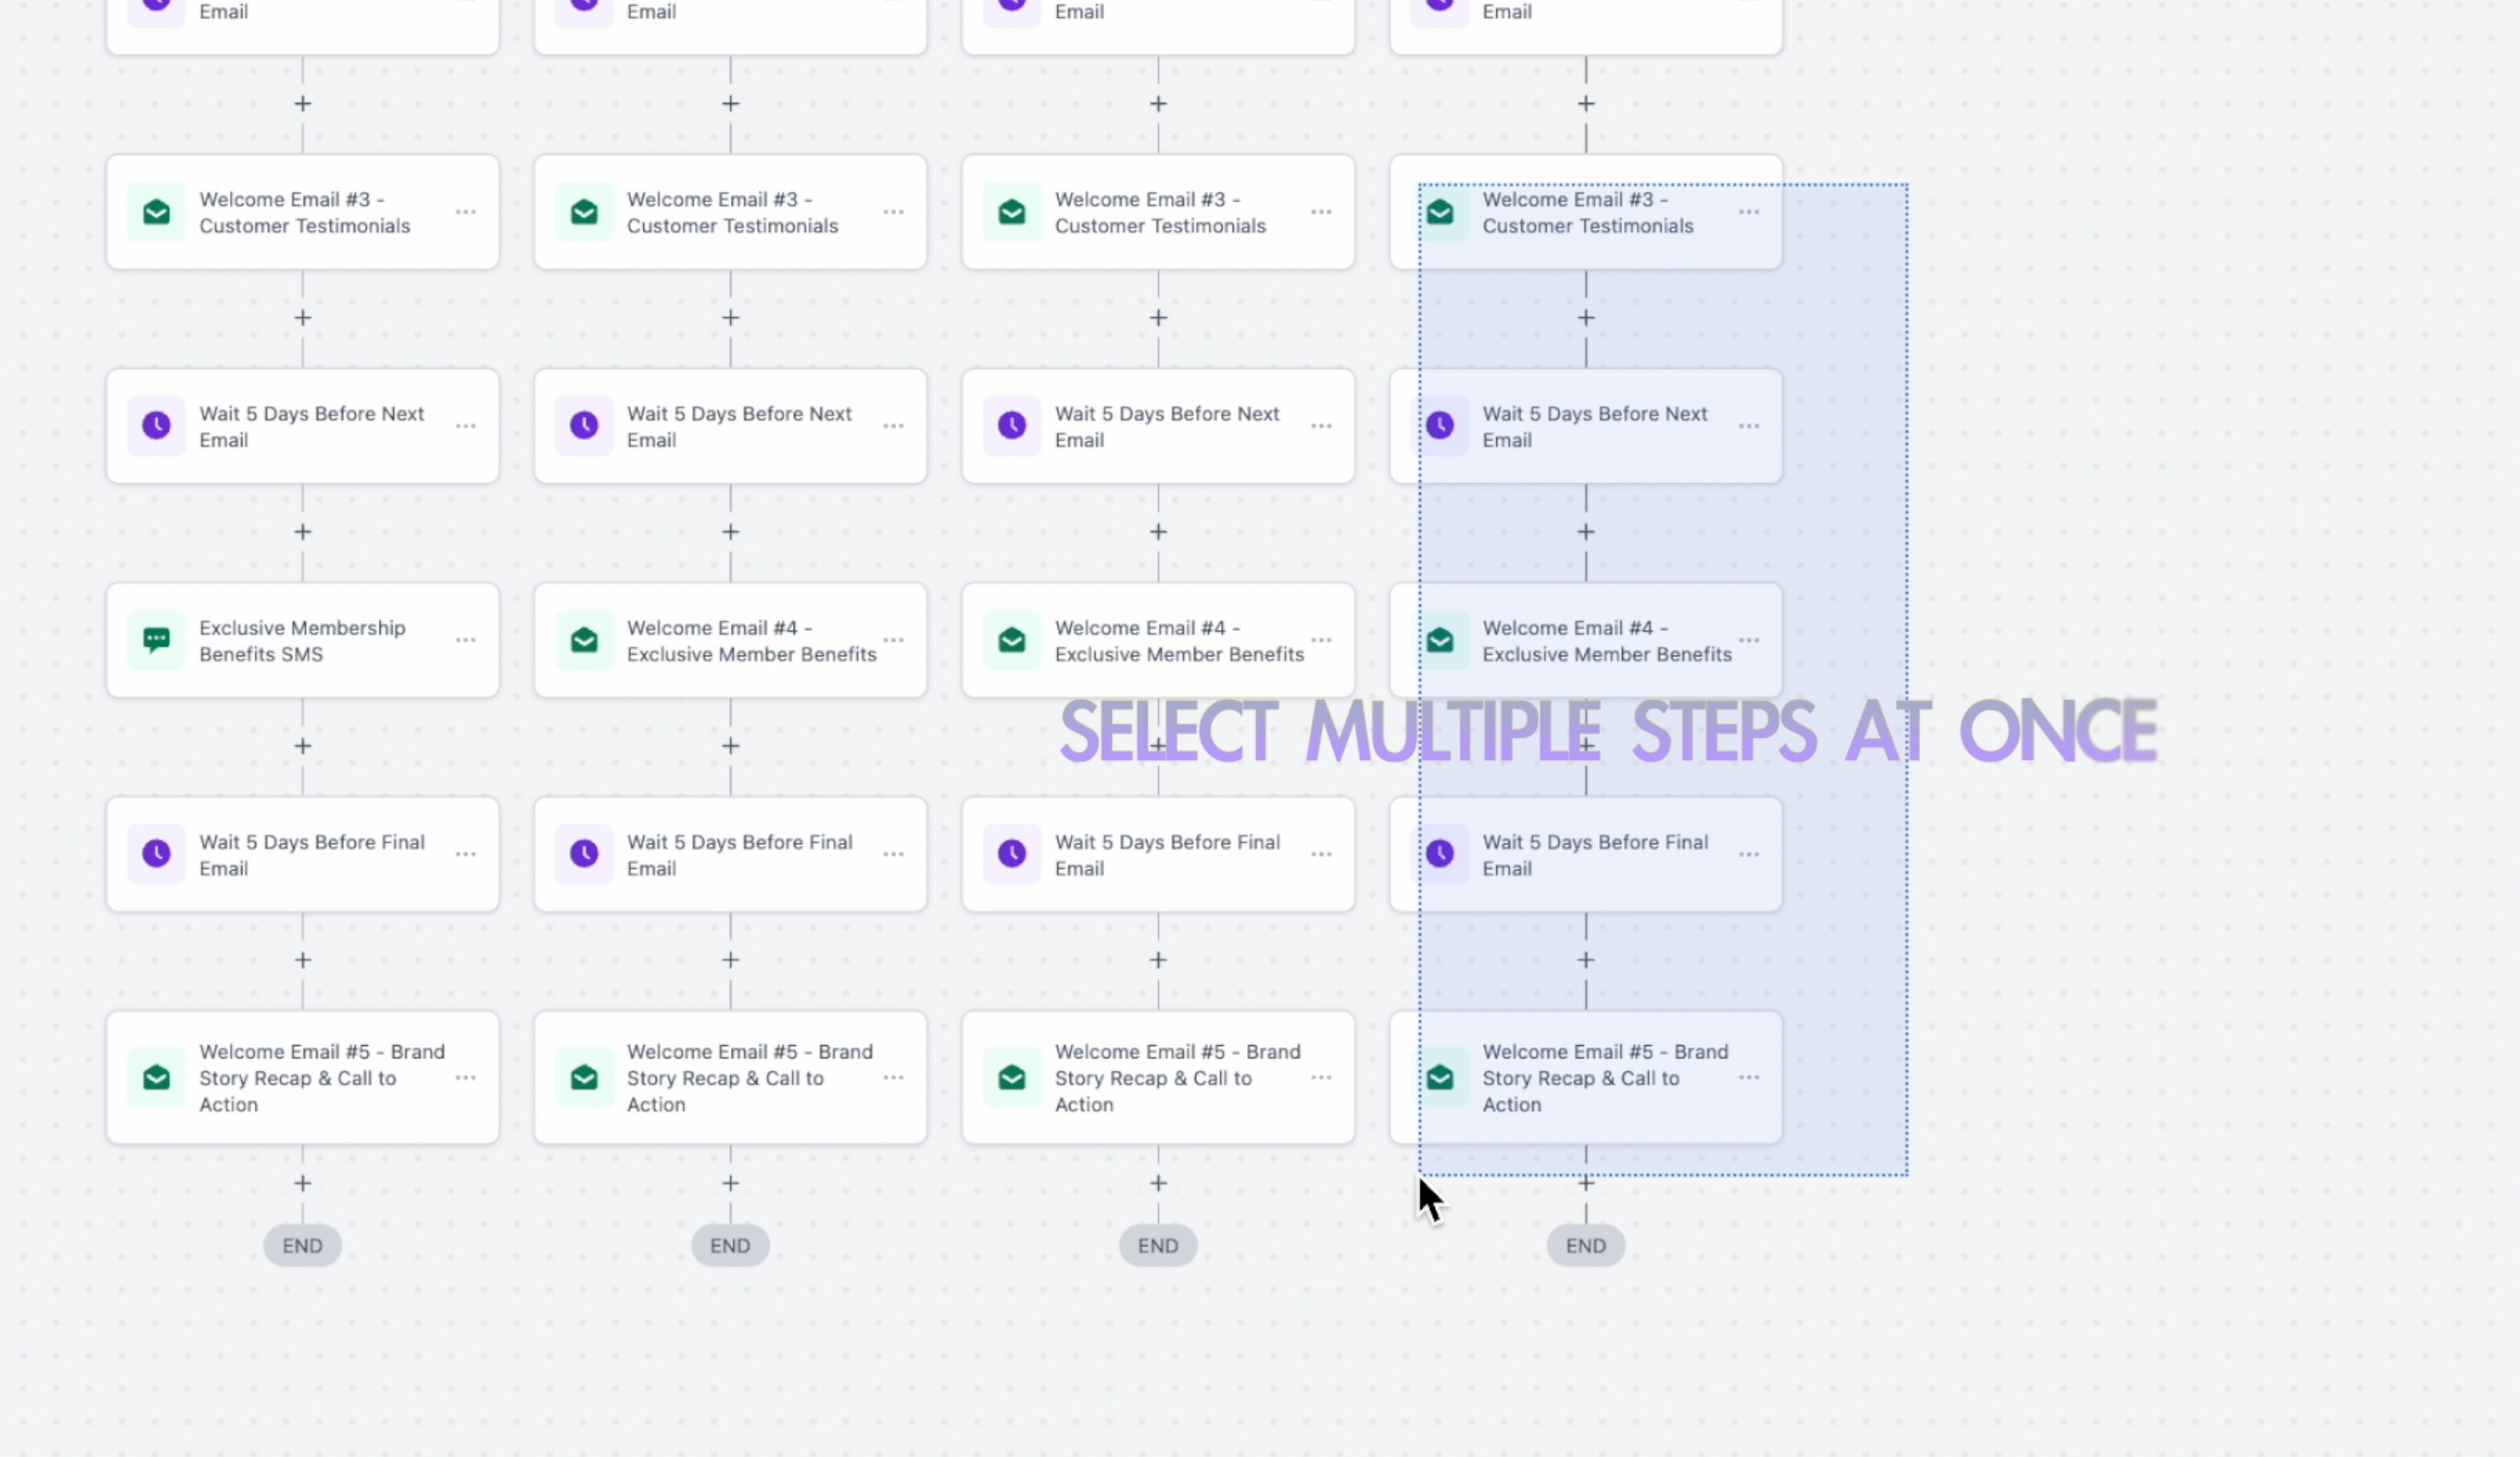
Select the actions you want to edit. Click one action, click multiple actions, or hold Shift and drag to select a range. Selected actions are highlighted.
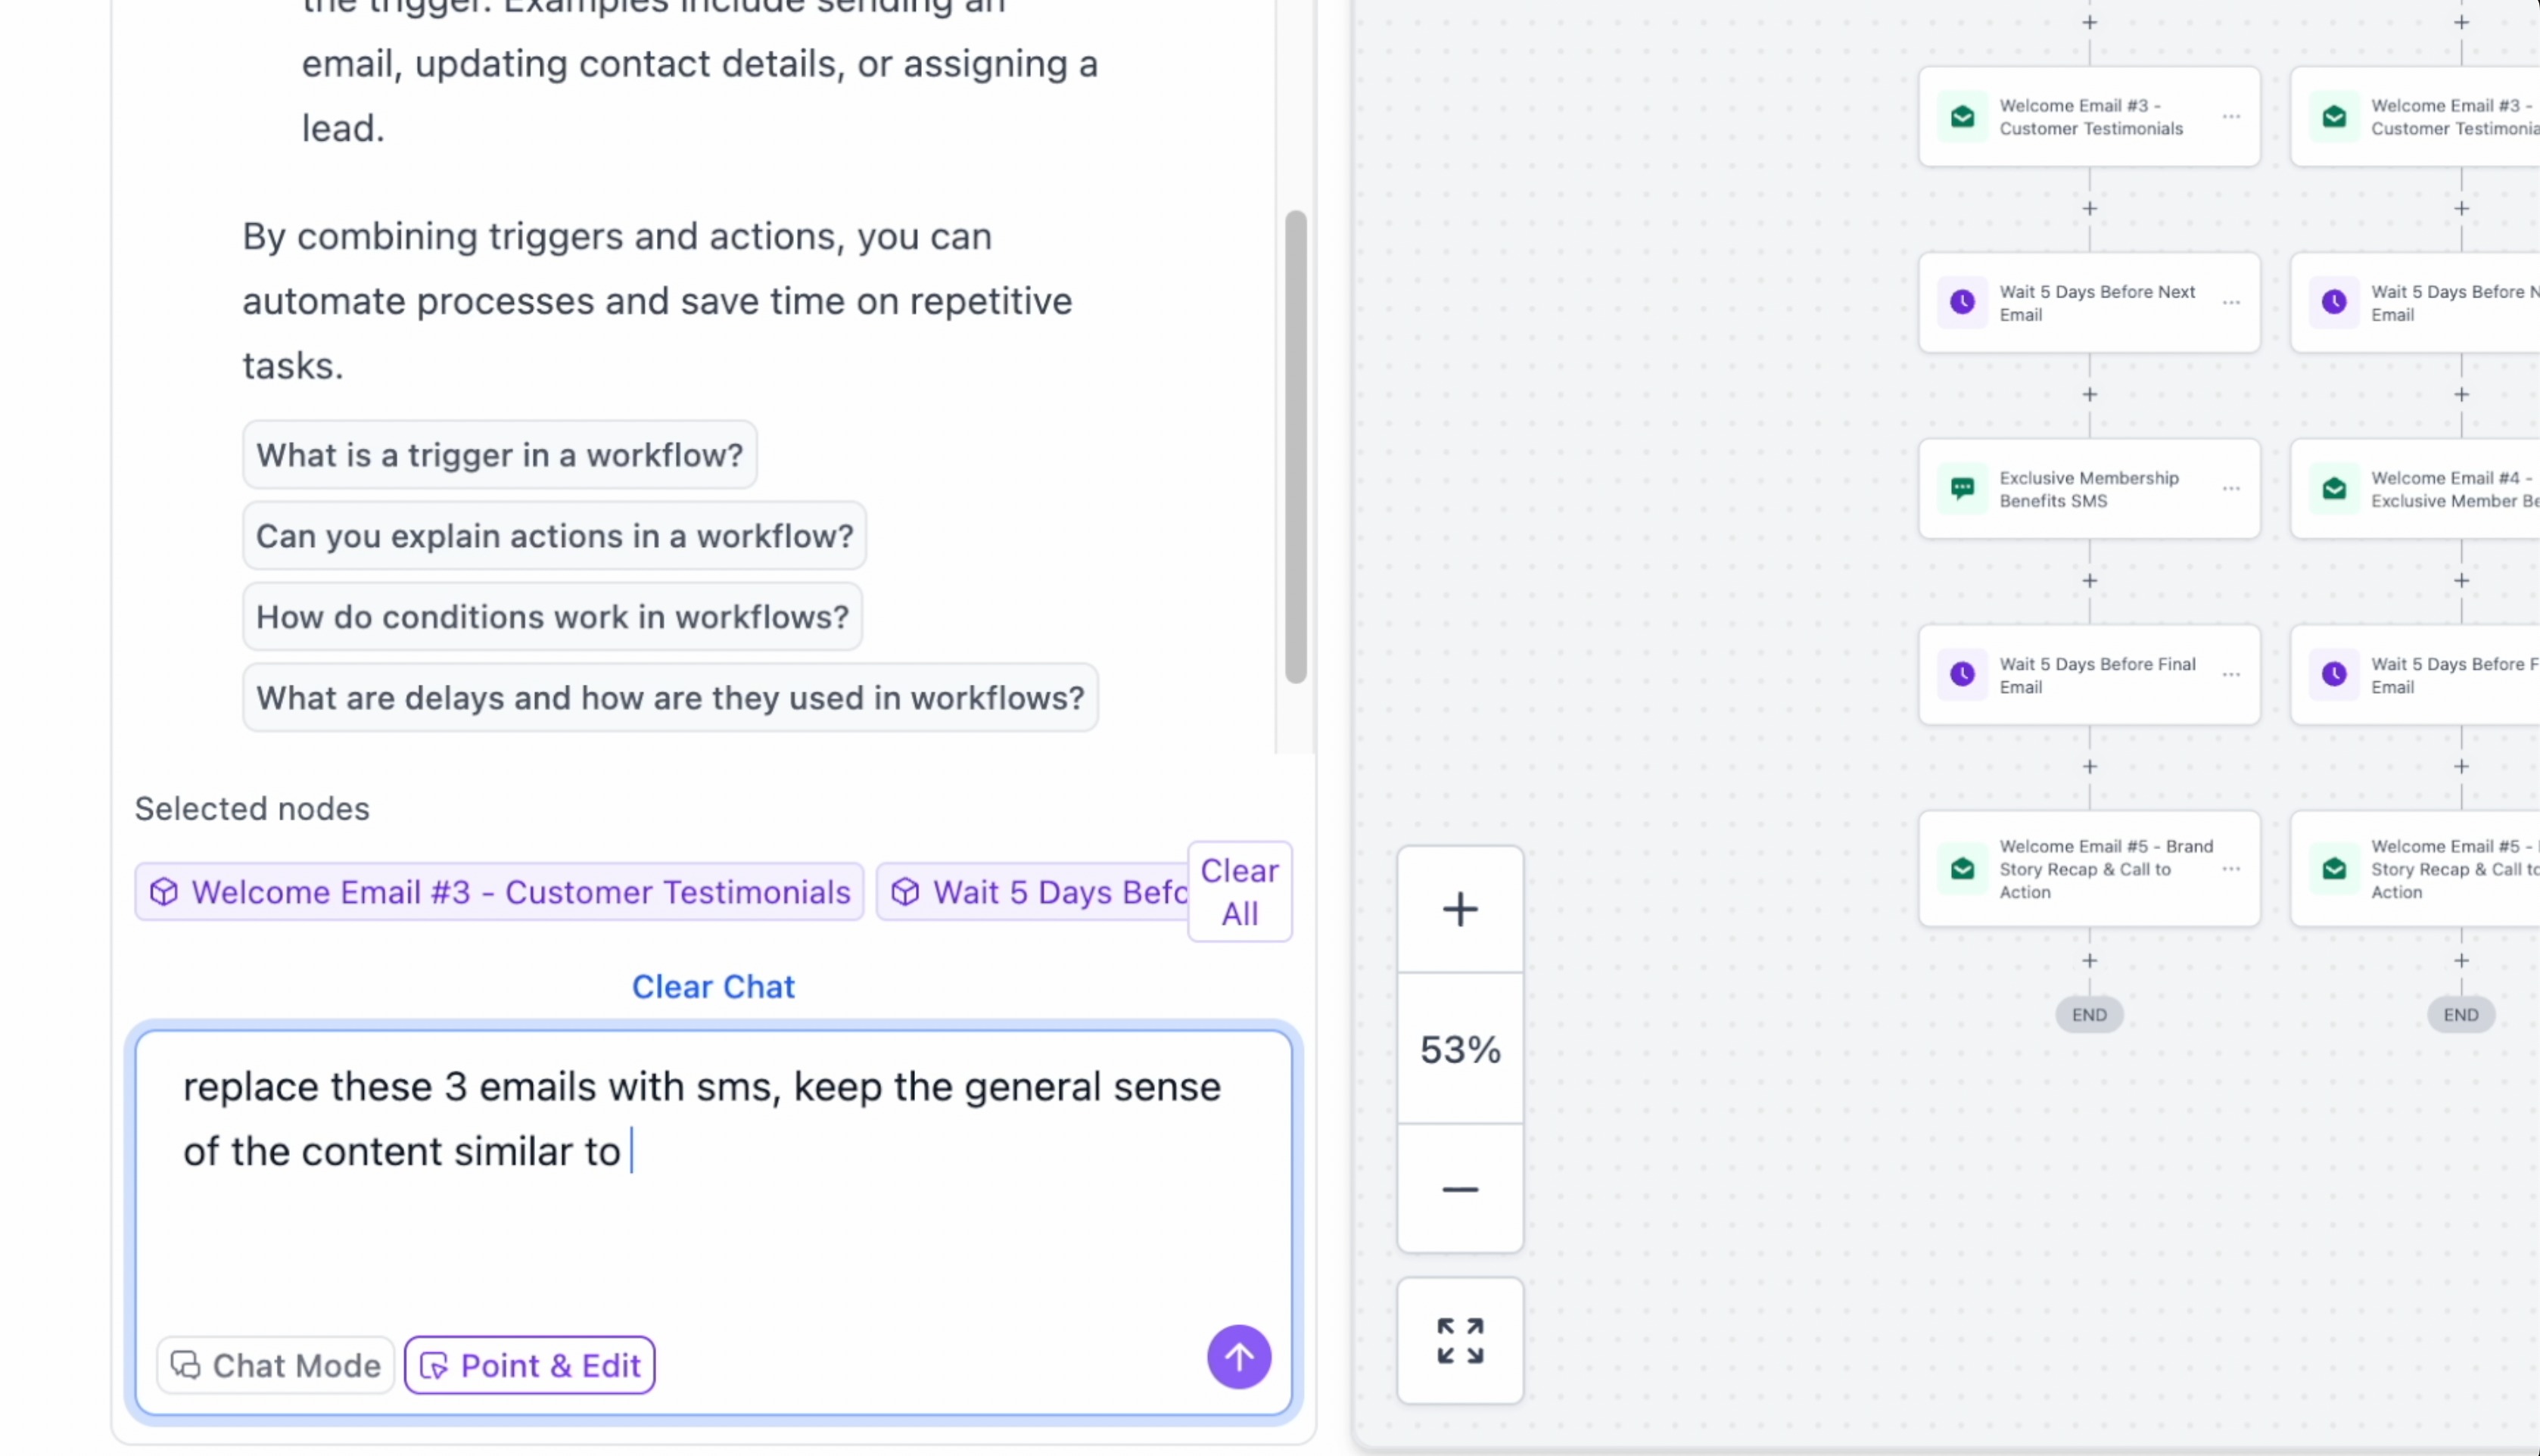
Describe your requested change in the chat. AI applies the change only to the selected steps.
Example Point and Edit Scenarios
Visual selection is useful for requests involving several actions or a particular branch.
- Select three email actions and enter "Change all these to SMS messages."
- Select a task action and enter "Change the text to be more urgent."
- Select multiple actions in a branch and enter "Move all of these after the tag action."
- Select a group of actions and enter "Delete these selected actions."
Benefits of Point and Edit
These benefits are especially helpful when working with large workflows that contain multiple branches and repeated action types.
- Precision: Edit the selected actions without affecting other parts of the workflow.
- Visual Clarity: See the actions being targeted before requesting changes.
- Efficiency: Apply bulk changes to multiple selected actions at once.
- Reduced Errors: Avoid confusion in complex workflows containing similar actions.
Clarifying Agent in Workflow AI Builder
The Clarifying Agent helps Workflow AI Builder generate more accurate results by requesting missing information before building a new workflow or modifying an existing one. This reduces assumptions, improves the initial output, and minimizes unnecessary revisions.
When your request is broad or omits important details, Workflow AI Builder may ask a short series of clarifying questions before proceeding.
The Clarifying Agent may appear when:
- The workflow trigger is not defined.
- The message channel is not specified.
- The timing is unclear.
- An unsupported channel is requested.
You can select from the available responses or enter your own answer. If you prefer not to answer, you can skip the question and let AI decide.
Workflow AI Builder asks up to three clarifying questions before continuing.
When the Clarifying Agent Appears
The Clarifying Agent appears when Workflow AI Builder determines that a request does not contain enough information to generate a reliable result.
This applies to new workflow requests and edit requests.
Examples include:
- "Follow up with the customer" without specifying a trigger.
- "Send a message sequence" without identifying the channel.
- "Remind them later" without providing timing details.
- Requesting a communication channel that is not supported.
How to Answer Clarifying Questions
Answering clarifying questions gives AI Builder additional context and can improve the accuracy of the first workflow draft.
- Review each question displayed by AI Builder.
- Select one of the provided options or type your own response.
- Continue through the questions if more than one appears.
- Skip a question if you want AI to decide.
- Let AI Builder generate or edit the workflow using the additional context.
Why This Improves Workflow Generation
Clearer inputs produce more accurate workflows. By gathering missing details before generation or editing begins, the Clarifying Agent reduces revision cycles and helps AI Builder make changes that match your intended automation.
Chat Mode
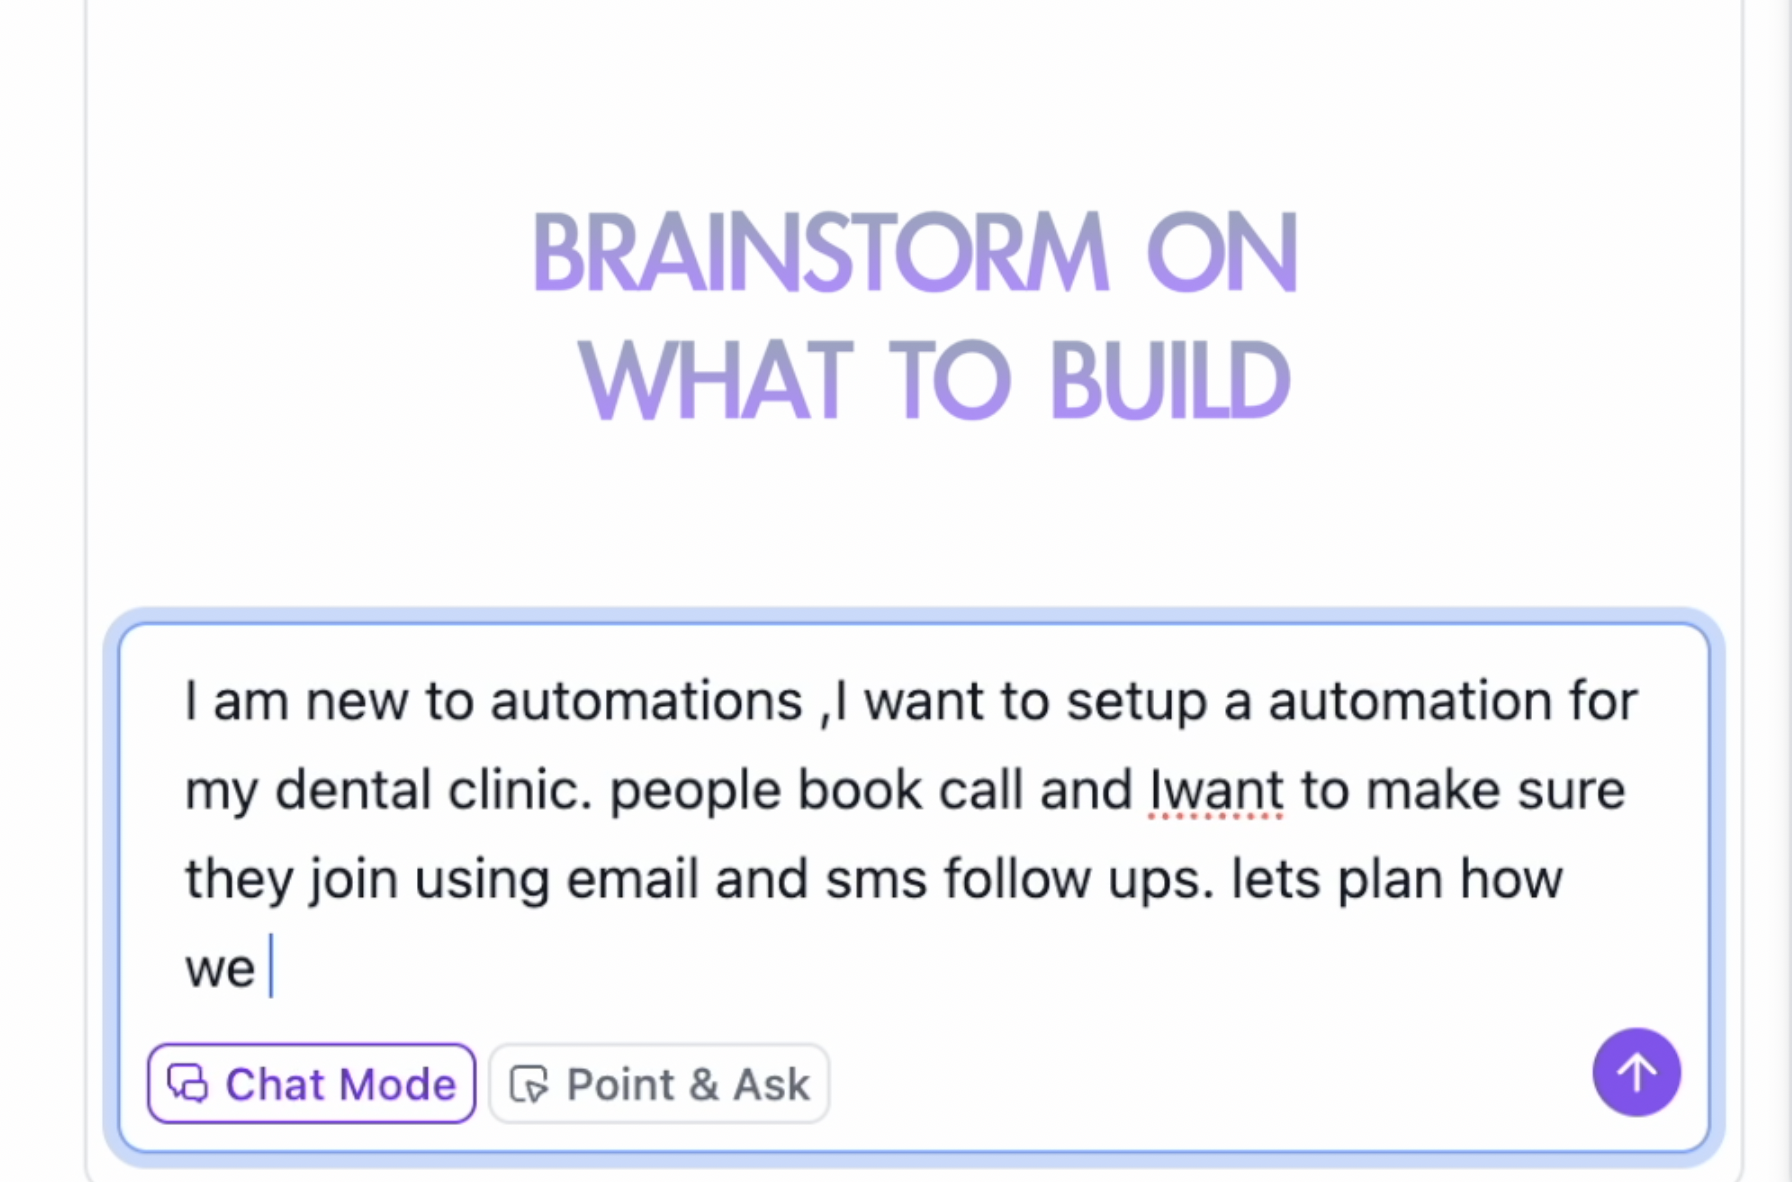
Chat Mode lets you plan a workflow without immediately building it. You can brainstorm requirements, define triggers and actions, and refine the automation structure through conversation before applying changes.
How to Use Chat Mode
Chat Mode provides a way to discuss your automation requirements before asking AI Builder to generate the workflow.
- Open the Workflow Builder from Automation > Workflows.
- Open the AI panel.
- Click Chat Mode to enable brainstorming.
- Discuss triggers, actions, branches, and timing with AI.
- When ready, disable Chat Mode and ask AI to build the workflow.
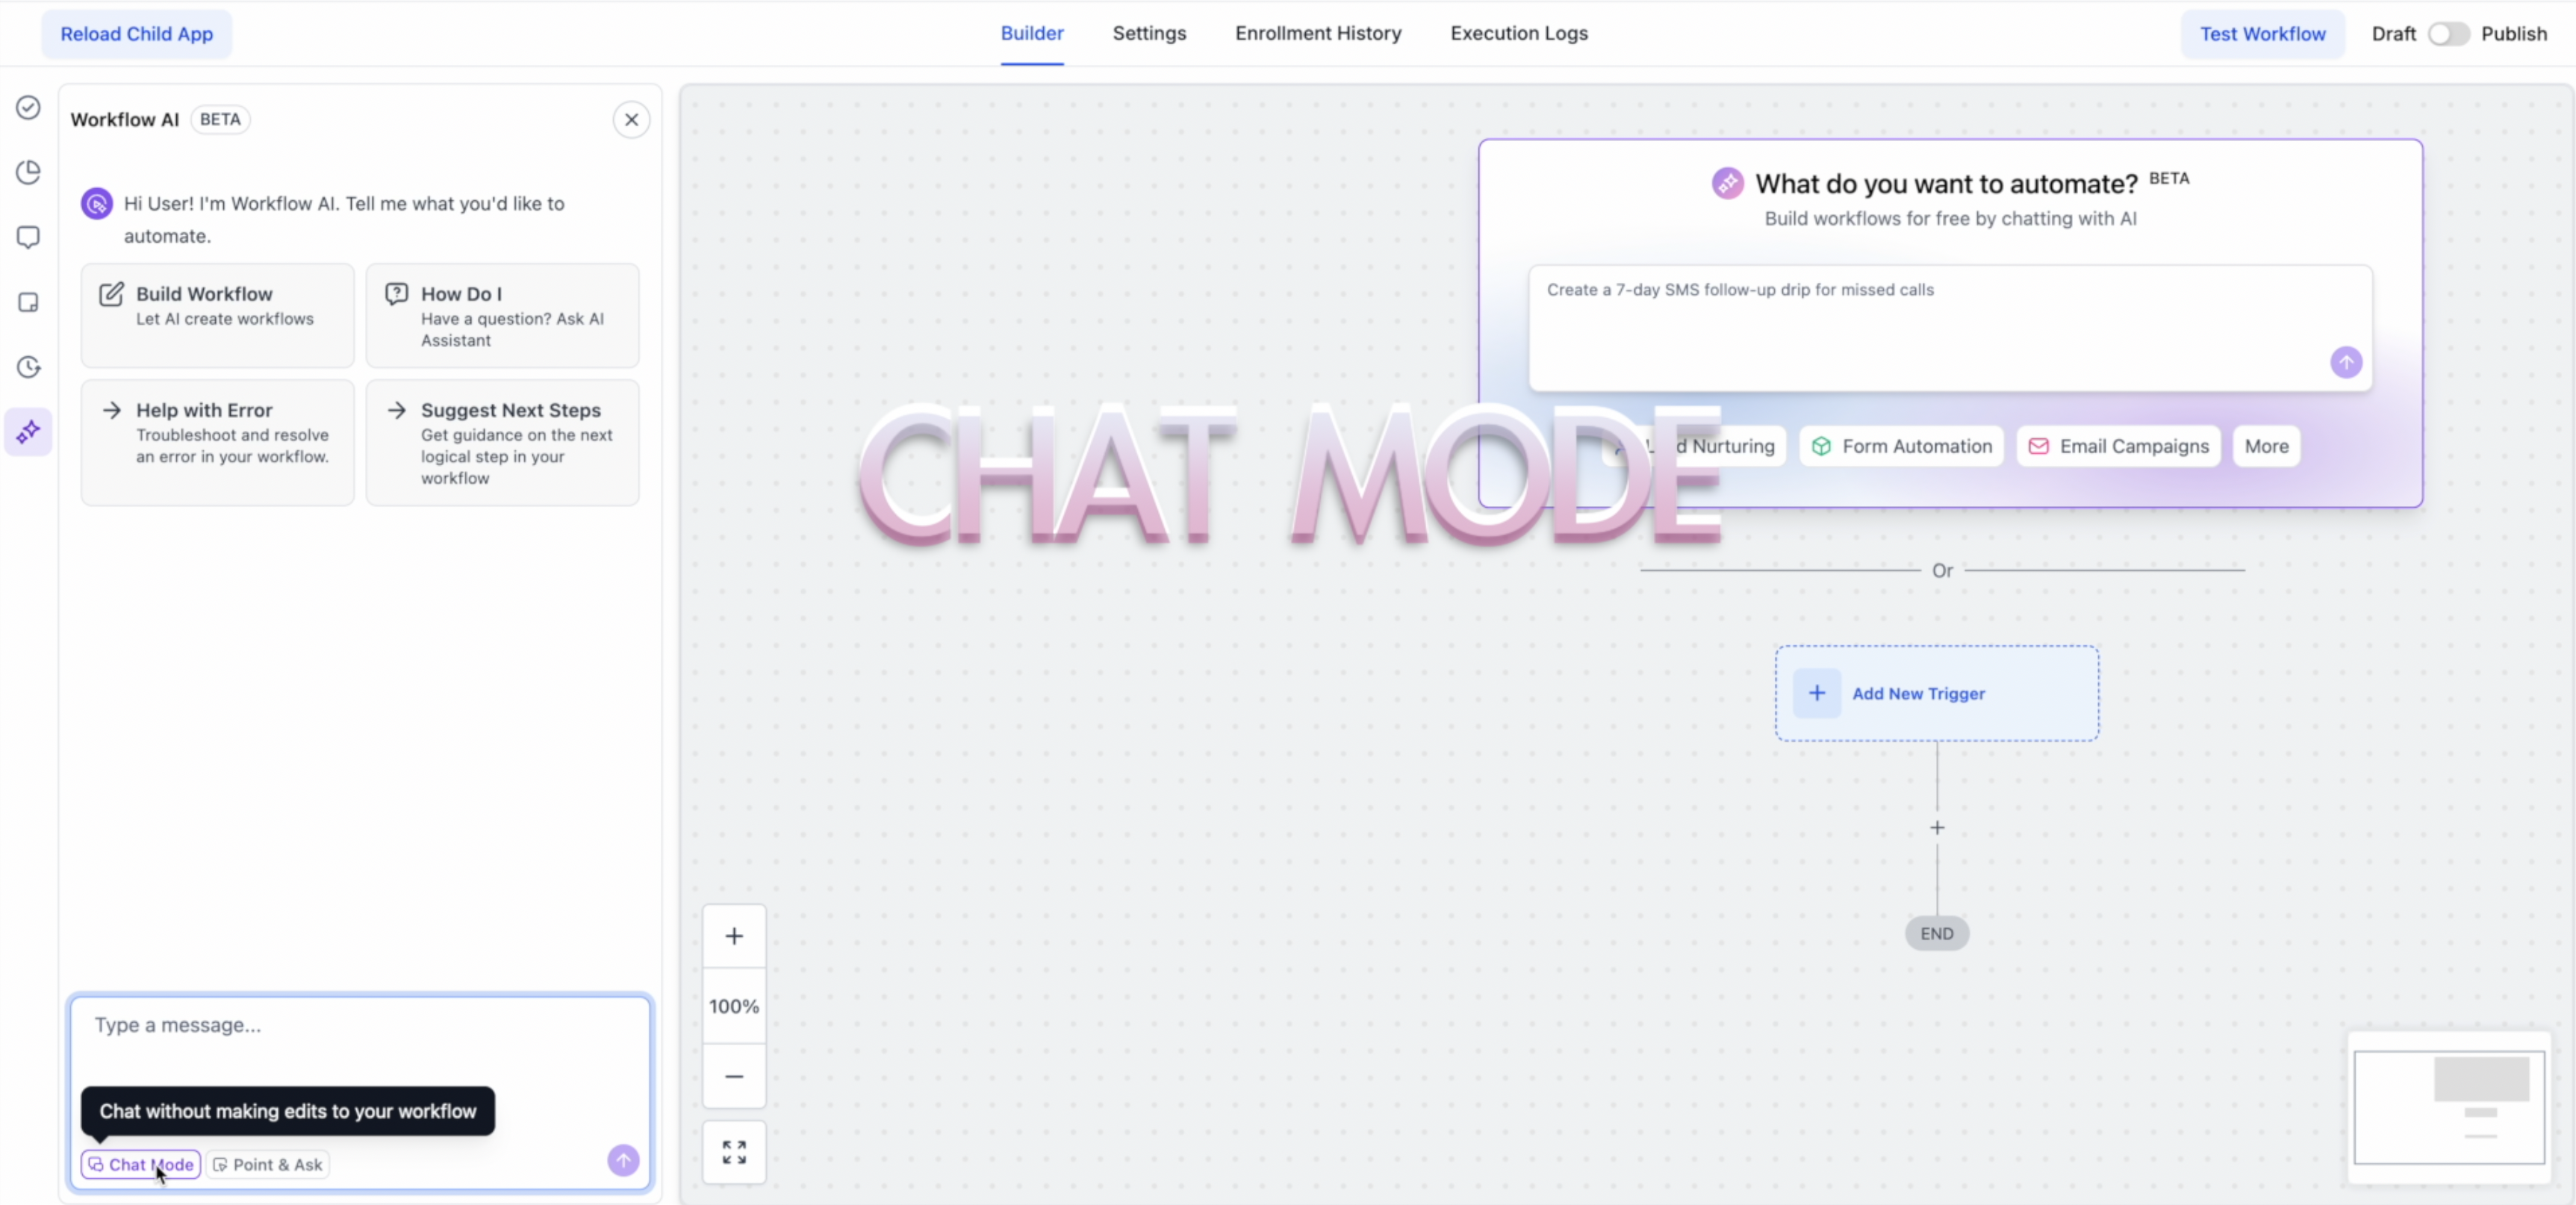
Brainstorm with AI
Use Chat Mode to decide what to build and develop a structured plan for the workflow.
- Brainstorm first: Describe the goal and ask AI to suggest an automation approach.
- Create a plan: Discuss the actions, triggers, and conditions before building.
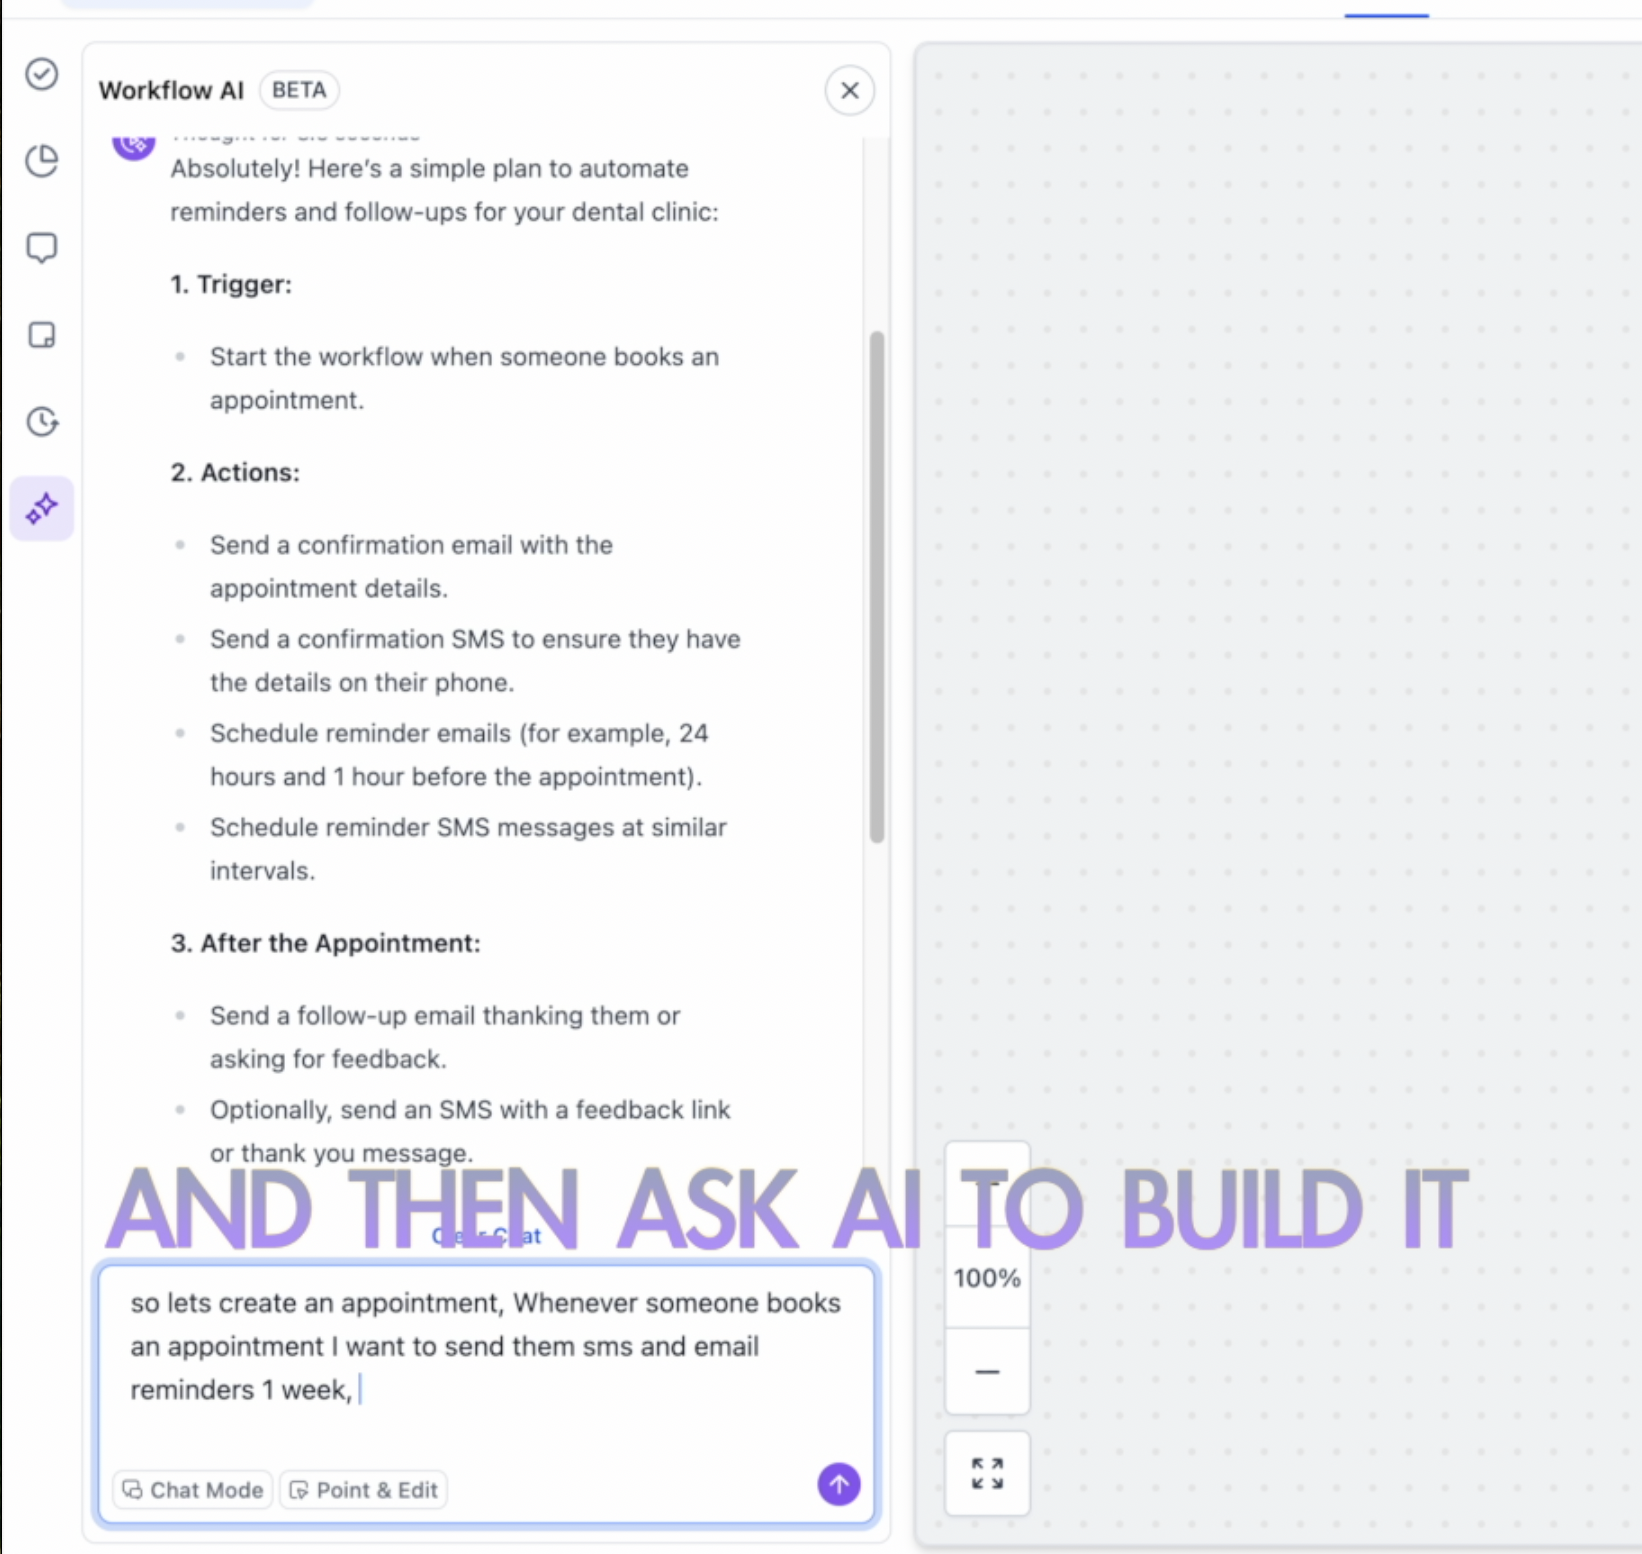
Ask AI to Build It
After finalizing the workflow plan, switch from brainstorming to building so AI Builder can create the automation.
- Disable Chat Mode.
- Ask AI to create the workflow based on your plan.
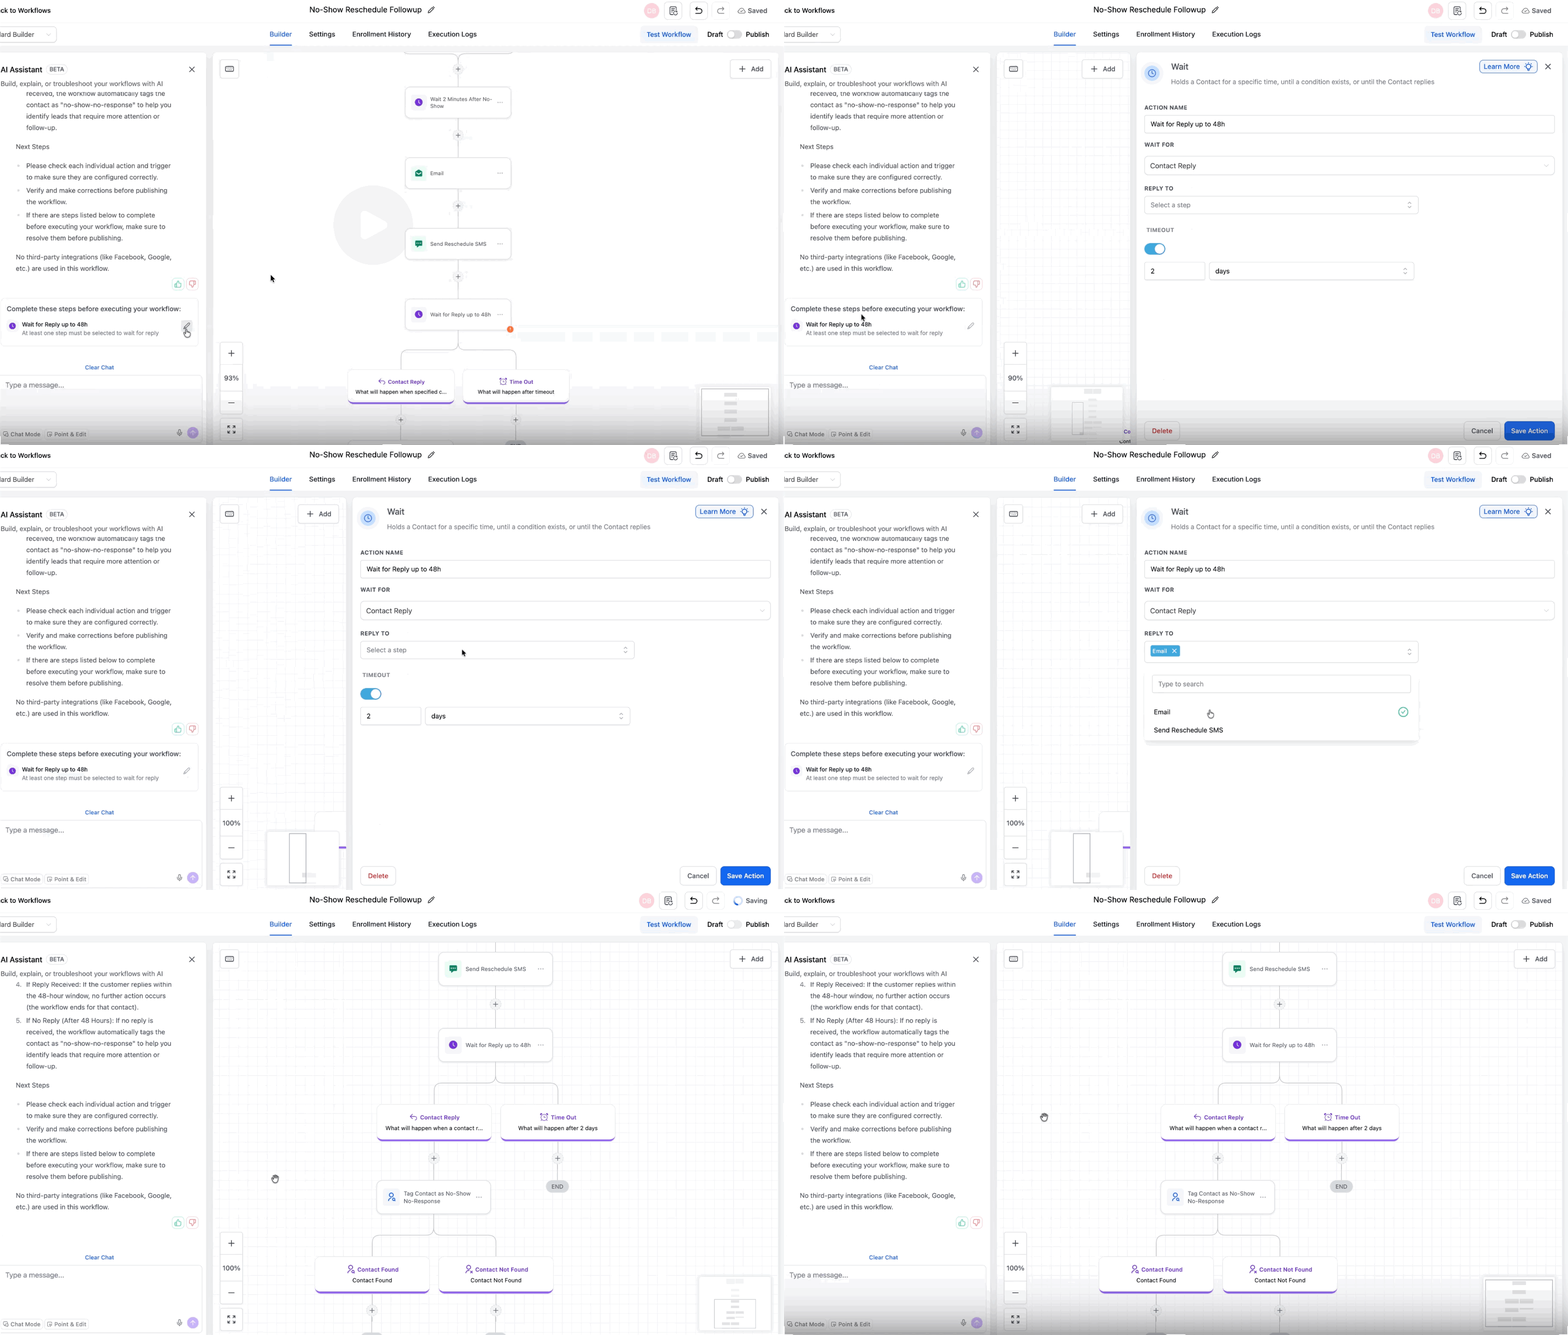
Post-Generation To-Do List (Complete Before Publishing)
After AI generates your workflow, review the To-Do List labeled Complete these steps before executing your workflow.
The list identifies settings that still require your input, such as integration credentials, required fields, or custom values. Completing these items before publishing helps prevent incomplete workflows from going live.
Select a To-Do item to jump directly to the associated action, then complete the missing configuration.
Common To-Do List Items
These items represent configuration details that AI Builder could not complete automatically and that require review before the workflow runs.
- Connecting integration credentials.
- Selecting the correct account for a connected integration.
- Completing action settings that AI Builder could not resolve automatically.
- Adding required field values.
- Defining step-specific settings when multiple options are available.
Best Practices for Effective Prompts
Clear prompts improve the accuracy of generated workflows. Specify timing, channels, conditions, content, and the exact records you want AI Builder to use.
- Be specific and clear: Describe the desired behavior in detail. Example: "When a contact books an appointment, wait 24 hours, then send a confirmation email and a reminder SMS one day before the appointment."
- Include key details: Provide timing, channels, conditions, filters, and content types.
- Use action verbs: Begin instructions with words such as Send, Notify, Create, Update, Wait, or Check if.
- Define the edit scope: Specify whether a change applies to all matching steps, a selected number of steps, or specific actions and triggers.
- Name the exact records: Use existing forms, pipelines, stages, snippets, tags, users, workflows, and custom fields exactly as they appear in your account.
Providing Feedback
Feedback helps improve workflow generation quality and informs future enhancements. You can provide feedback after AI Builder creates a workflow.
- Review the generated workflow and its summary.
- Use thumbs up if the workflow meets your expectations.
- Use thumbs down if you want to provide details about issues or improvements.
- Describe whether the automation matched your intent, what was missing or incorrect, and any suggestions.
Beta Limitations
Understanding current limitations helps you validate workflows before activating them. AI Builder can generate and configure automation steps, but reviewing and testing the final workflow remain necessary.
- Manual review required: Verify all triggers, actions, and configurations before publishing.
- Configuration verification: Some complex configurations may require manual adjustments.
- Testing: AI Builder cannot test workflows. Perform manual tests before activation.
Troubleshooting
If the first workflow draft does not match your requirements, refine the prompt or narrow the requested changes. More precise instructions can help AI Builder correct the workflow without rebuilding everything.
- Refine your prompt: Add more detail or divide complex goals into smaller parts.
- Wrong trigger: Specify the exact trigger type or update it through conversational editing.
- Missing actions: List the desired actions explicitly or add them through AI edits.
- Incorrect timing: Use precise timing references, such as "after 2 days."
- Wrong record selected: Use the exact name of the form, pipeline, snippet, user, or field, or update the step through conversation.
Quick Tips
These practices reduce setup time and help you avoid common mistakes when creating AI-assisted workflows.
- Start with simple workflows to learn the available capabilities, then gradually increase complexity.
- Always test workflows before publishing.
- Provide feedback to improve future results.
- Review Workflow AI Builder periodically for new features and improvements.
Frequently Asked Questions
Q: Can I edit a generated workflow using AI?
Yes. Use conversational edits to add, remove, replace, move, or modify actions and triggers. You can also edit multi-path configurations for If/Else and Wait actions through conversation.
Q: Can I target only certain steps when editing?
Yes. Define the scope in your instruction by identifying all matching steps, a specified number of steps, or particular actions and triggers. Workflow AI Builder applies changes only within the defined scope. You can also use Point and Edit to select one or more actions visually.
Q: What if the workflow doesn't match my intent?
Refine your prompt with more detail or make conversational edits. You can also use Chat Mode to plan the automation before generating it.
Q: Do I still need to test AI-generated workflows?
Yes. Always validate triggers, actions, timing, and outcomes through manual testing before activating a workflow.
Q: Why do items appear in the Post-Generation To-Do List?
Some settings still require user input, such as integration credentials, account selection for connected services, or unresolved action configurations. Complete these items before publishing.
Q: Is an AI-generated workflow always ready to publish immediately?
Not always. Review the Post-Generation To-Do List after generation and complete any required fields or configurations before publishing.
Q: Can Workflow AI Builder use existing forms, pipelines, and other records?
Yes. Name the records in your prompt exactly as they appear in your account. AI Builder finds matching records and configures supported steps, including form triggers, opportunity pipelines, email snippets, task assignees, and custom fields.
Q: What if a workflow step uses the wrong record?
Ask AI Builder to change the record through a conversational edit, or open the action and select the correct record manually. Review each step before publishing.
Need Help?
If you have questions or need assistance with a feature, contact support for further guidance. To help resolve your issue efficiently, include a brief description of what you're trying to accomplish, the steps you've already taken, and any relevant screenshots or error messages.