
Managing user access helps protect your account and ensures each person can use the features they need. From Users, authorized users can add team members, update user details, configure permissions, and remove access when it is no longer required. Login-email verification and security alerts provide additional protection when an email address changes. This guide explains how to manage users, configure permissions, verify login-email changes, and restore a previous email address after an unexpected change.
TABLE OF CONTENTS
- What Is User Access?
- Key Benefits of User Access Management
- Prerequisites and Limitations
- How to Manage Users
- User Details and Settings
- Permissions and Roles Overview
- Email Change Verification
- Email-Change Security Alerts
- How to Reverse an Unexpected Email Change
- Security, Language Support, and Auditability
- Best Practices
- Frequently Asked Questions
- Need Help?
- Related Articles
What Is User Access?
User Access provides controls for managing who can use the account and which features, records, and actions are available to them.
Authorized users can manage team members from Settings > Users. Available controls include adding users, updating personal information, assigning roles, managing permissions, and removing access.
User Access also works with login-email verification and security notifications to help protect user identities when email addresses change.
Key Benefits of User Access Management
User management helps keep account access organized while supporting secure daily operations. Roles, permissions, and security controls let you manage access according to each person's responsibilities.
- Centralized User Management: Search, add, edit, and remove users from the Users area.
- Flexible Permissions: Control access to supported features, actions, and assigned data.
- Secure Email Updates: Verify login-email changes using available authentication methods.
- Security Notifications: Receive alerts when a login email changes.
- Email Recovery: Restore a previous login email after an unexpected change using the supported reversal process.
- Accountability: Review access settings and maintain appropriate permissions as responsibilities change.
Prerequisites and Limitations
Before updating users or login credentials, confirm that you have the appropriate access and that the required verification methods are available. Some actions depend on the user's role or configured permissions.
- User Management Access: You need the appropriate permissions to add, edit, or remove other users.
- Roles and Permissions: Available controls depend on the user's assigned role and the supported features.
- Login Email Verification: Available verification methods depend on the user's previously verified authentication methods.
- Authenticator Setup: Users may need to configure an authenticator app when another verified method is unavailable.
- Email Reversal: A security-email reversal link is valid for 30 days and can be used only once.
- Existing User Emails: If an email already belongs to an existing user, follow the guidance shown in Users rather than creating a duplicate.
How to Manage Users
The Users area provides the controls for creating, updating, and managing team-member access. Start here when someone needs access or when an existing user's responsibilities change.
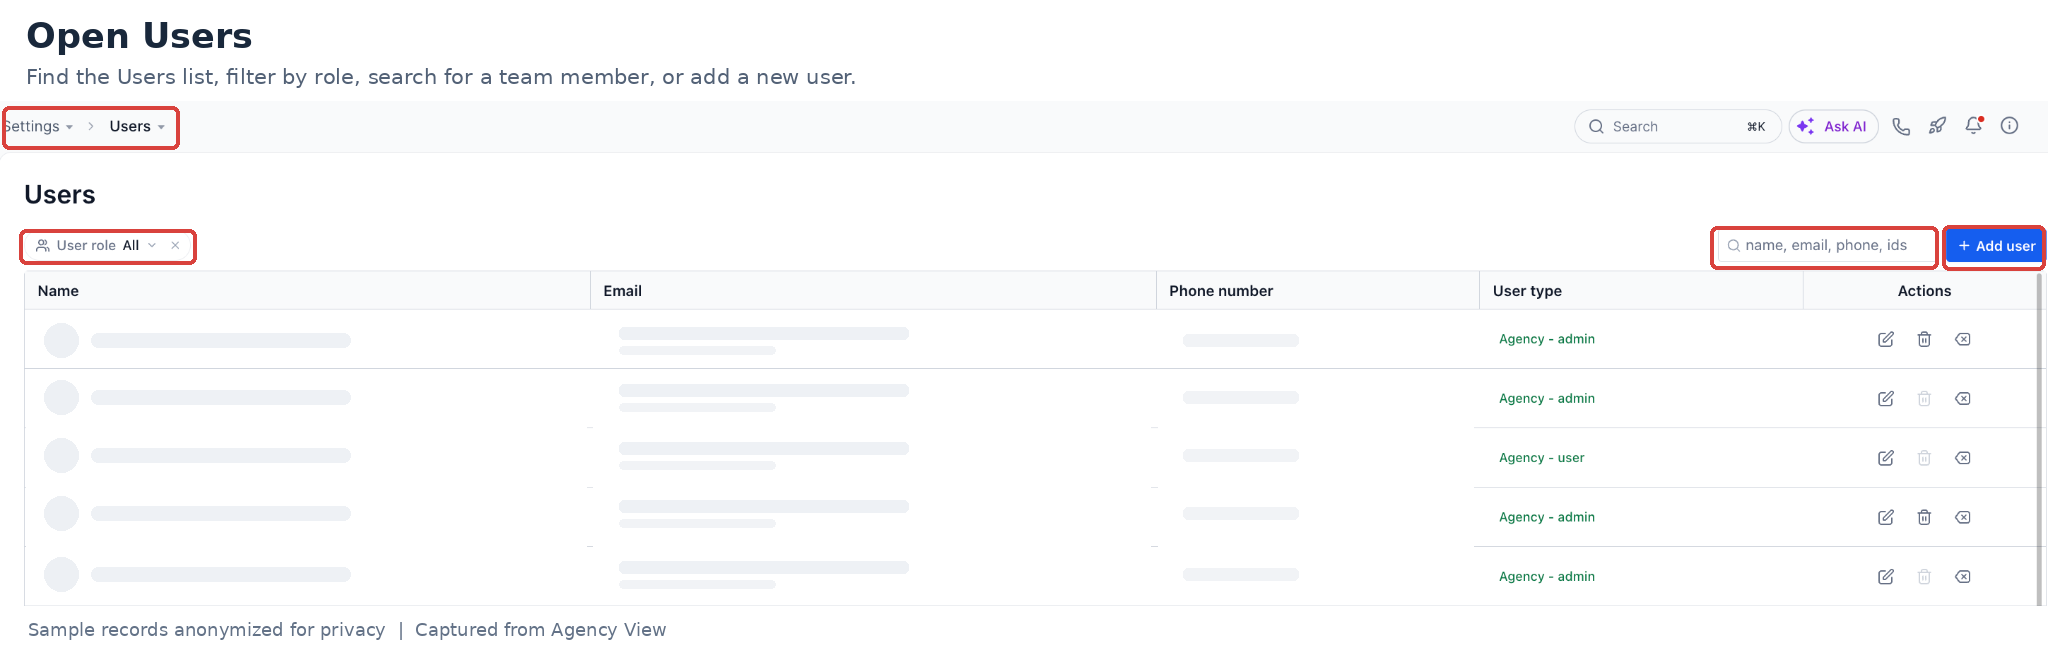
Step 1: Open Users
Open the user-management screen to review existing users or make changes.
- Open Settings.
- Select Users.
- Use the available user list and search controls to locate a user.
Step 2: Add a User
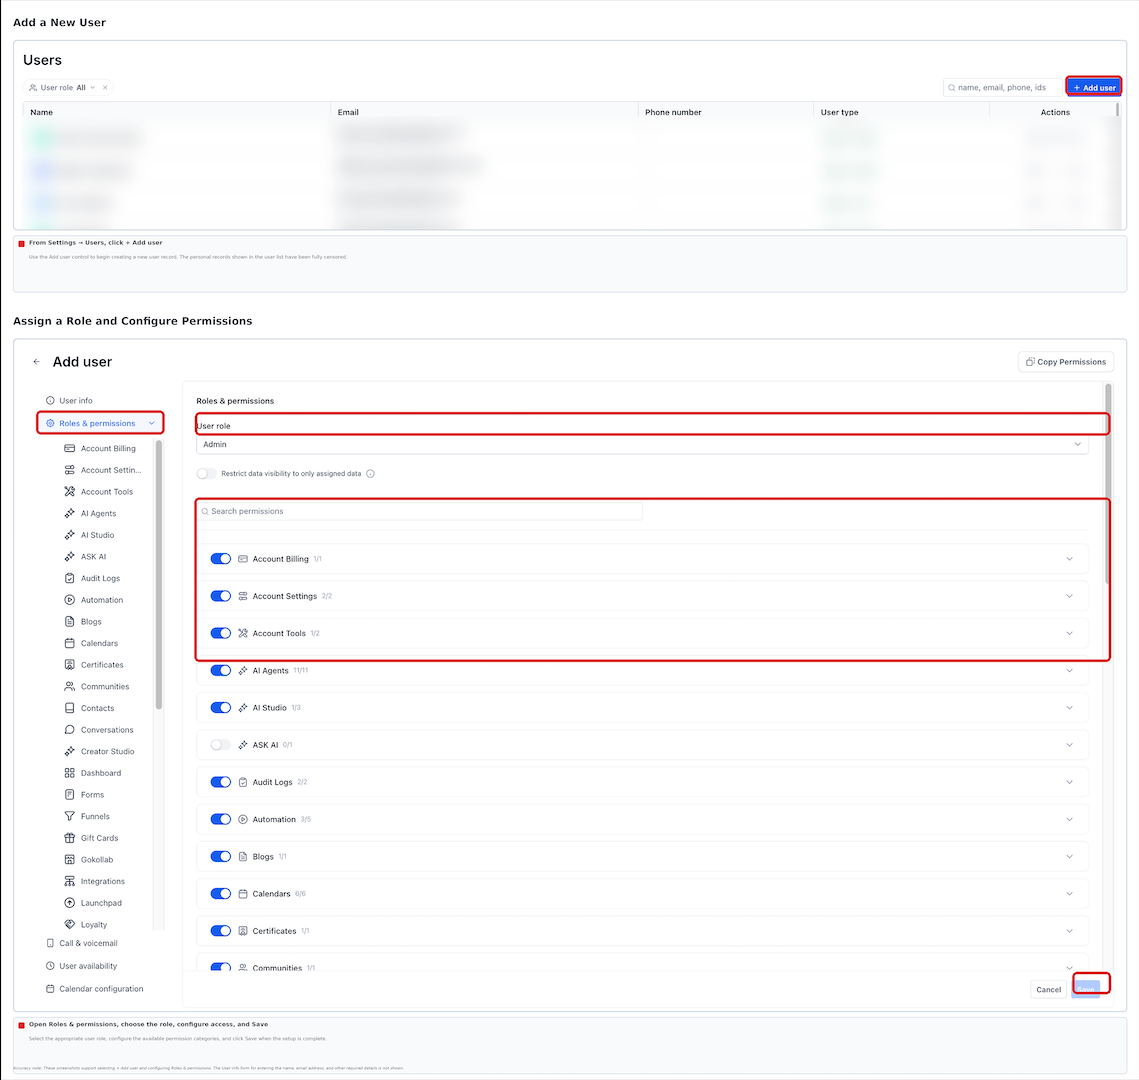
Create a user record when a new team member needs access. Enter the supported details and configure the appropriate role and permissions.
- From Settings > Users, select + Add User.
- Enter the available user details, including the user's name and email address.
- Complete any other required information shown in the form.
- Open Roles & Permissions.
- Select the appropriate role and configure the available permissions.
- Click Save to apply the settings.
Note: The user-creation experience may also include call-forwarding defaults and voicemail options when those settings are available.
Step 3: Edit an Existing User
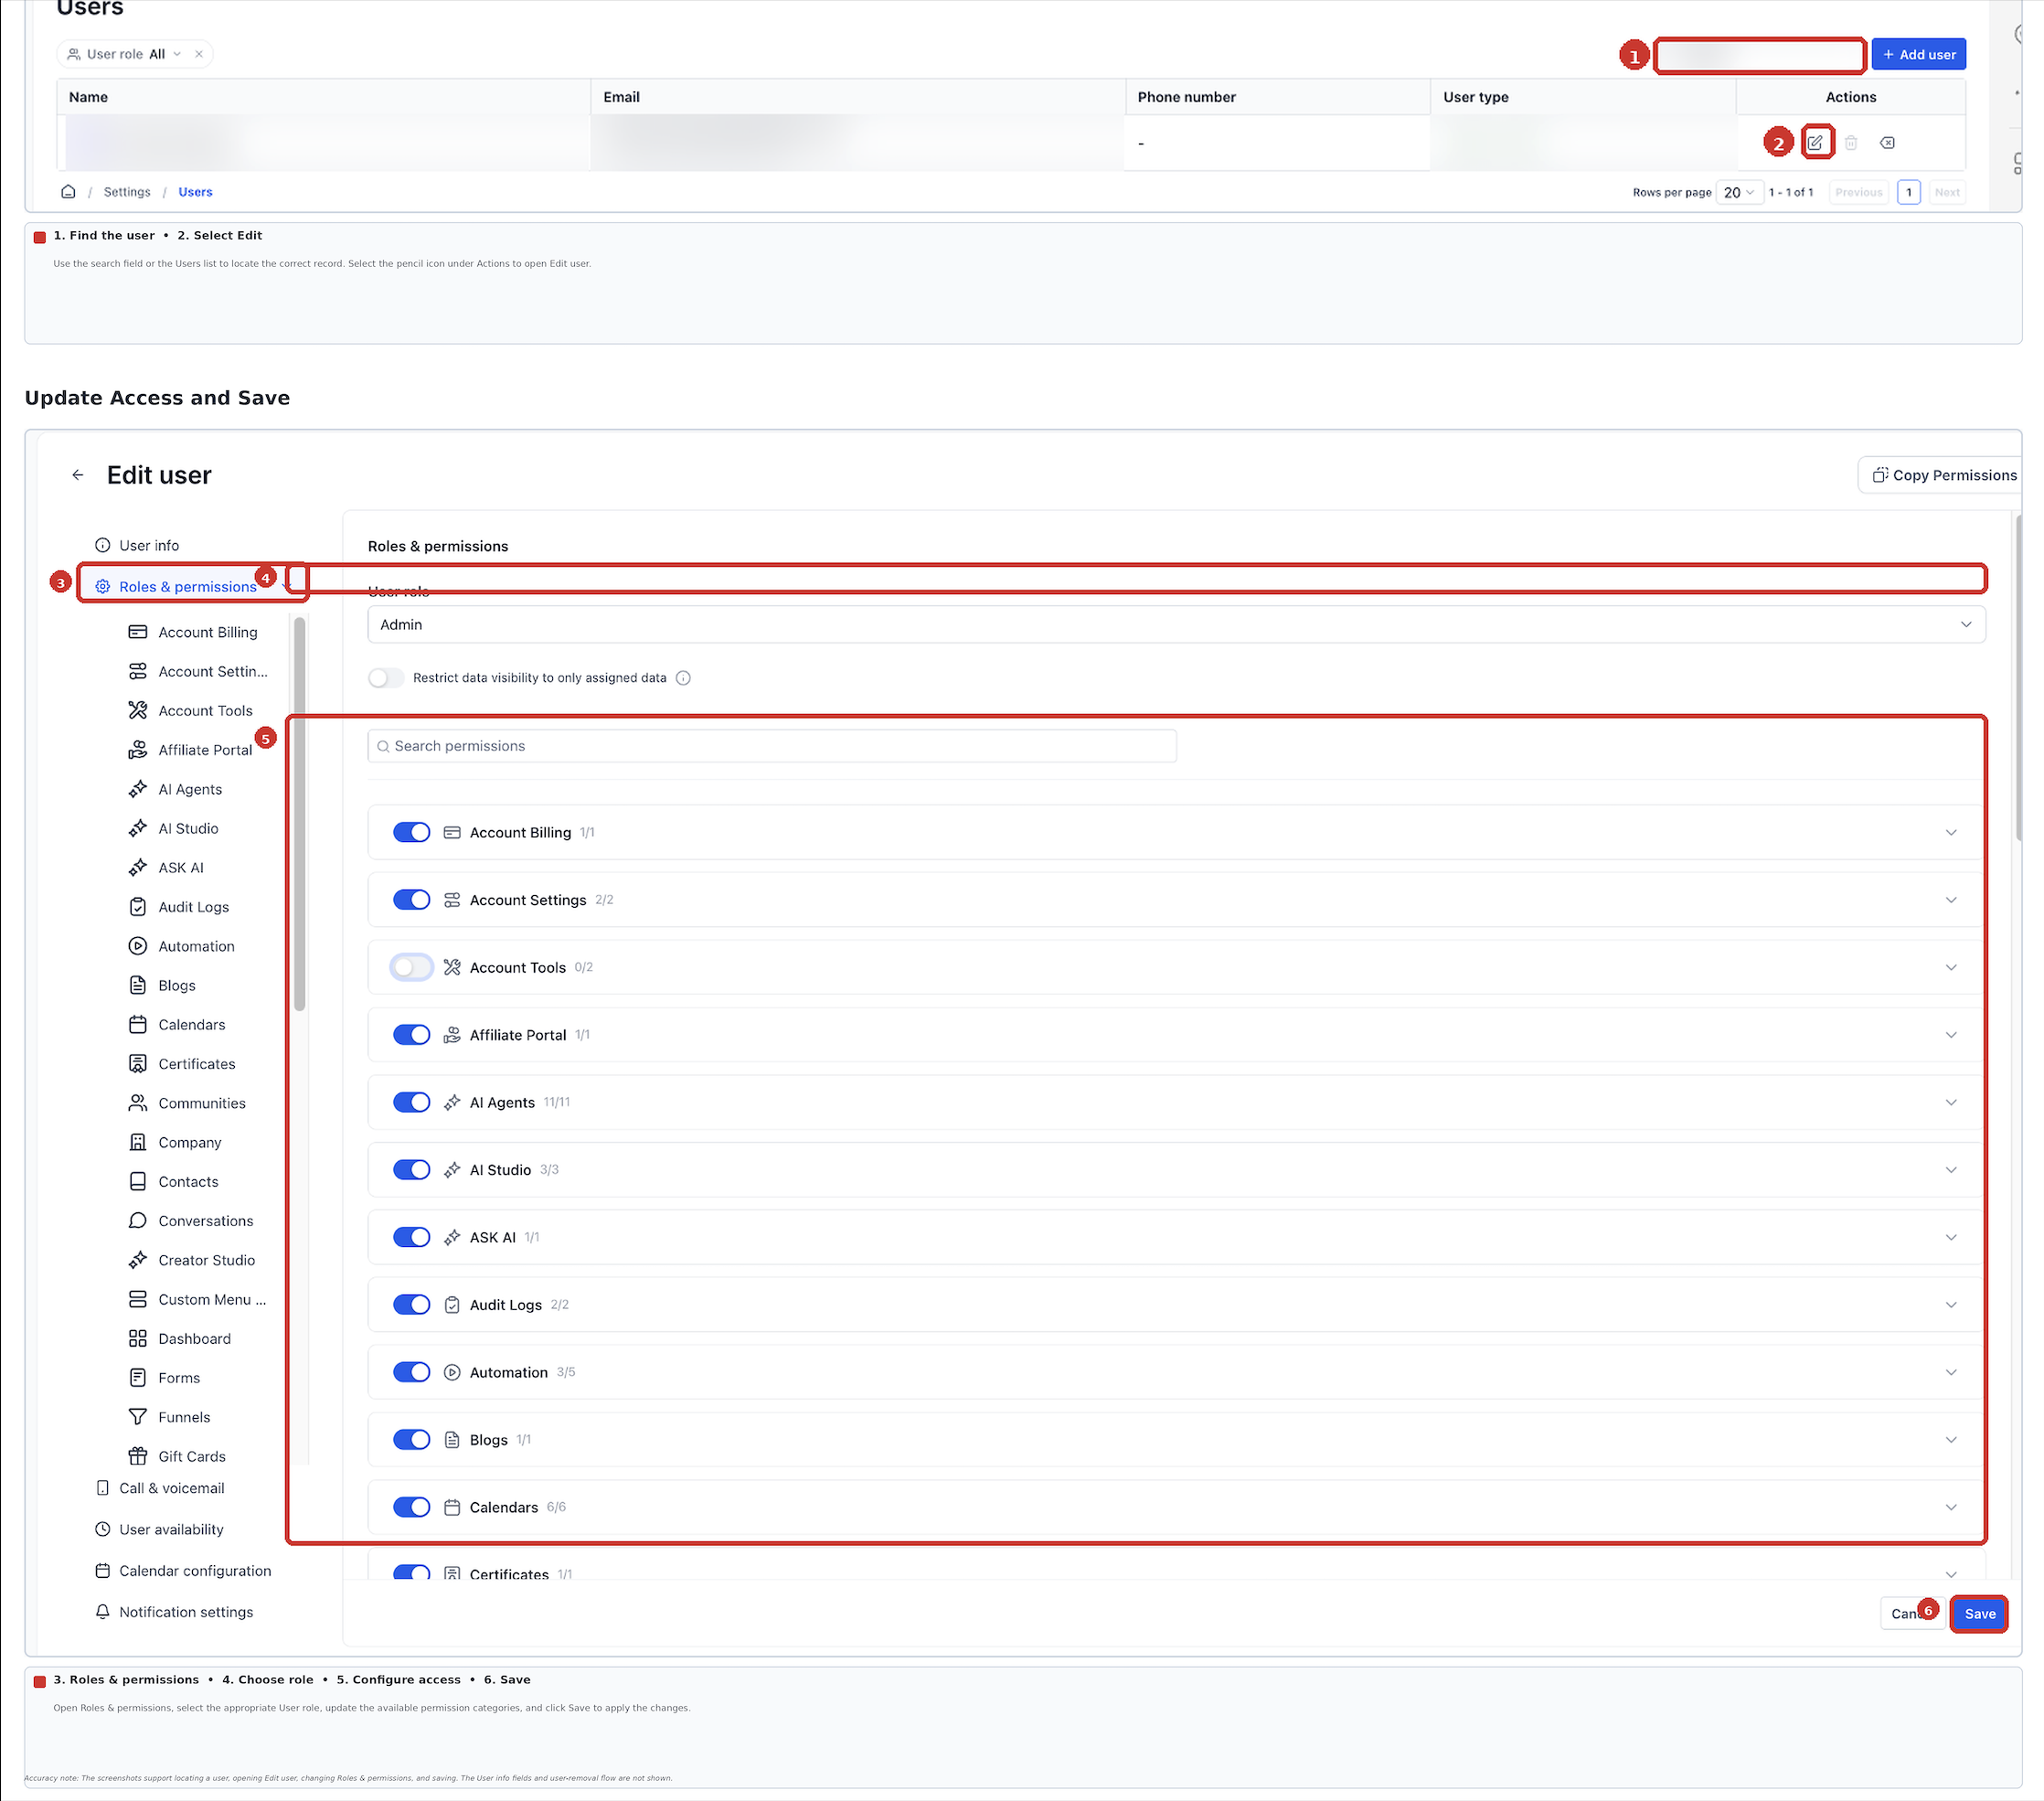
Update an existing user's details or permissions when their information or responsibilities change.
- Go to Settings > Users.
- Find and open the user you want to edit.
- Review the available personal information and access settings.
- Update the appropriate fields or open Roles & Permissions to change access.
- Click Save to apply the changes.
You can also remove users who no longer require access by using the available user-management controls.
User Details and Settings
User records contain identifying information and settings used for account access. Review these details when creating a user or updating an existing record.
Supported user details can include:
- Personal Logo: An available profile image or logo.
- First Name: The user's first name.
- Last Name: The user's last name.
- Email: The email address used for login.
- Phone Number: The phone number associated with the user.
- Password: The available password setting.
- Permissions: Controls governing access to supported features and actions.
Handle an Existing Email Address
An email address may already belong to an existing user. Review the guidance displayed in Users before attempting to create another user with the same email address.
When an existing user is identified, follow the available instructions for managing that record rather than creating a duplicate.
Permissions and Roles Overview
Roles and permissions determine which features, actions, and supported records a user can access. Assign permissions according to the user's responsibilities.
Available User Roles
The available roles provide different levels of access within the account.
- Admin: Provides broader administrative access, subject to supported permission controls.
- User: Provides access according to the permissions configured for that user.
Configure Roles and Permissions
Use Roles & Permissions to review a user's access and adjust the supported controls.
- Go to Settings > Users.
- Open an existing user or select + Add User.
- Open Roles & Permissions.
- Select the appropriate role.
- Enable or restrict access using the available module and permission controls.
- Review the settings and click Save.
Supported permissions may determine which features users can view or manage and which actions they can perform.
Restrict Access to Assigned Data
The Only Assigned Data option can limit visibility to supported records associated with a user. This helps users focus on the records assigned to them.
Depending on the supported feature, assigned data can include contacts, opportunities, appointments, or tasks.
Important: Assigned-data restrictions work alongside module permissions. They do not replace the permissions that control access to each feature.
Email Change Verification
Changing a login email address is a sensitive security update. Multi-channel one-time password verification helps confirm identity during the change, including when the previous email address cannot be accessed.
Available verification methods can include:
- Email OTP: A one-time verification code delivered by email.
- Phone (SMS) OTP: A one-time verification code delivered by text message.
- TOTP: A time-based code generated by a supported authenticator app.
The verification methods shown depend on the user's verified two-factor authentication methods.
Change Your Own Login Email
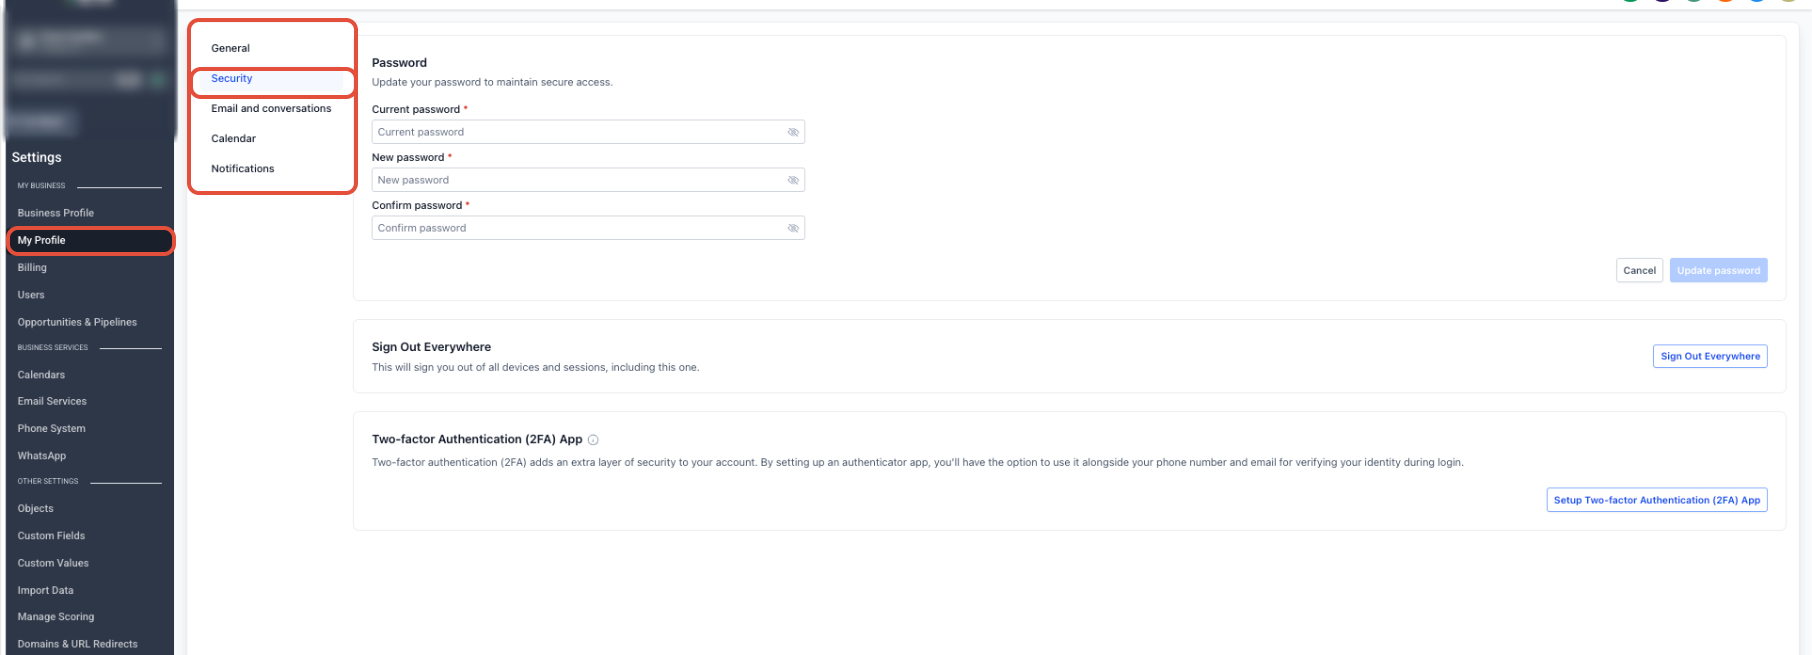
Use your profile security settings when you need to update the email address associated with your login.
- Open Settings.
- Select My Profile.
- Open the Security section.
- Locate the login-email setting and follow the available update instructions.
- Complete verification using an available method, such as SMS or an authenticator app.
If no other verified authentication method is available, you may be prompted to set up an authenticator app.
When an Administrator Changes a User's Email
Authorized administrators can manage supported user information through the Users area. When a login email is changed, the available verification methods are shown for the affected user.
These methods can include Email OTP, SMS OTP, or an authenticator app, depending on the user's verified authentication settings.
Email-Change Security Alerts
Security alerts notify users when their login email address changes. These notifications help users recognize unexpected updates and access the available recovery process.
Alerts apply to supported changes made by the user or by an authorized administrator.
How Email-Change Security Alerts Work
When a login email changes, security notifications provide details about the update and help the affected user determine whether the change was expected.
- Email Notification: A security alert is sent to the previous login email address.
- In-App Notification: The affected user also receives a security notification in the application.
- Change Details: The alert identifies what changed and when the change occurred.
- Local Timestamp: The change time is displayed using the user's timezone.
- Change Attribution: The notification identifies the change as initiated "by you" or "by your admin."
- Recovery Option: The security email includes a reversal link for restoring the previous login email address.
If you recognize the change and intended to make it, no further action is required.
How to Reverse an Unexpected Email Change
If your login email changes unexpectedly, the security alert sent to your previous email address provides a recovery option. The reversal process can restore the previous login email without requiring you to sign in.
Restore Your Previous Email Address
Use the reversal link in the security email when you need to undo an unexpected login-email change.
- Open the inbox associated with your previous login email address.
- Locate the security notification about the email-address change.
- Review the change details, including when the change occurred and who initiated it.
- Click the reversal link provided in the security email.
- Review the confirmation page to verify that your previous login email has been restored.
Important: The reversal link is valid for 30 days and can be used only once. If the original email change was expected, you do not need to use the link.
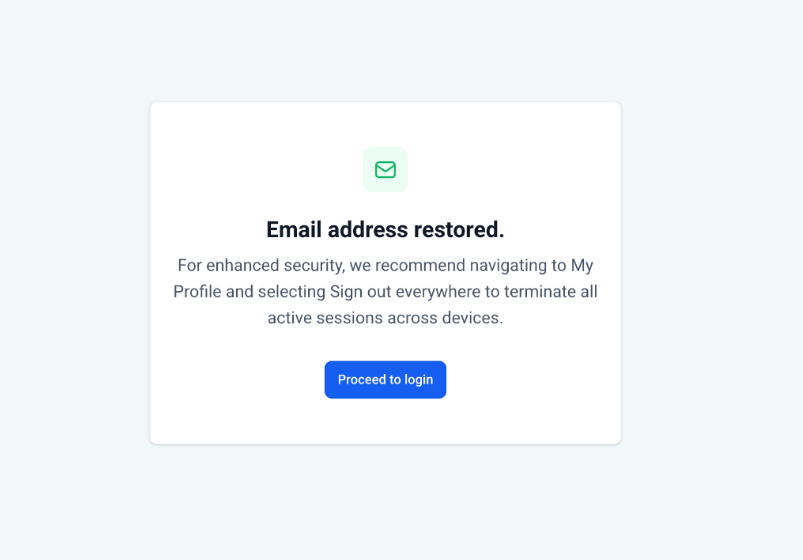
Example confirmation page shown after a successful email-address reversal.
Review the Restoration Confirmation
After a successful reversal, the confirmation page indicates that the previous login email address has been restored. A confirmation email can also be sent to document the completed change.
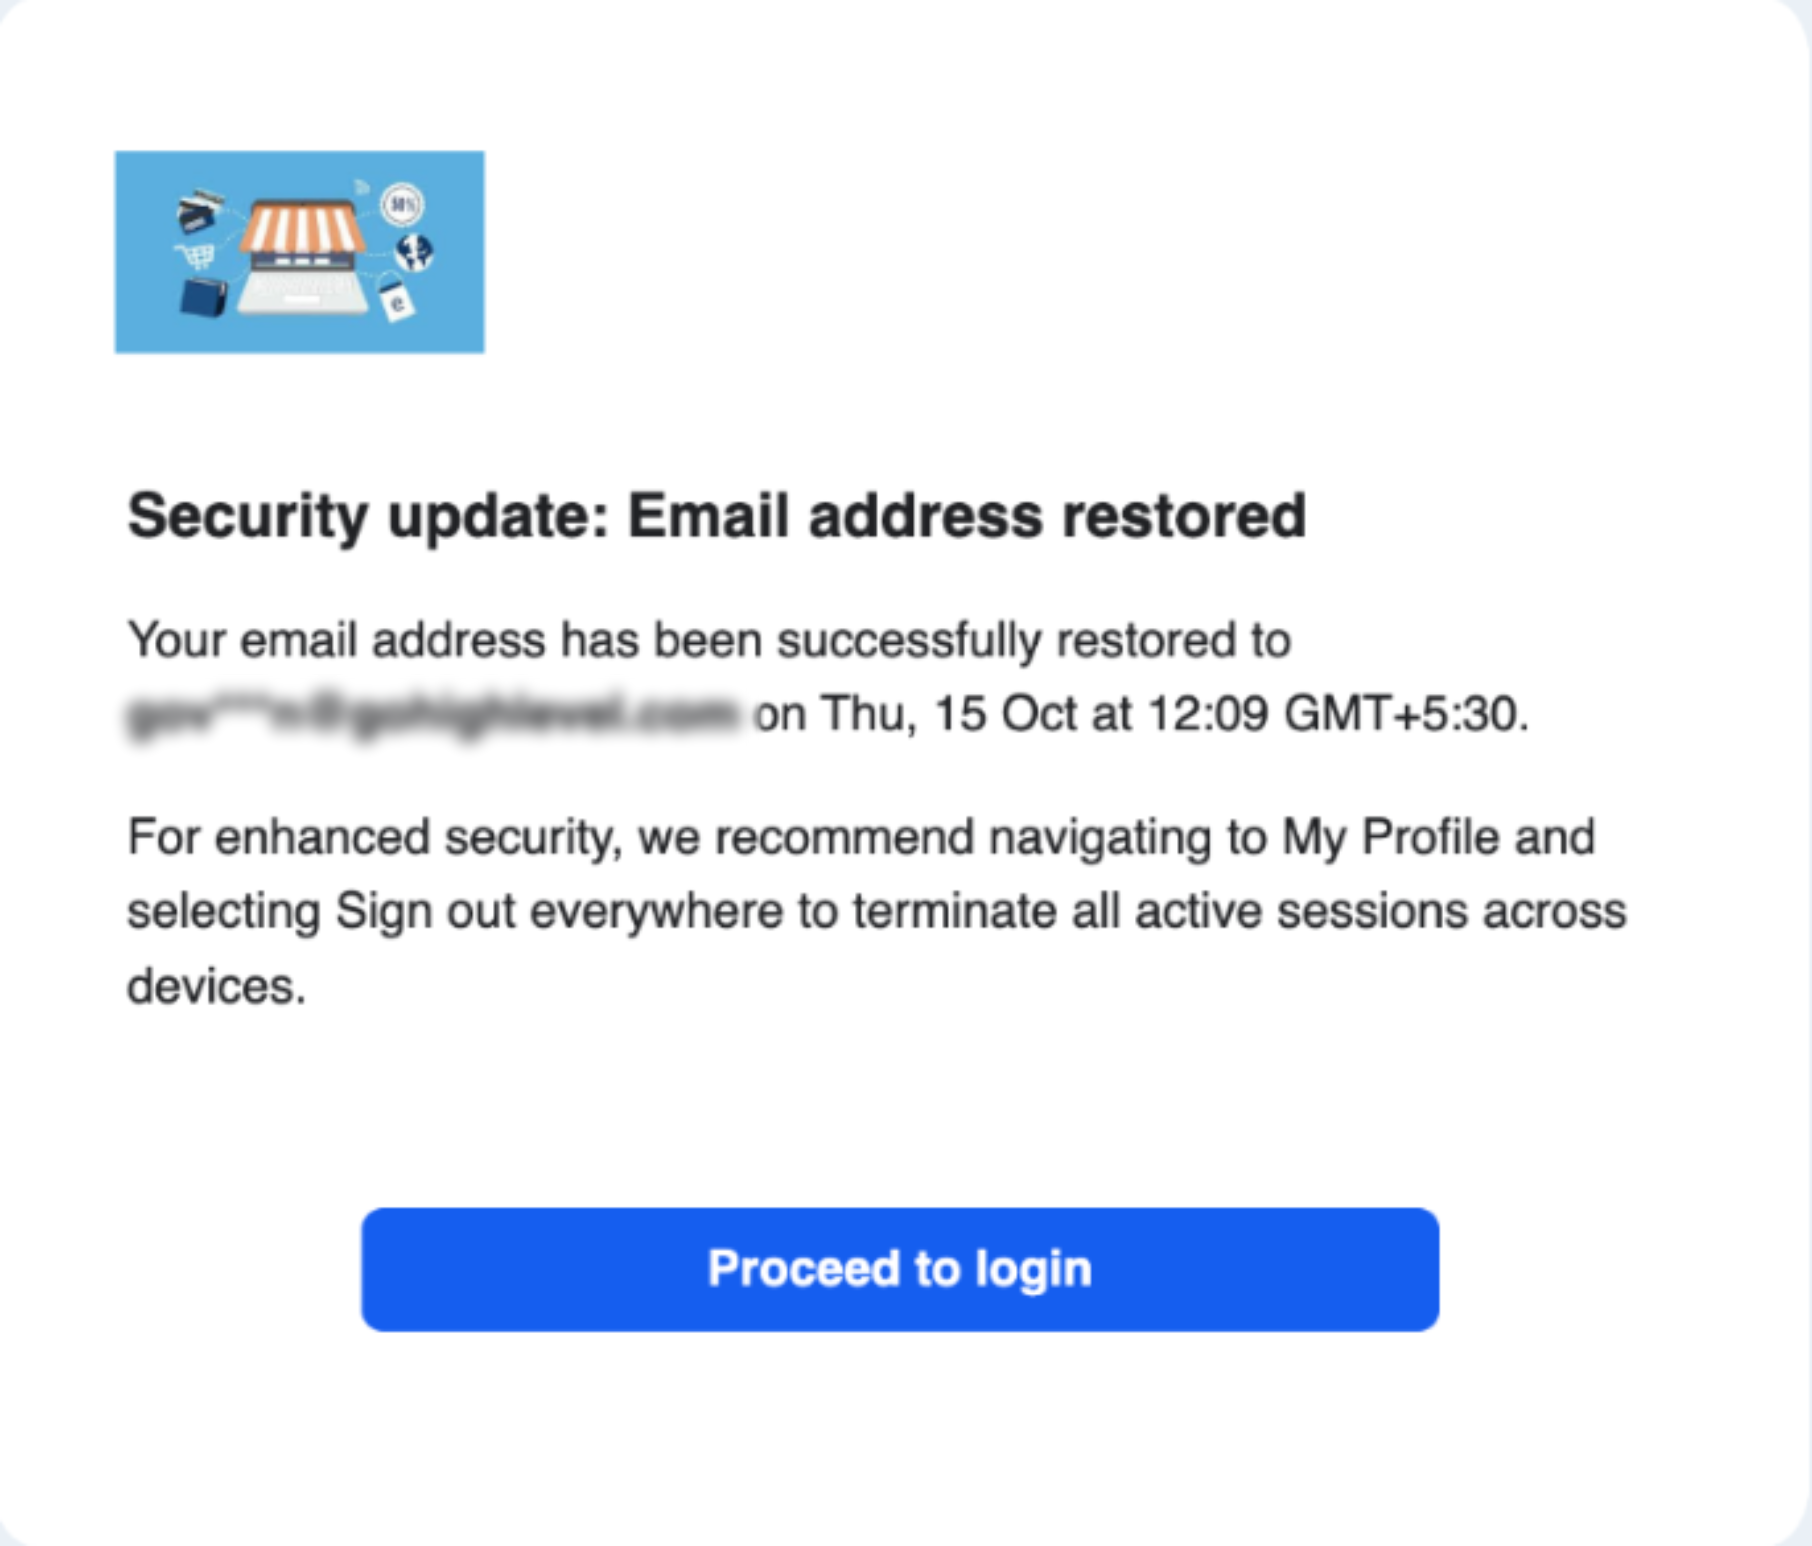
Example email confirmation after restoring the previous login address.
When a Reversal Link Cannot Be Used
Reversal links are single-use and expire after 30 days. A link that has already been used cannot complete another email-address reversal.
If the link is unavailable, expired, or already used and you still need assistance, contact support.
Security, Language Support, and Auditability
Email-change verification and security notifications provide complementary protections. Verification helps secure the change, while alerts provide visibility and recovery after it occurs.
- Language Support: Security alerts and reversal pages support 12 locales.
- English Fallback: If a translation is unavailable, the affected text appears in English.
- Auditability: Completed email-address reversals are recorded.
- Automatic Alerts: Security notifications are triggered by supported login-email changes.
Best Practices
Reviewing permissions and protecting login credentials helps maintain secure, predictable access for your team. Use the following recommendations when managing users.
- Use Least Privilege: Give users only the permissions they need for their responsibilities.
- Review Roles Before Saving: Confirm that each user has appropriate access to supported features and data.
- Track Changes: Maintain clear records of user-access changes.
- Review Access Periodically: Update or remove permissions when responsibilities change.
- Keep Authentication Methods Current: Maintain access to supported verification methods for sensitive account changes.
- Review Security Alerts: Check unexpected login-email notifications promptly and use the supported recovery process when needed.
Frequently Asked Questions
Q: Where do I add or manage users?
Go to Settings > Users. Authorized users can search, add, edit, and remove users using the available controls.
Q: Can I set different permission levels for different users?
Yes. Use Roles & Permissions to control access to supported features and actions for each user.
Q: How do I change someone's access when their responsibilities change?
Open Settings > Users, select the appropriate user, update the available permissions, and save the changes.
Q: What if a user's email address already exists?
Follow the guidance displayed in Users for the existing email address rather than creating a duplicate user.
Q: Where can I change my own login email?
Open Settings > My Profile > Security and use the available login-email setting.
Q: Which verification methods can I use when changing a login email?
Available options can include Email OTP, SMS OTP, and TOTP from an authenticator app. The options depend on your verified authentication methods.
Q: What happens after my login email address changes?
A security alert is sent to your previous login email address. The application also provides a security notification with details of the change.
Q: Can I reverse an unexpected login-email change without signing in?
Yes. Use the reversal link included in the security email sent to your previous login address.
Q: How long does the email-change reversal link remain valid?
The link is valid for 30 days and can be used only once.
Q: What should I do if the reversal link has already been used?
A used reversal link cannot be used again. Contact support if you still need assistance restoring access.
Need Help?
If a user cannot access the expected features, open Settings > Users and review the user's role, permissions, and saved settings.
If you cannot change a login email, confirm that an appropriate verification method is available under My Profile > Security. You may need to configure a supported authenticator app.
If you receive an unexpected email-change alert, review the notification sent to your previous email address. Use the reversal option while it remains valid if the change needs to be undone.
If the issue continues, contact support with a description of the problem, the affected setting, and relevant screenshots. Do not share passwords, one-time verification codes, backup codes, or recovery links in support messages.